Welcome to the 9: The Dark Side Walkthrough
End a centuries-old war between the Guardians and the Clan of the Nine in 9: The Dark Side!
Whether you use this document as a reference when things get difficult or as a road map to get you from beginning to end, we’re pretty sure you’ll find what you’re looking for here.
This document contains a complete 9: The Dark Side game walkthrough featuring annotated screenshots from actual gameplay!
We hope you find this information useful as you play your way through the game. Use the walkthrough menu below to quickly jump to whatever stage of the game you need help with.
Remember to visit the Big Fish Games Forums if you find you need more help. Have fun!


This walkthrough was created by prpldva, and is protected under US Copyright laws. Any unauthorized use, including re-publication in whole or in part, without permission, is strictly prohibited.
 Hidden Object Scenes and mini-games are often randomized - your solution may vary.
Hidden objects listed in yellow are hidden or require you to change the item to what you are trying to locate.
Hidden Object Scenes will be referred to as HOS in this walkthrough.
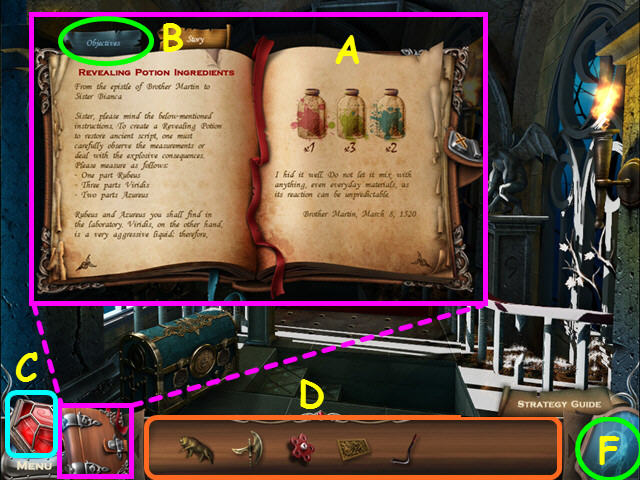
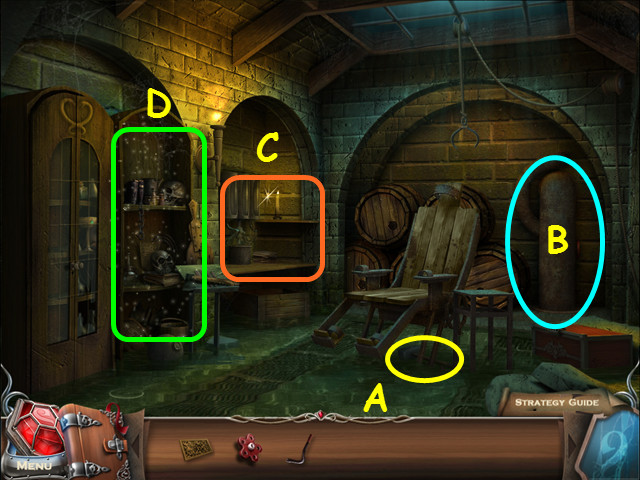
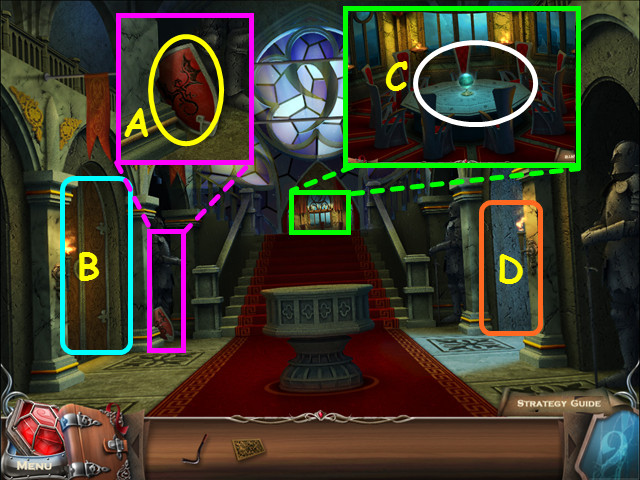
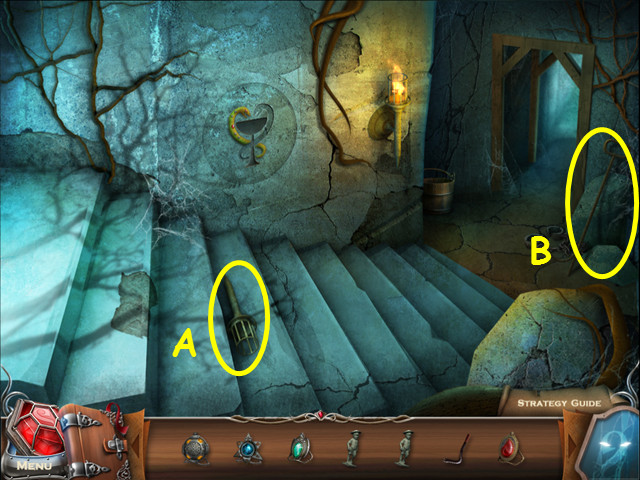
Inside the journal you will find the clues and information you have found (A).
Click on the Objectives tab to view your current tasks (B).
The amulet will glow when there are hidden runes to find; click on the amulet and move it over a scene to locate the runes (C).
Your inventory is in the bottom panel - click on an item to select it for use (D).
Hints are unlimited, but you must wait for the hint meter to recharge (F).
 You will have the option of some interactive help.
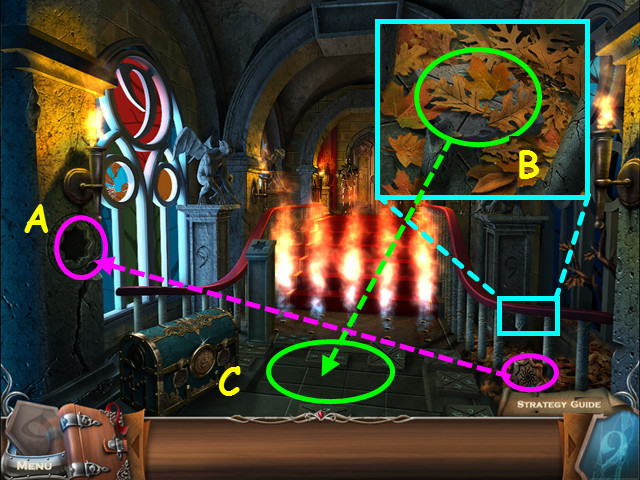
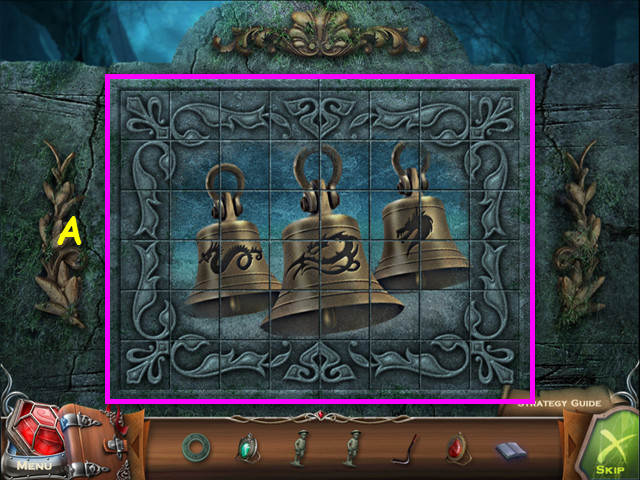
Take the STONE STAR from the right and place it in the niche on the left (A).
Zoom into the right, remove the leaves and take the TILE (B).
Place the TILE into the floor grid for a mini-game (C).
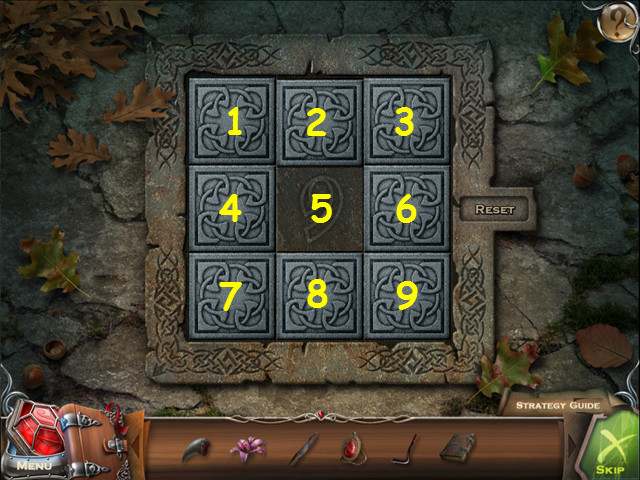
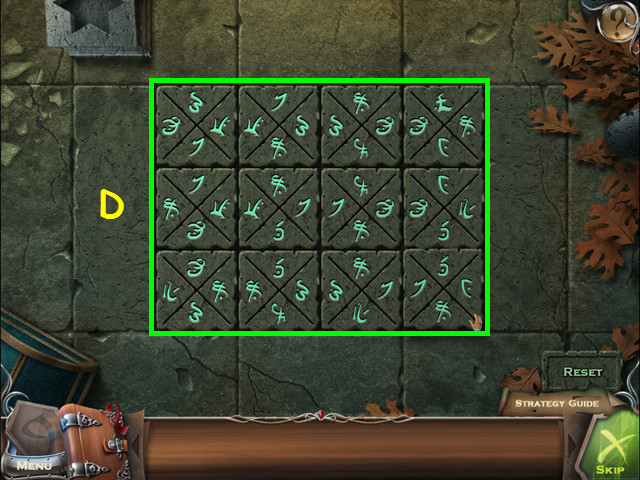 Place the tiles into the grid so the same symbols are touching on the edges.
This mini-game is randomized - your solution may vary.
Our solution is shown here (D).
Walk down the stairs that appear.
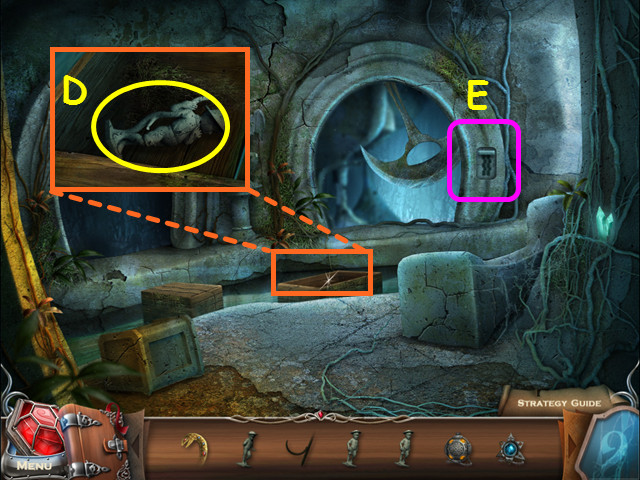
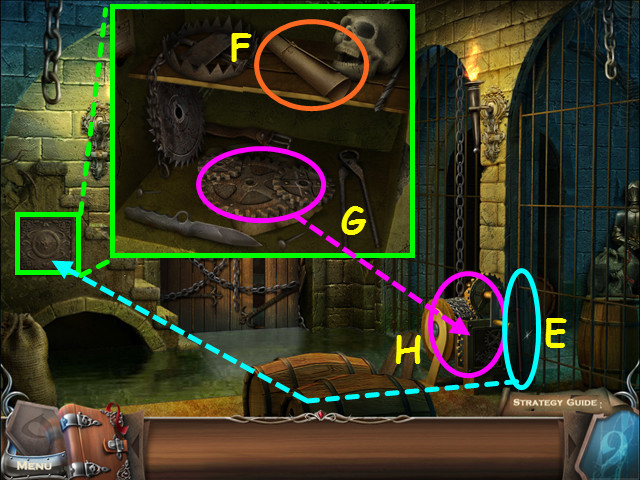 Take the CROWBAR and use it to open the compartment (E).
Look inside the compartment and read the scroll on the top shelf (F).
Move items on the bottom shelf and take the GEARS (G).
Use the GEARS on the hoist for a mini-game (H).
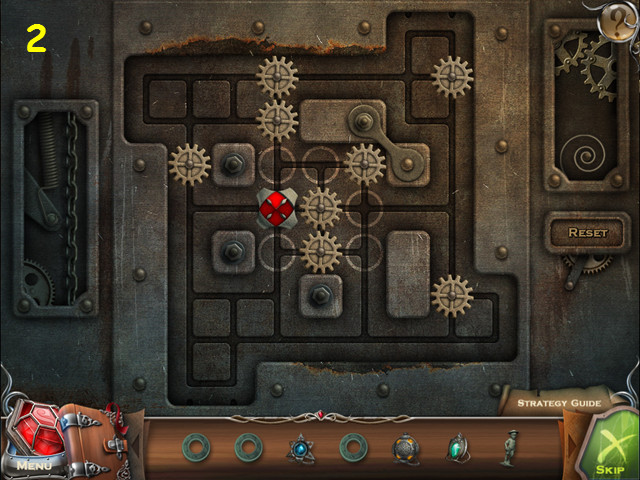
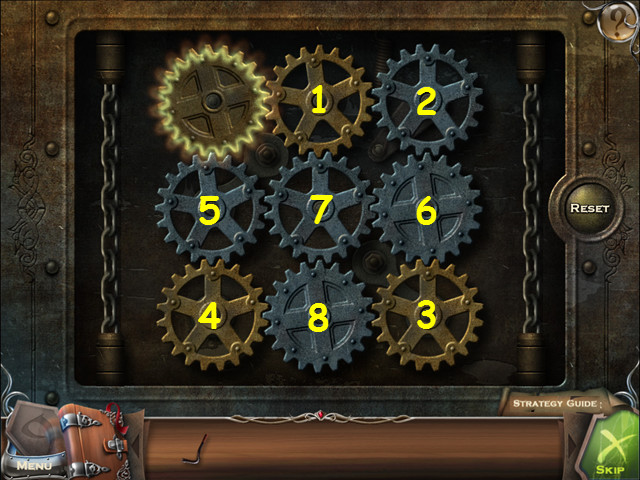 Get all the gears turning by clicking on them in a specific order.
Click on the gears in numerical order (1-8).
Walk to the right.
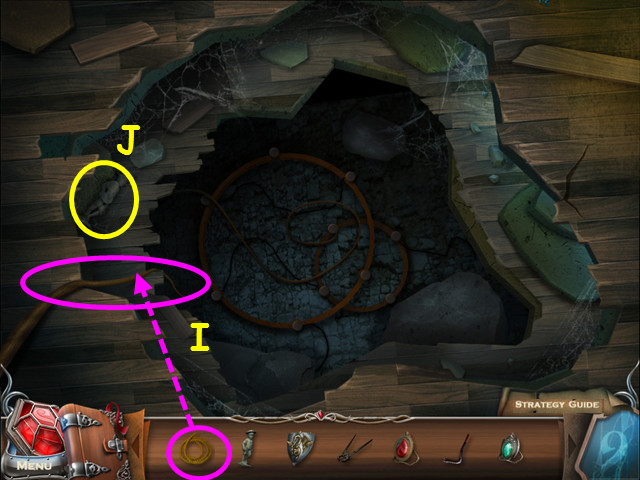
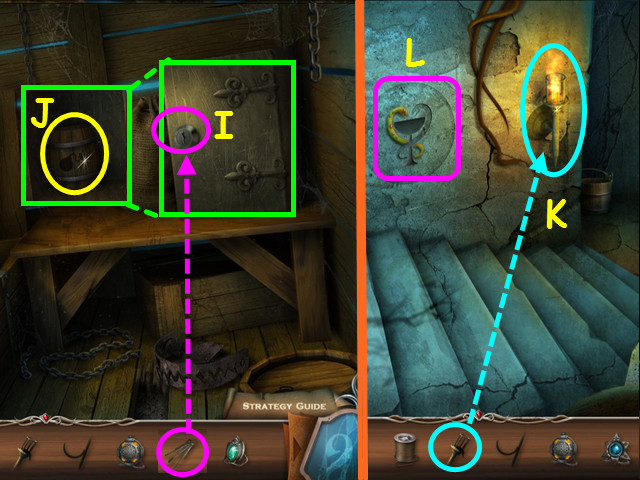
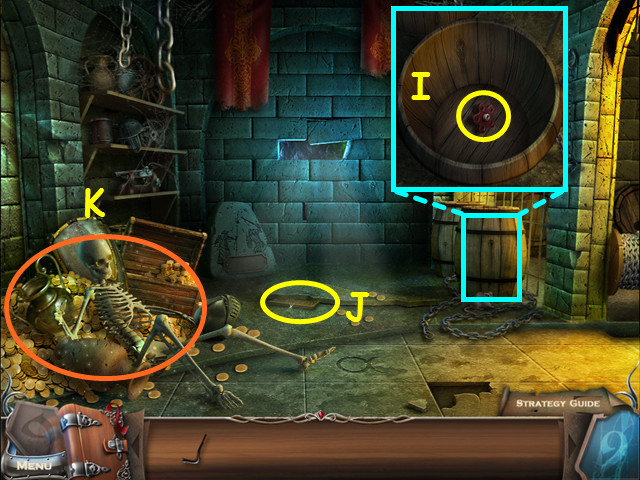 Look in the barrel and take the VALVE (I).
Take the 1st STAR FRAME (J).
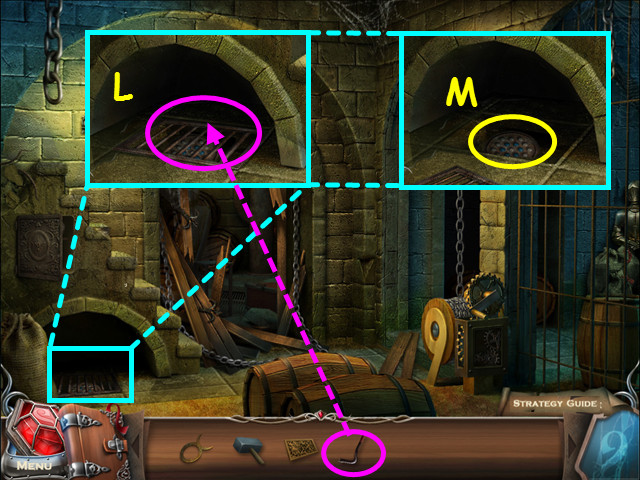
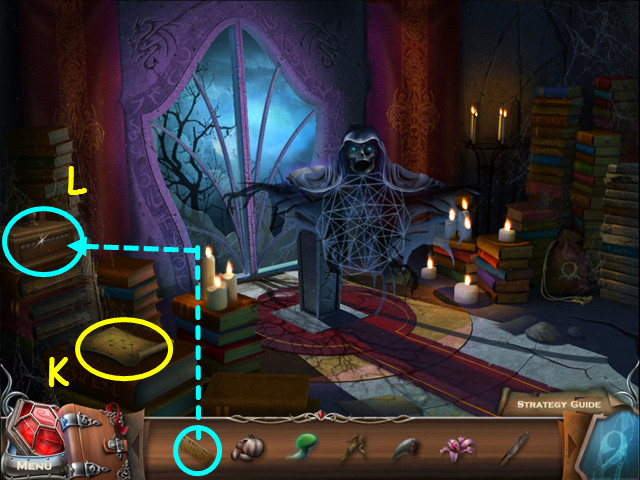
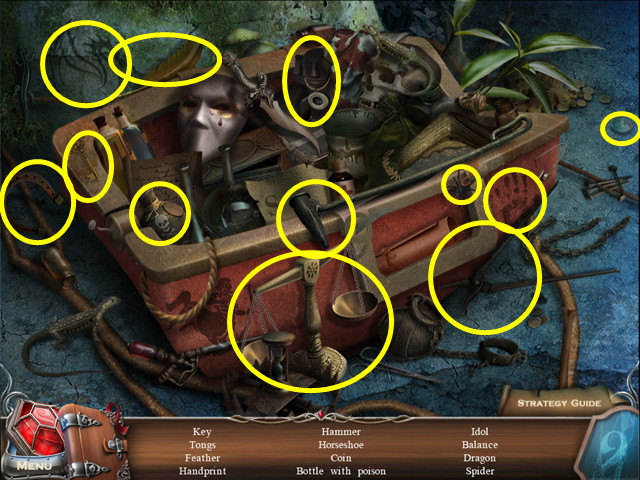
Select the skeleton for a HOS (K).
 Locate all the items on the list.
Use the matches on the lamp to make the burning lamp (L).
You will earn the GOLDEN STAR.
Walk to the right, then go down.
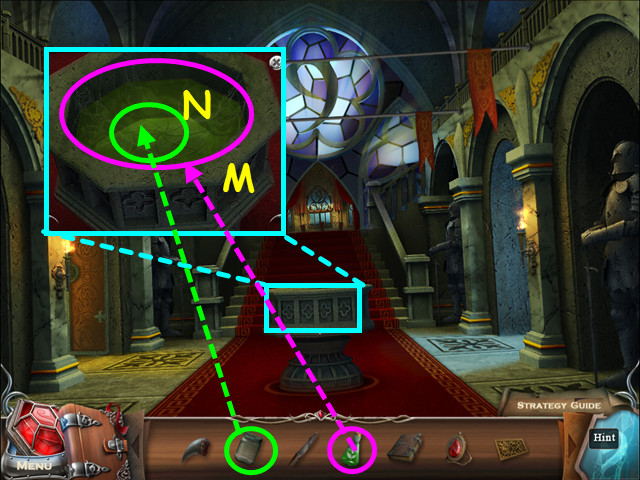
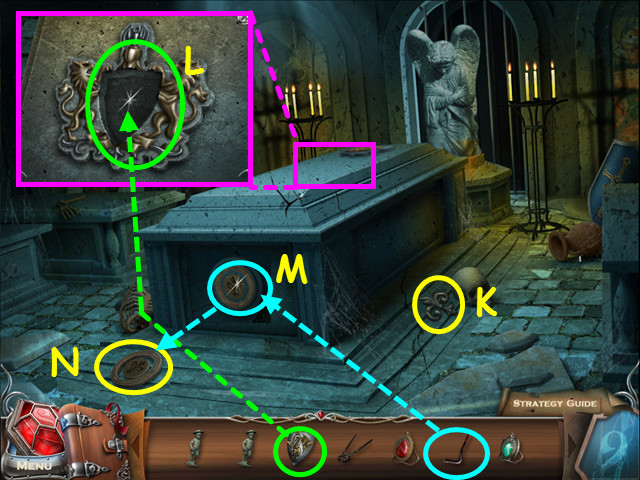
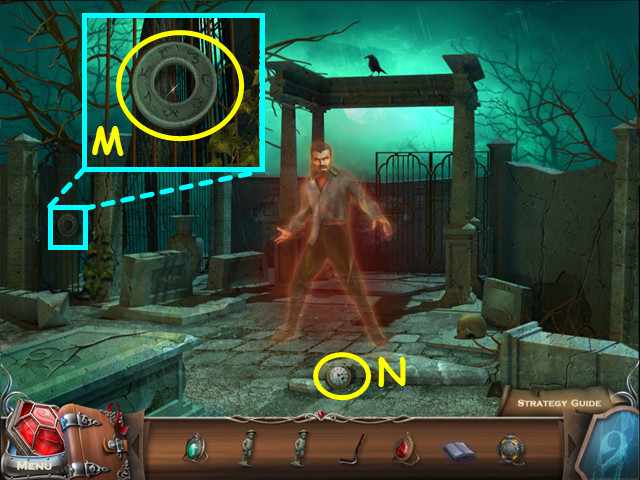
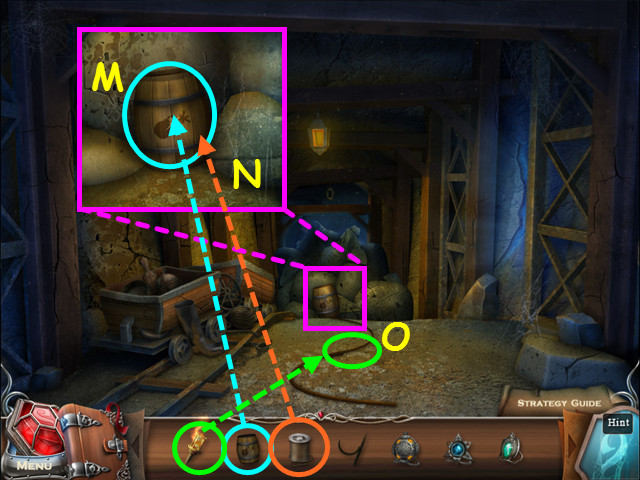
 Look at the pedestal and place the GOLDEN STAR into the niche (M).
Walk forward to the double doors (N).
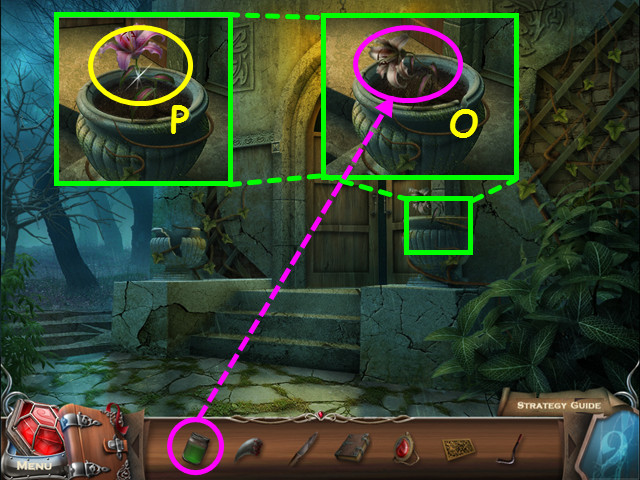
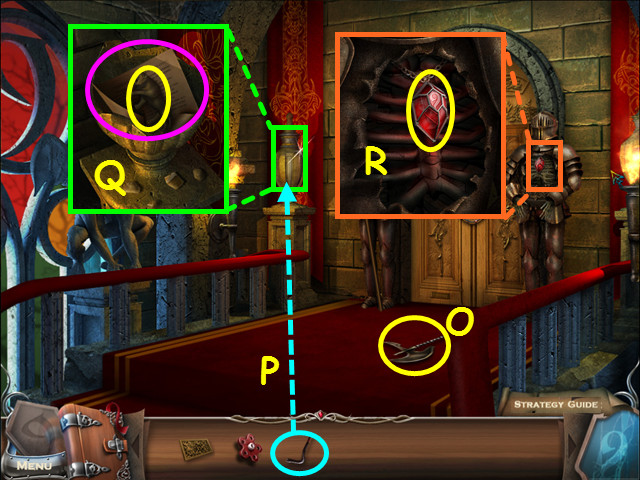 Take the BATTLE AXE (O).
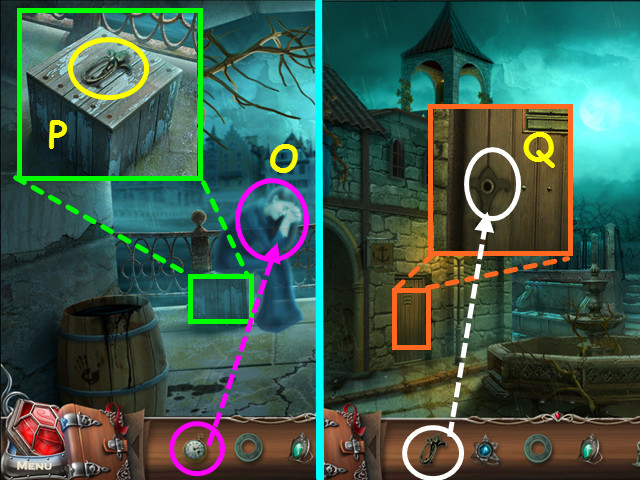
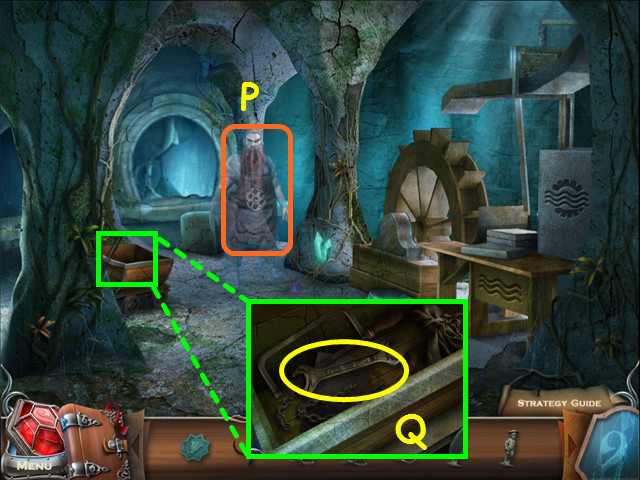
Use the CROWBAR on the urn (P).
Look inside the broken urn; take the LION STATUETTE and read the scroll (Q).
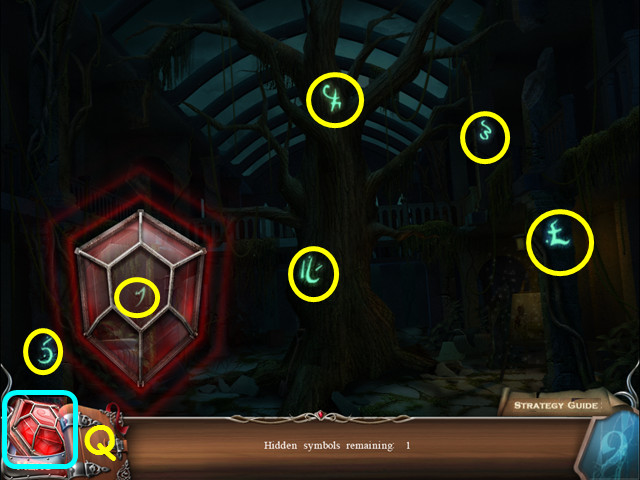
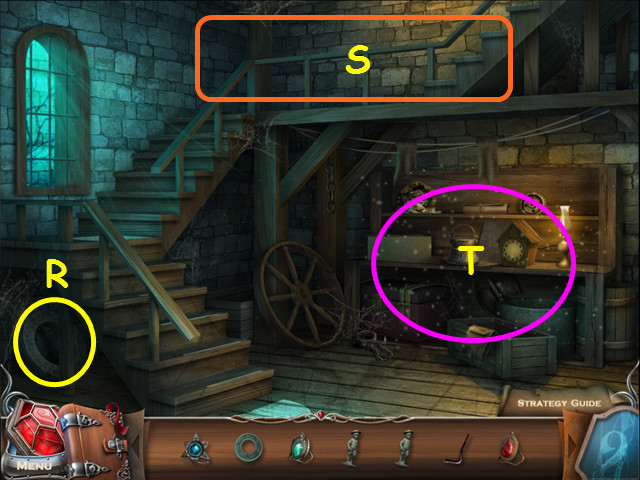
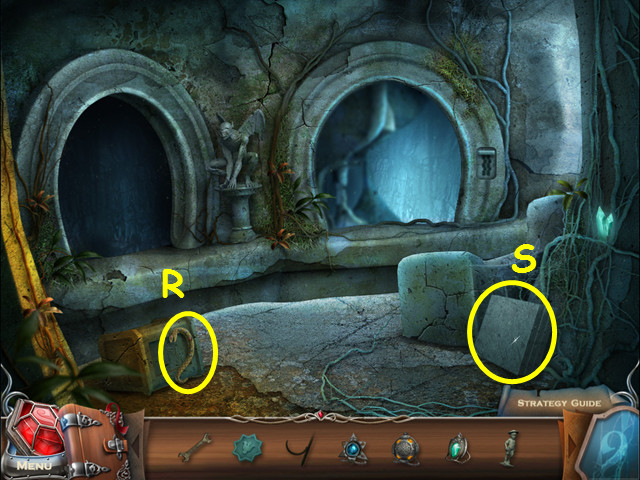
Look at the right knight and take the amulet (R).
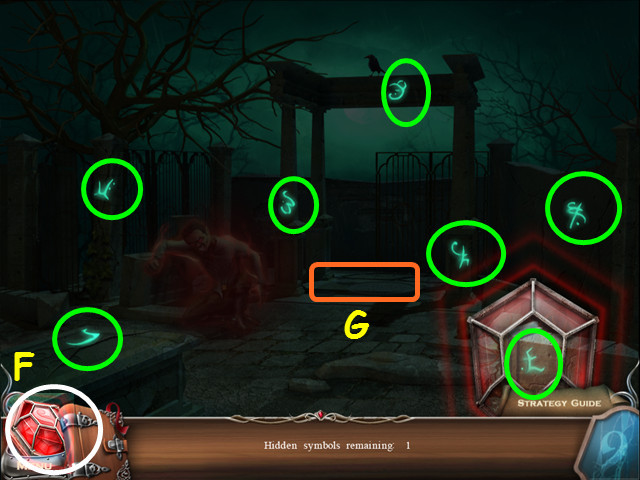
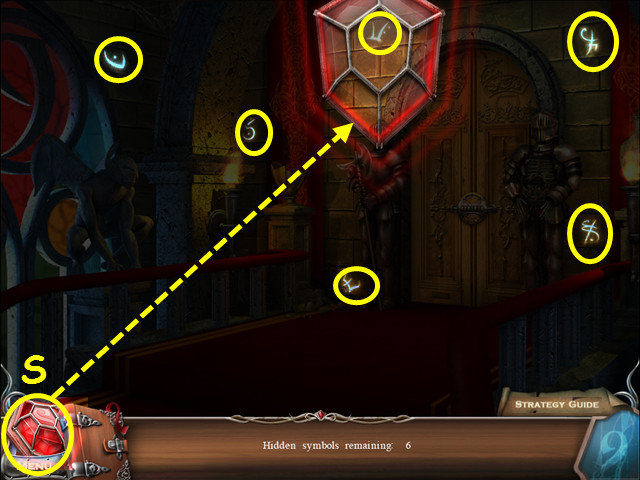 When the red amulet in the lower left glows red, it means there are runes to find in the scene.
Click on the amulet to take it from the corner, then move it around to find the hidden runes (S).
Click when you are over a rune to make it visible.
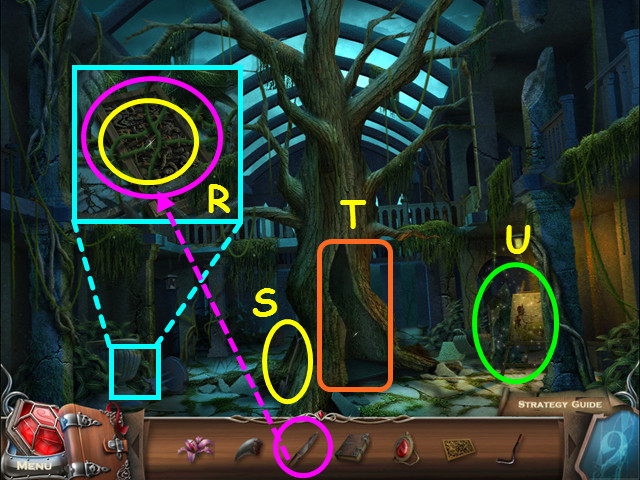
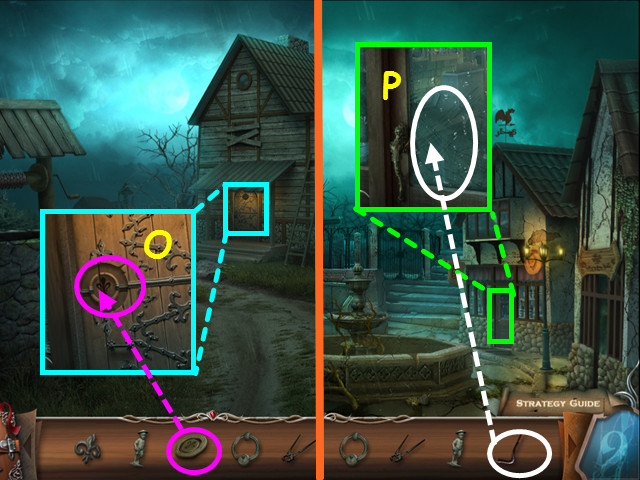
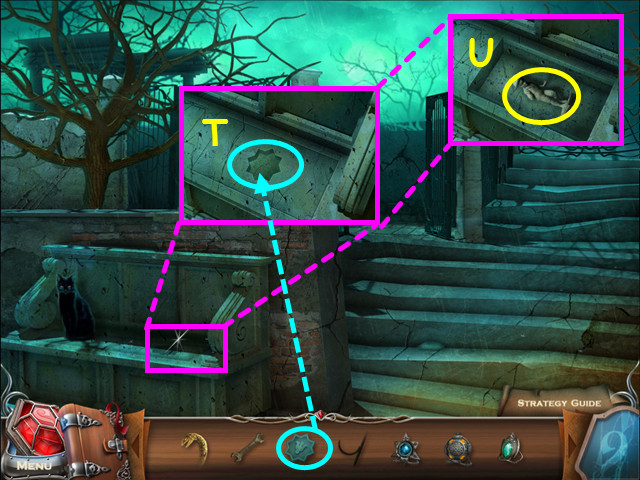
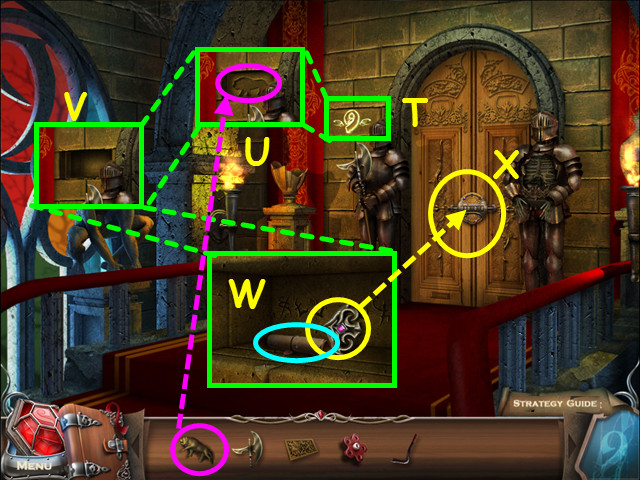 Press the brick with the '9' symbol (T).
Place the LION STATUETTE into the niche (U).
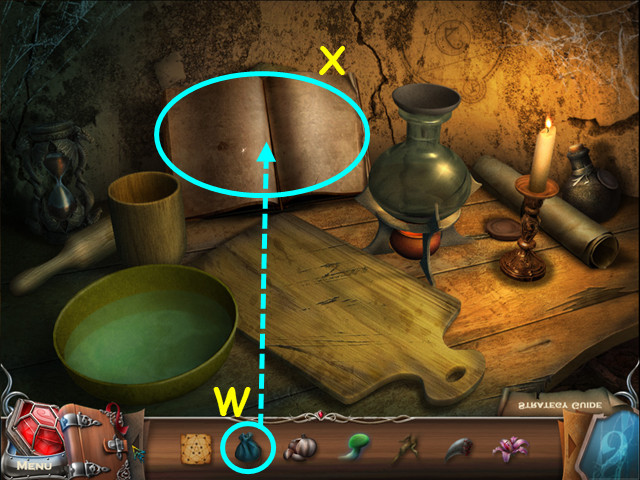
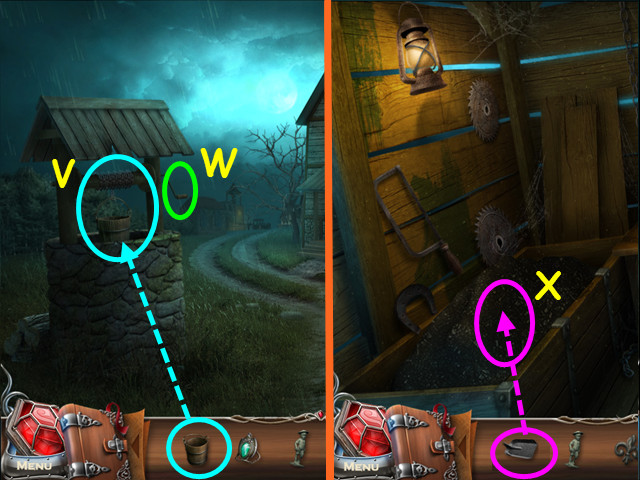
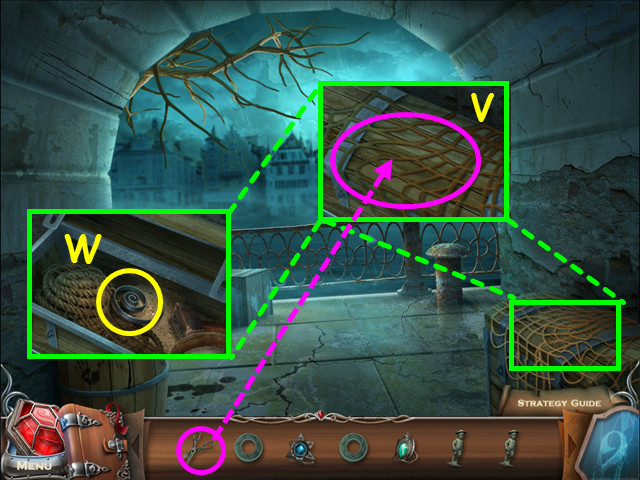
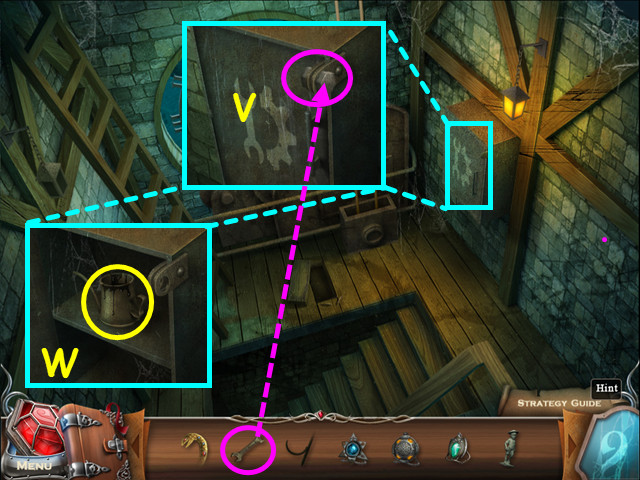
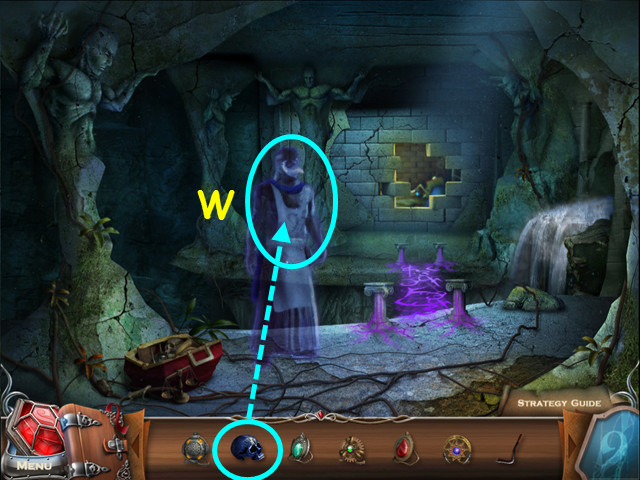
Look inside the opening (V), take the GOLDEN ARROW and read the scroll on the potion (W).
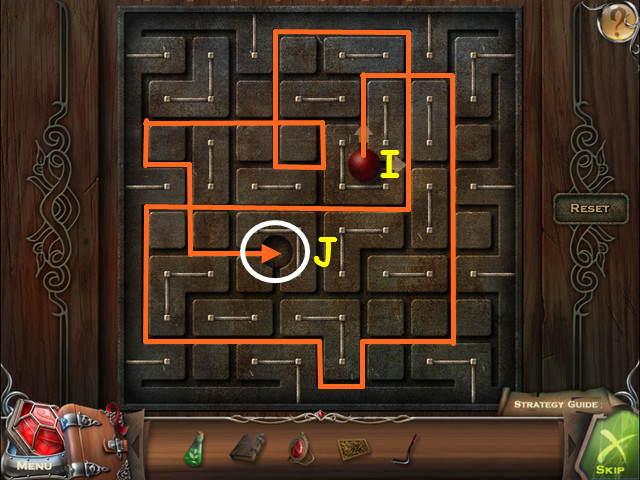
Look at the lock on the door; use the GOLDEN ARROW on the lock for a mini-game (X).
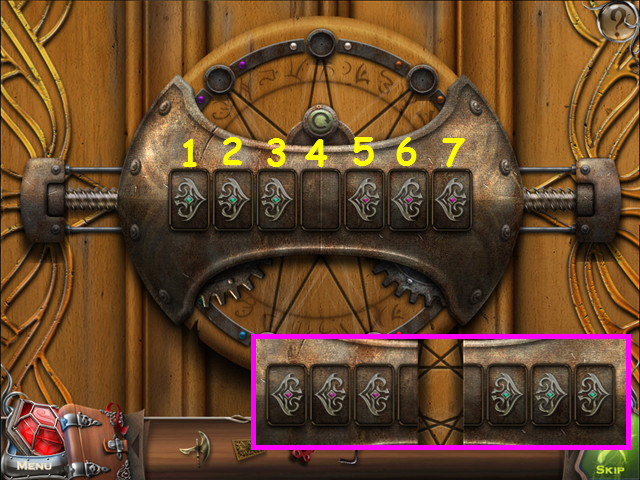 Swap the positions on the blue and violet arrows.
Arrows can only move in the direction they point to an empty spot next to them or jump another arrow to a spot.
Click on the arrows in the numbered positions in this order: 3-5-6-4-2-1-3-5-7-6-4-2-3-5-4.
Exit the close-up and walk down twice.
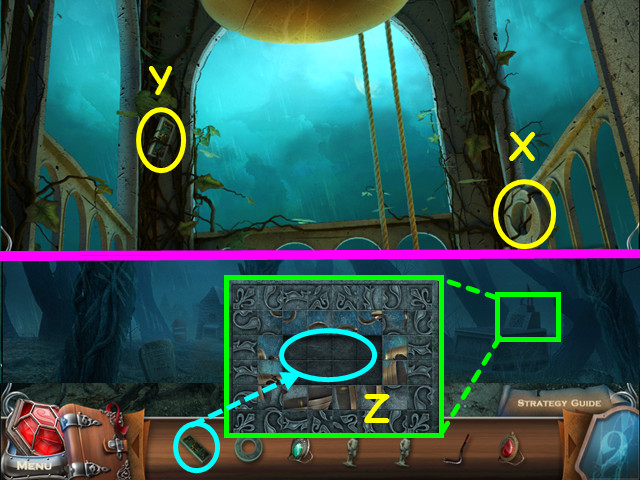
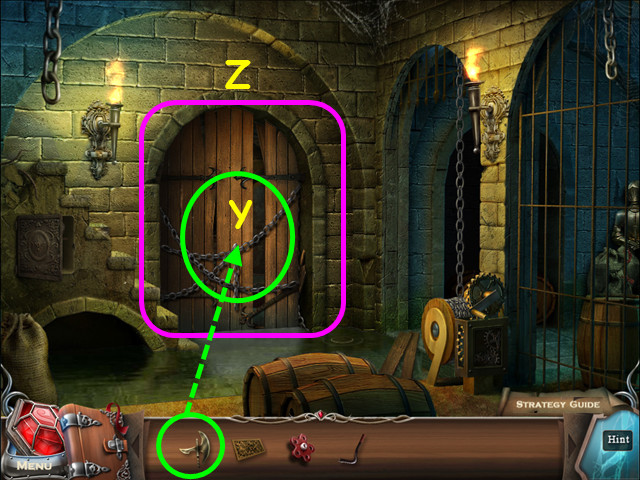 Use the BATTLE AXE to break down the wooden doors (Y).
Walk forward into the laboratory (Z).
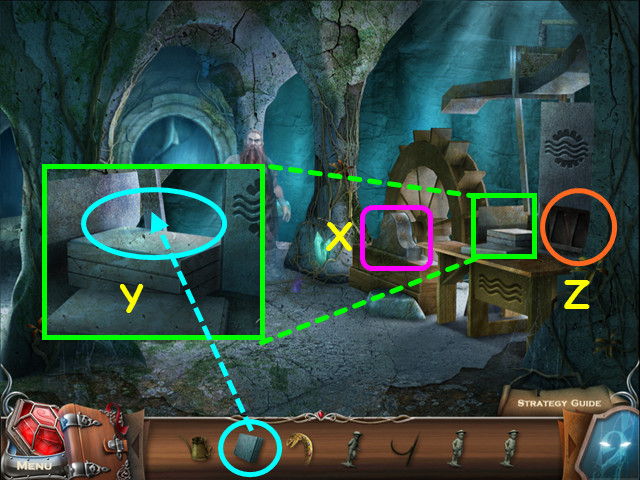
 Take the SLEDGEHAMMER (A).
Note the water control mechanism (B).
Note the desk (C).
Select the shelves for a HOS (D).
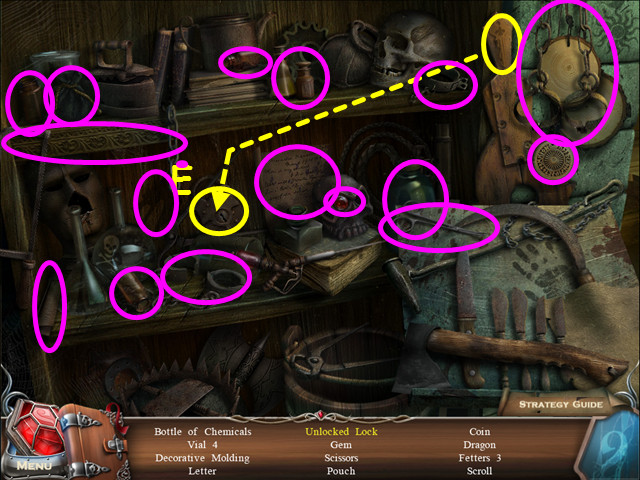 Locate all the items on the list.
Use the key on the lock to get the unlocked lock (E).
You will earn the BOTTLE of AZUREUS.
Look at the water control mechanism for a mini-game.
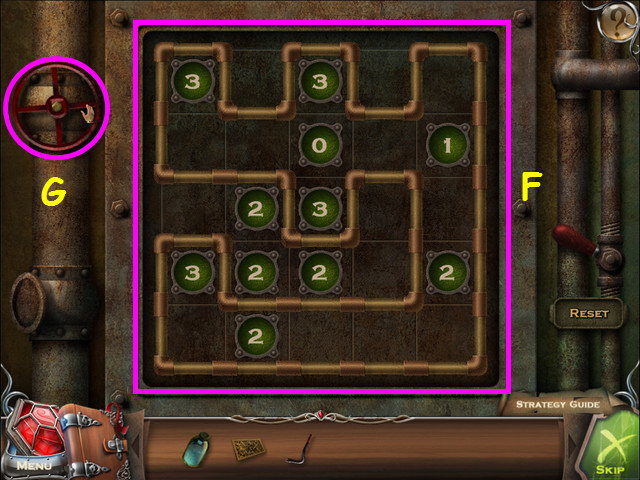 Place pipes on the grid based on the numbers so there is a continuous pipe (F).
Each number indicates how many pipes are on that number's border.
Turn the valve to drain the water in the lower level (G).
Look at the desk.
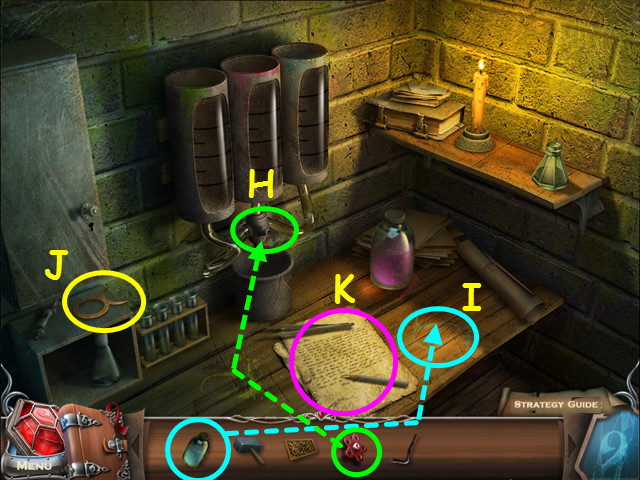 Place the VALVE on the mixer (H).
Place the BOTTLE of AZUREUS on the blue stain (I).
Take the ANCIENT SYMBOL (J).
Take and read the scroll on the revealing potion (K).
Exit the close-up and walk down.
 Look in the alcove and use the CROWBAR to open the grate (L).
Take the 1st TOKEN (M).
Walk to the right.
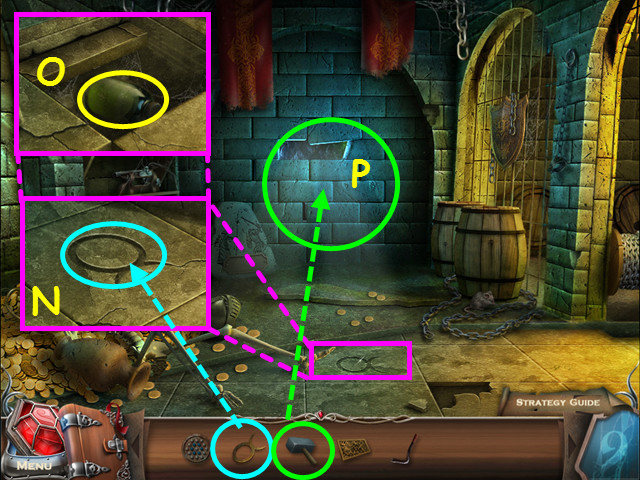 Look at the tile and place the ANCIENT SYMBOL into the indentation (N).
Take the BOTTLE of VIRIDIS (O).
Use the SLEDGEHAMMER on the back wall (P).
Walk forward through the hole in the wall.
Watch the cut-scene then return to the laboratory desk.
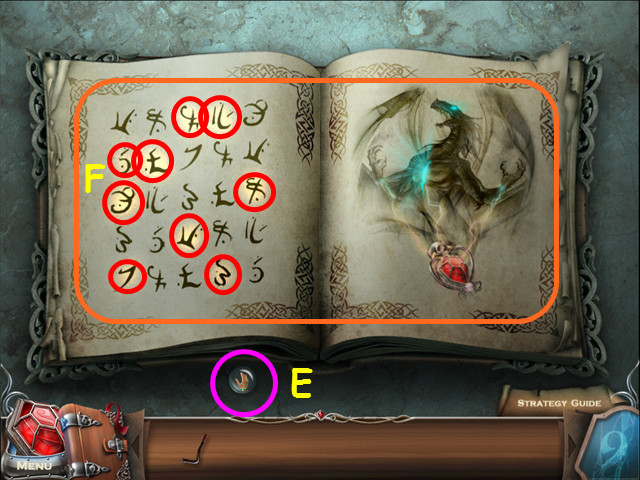
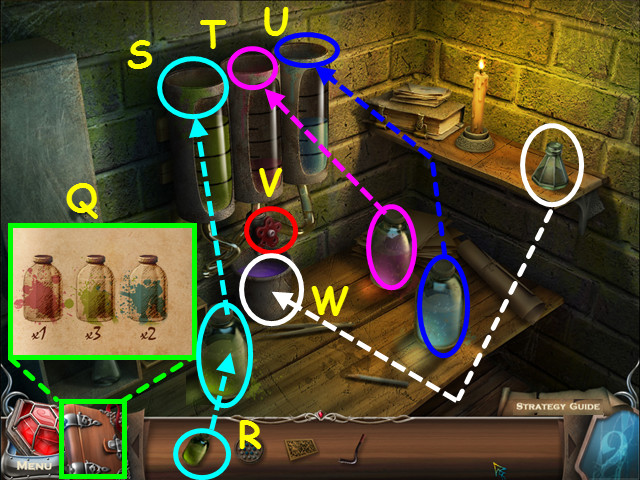 Refer to your journal for the potion recipe (Q).
Place the BOTTLE of VIRIDIS on the green stain (R).
Use the green bottle on the left tube 3 times (S).
Use the red bottle on the center tube once (T).
Use the blue bottle on the right tube twice (U).
Click on the valve to mix the potion (V).
Take the small bottle from the shelf and use it on the container to get the REVEALING POTION (W).
Exit the close-up of the desk, walk down, then go to the right.
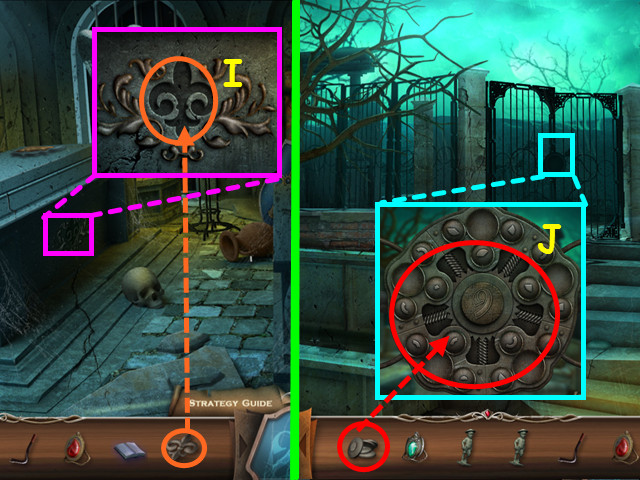
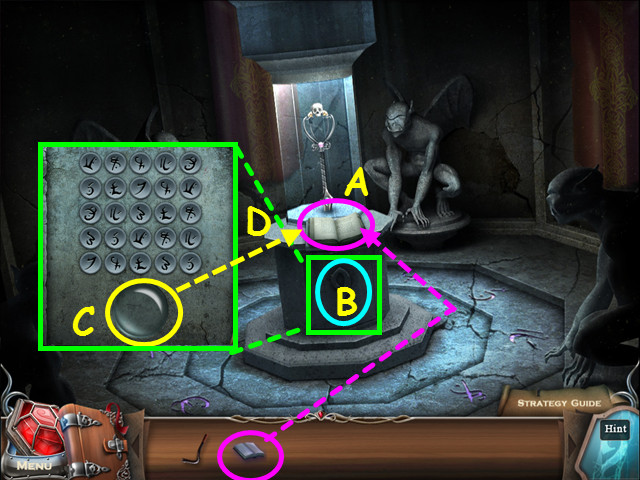
 Look at the tablet and use the REVEALING POTION on the plaque (A).
Note the symbols that appear.
Walk to the right, then go forward.
Look at the chest and enter the symbols using the arrow keys (B).
Look inside the chest and take the 2nd TOKEN (C).
Walk down twice.
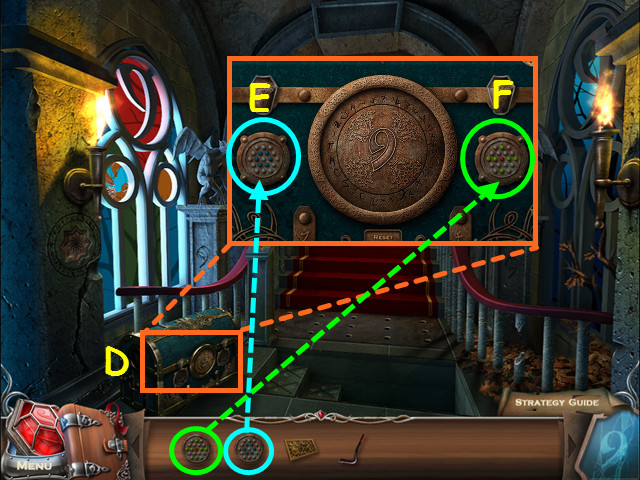 Look at the chest (D).
Place the TOKEN with the blue gems on the left (E), while the TOKEN with the red and green gems go on the right (F).
This will trigger a mini-game.
 This mini-game has 2 parts.
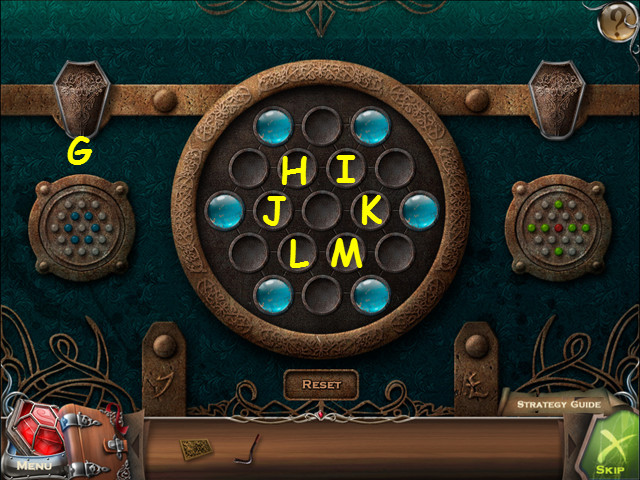
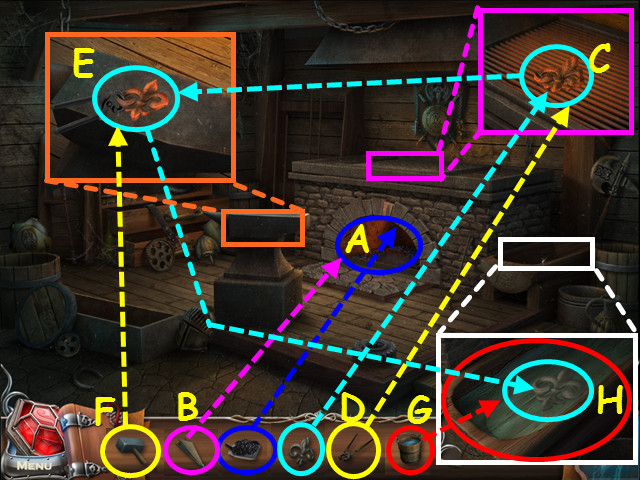
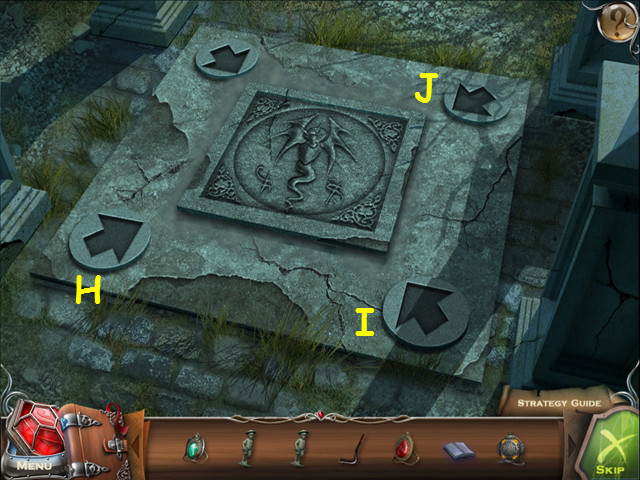
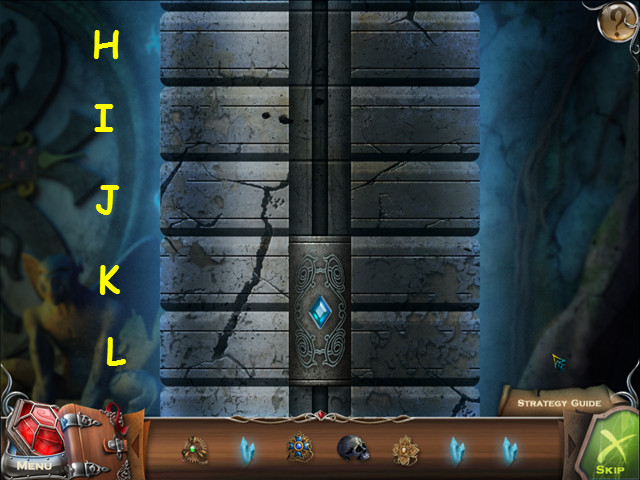
For the first part, move the gems in the center to match the pattern shown on the left (G).
Click in the center of 7 circles to rotate them clockwise.
Click on the following: Lx2, Mx4, Jx4, Kx2, Hx2, Ix2, and Hx2.
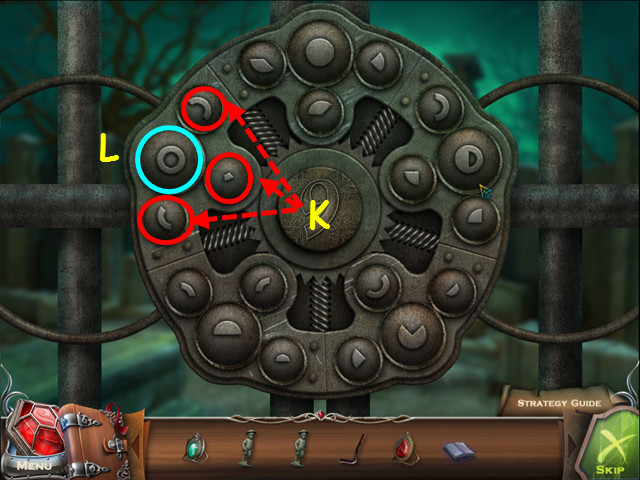
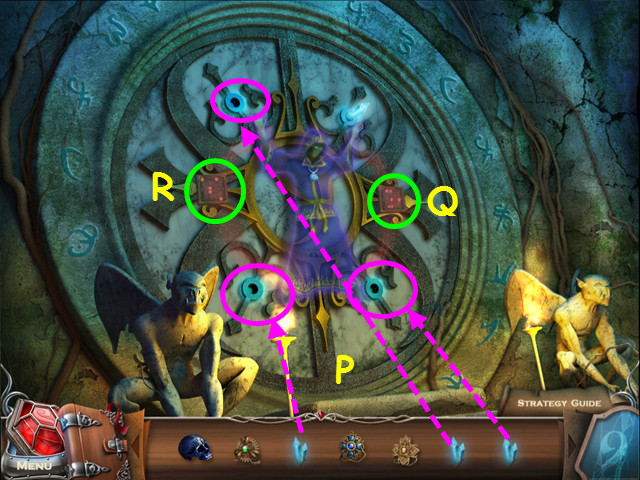
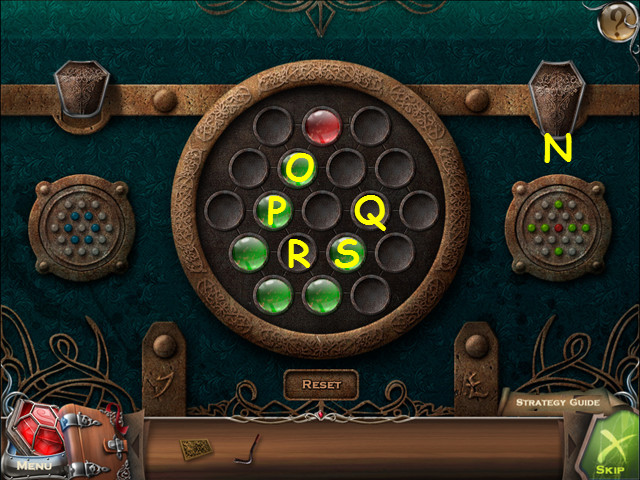 For the second part, move the gems in the center to match the pattern shown on the right (N).
Click in the center of 7 circles to rotate them clockwise.
Click on the following: Sx3, Px2, Qx2, Px2, Rx1, Px1, Qx2, Px1, Rx4, Px5, and Ox2.
Look inside the chest for a HOS.
 Locate all the items on the list.
Look inside the pot to find the GEMS (T).
Use the paintbrush on the red paint (U) then on the flower to make the red flower (V).
You will earn the GEMS.
Walk forward; look at the lock on the doors and use the GEMS to trigger a mini-game.
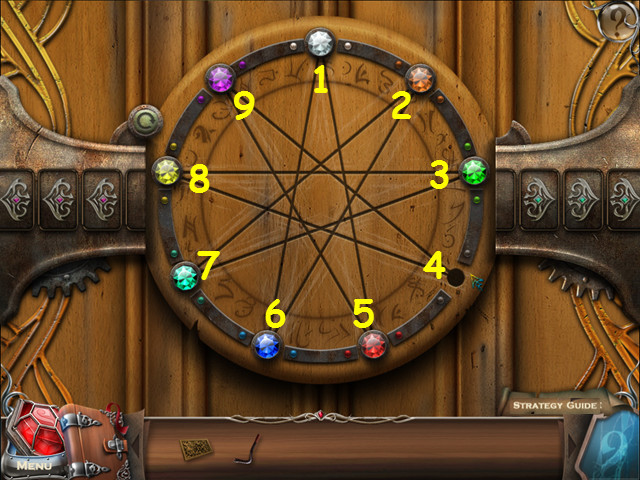 Slide the gems to the point on the star with the same color.
Click on the points in this order: 8-3-7-2-6-1-5-9-4-8-3-7-2-6-1-5-9-4-8-3-7-2-6-1-5-9-4-8-3-7-2-6-1-5-9-4.
Walk forward.
 Look at the knight on the left and take the SHIELD (A).
Note the locked door on the left (B).
Walk forward to the great hall and look at the table (C).
Exit the close-up and walk down again.
Exit to the garden on the right (D).
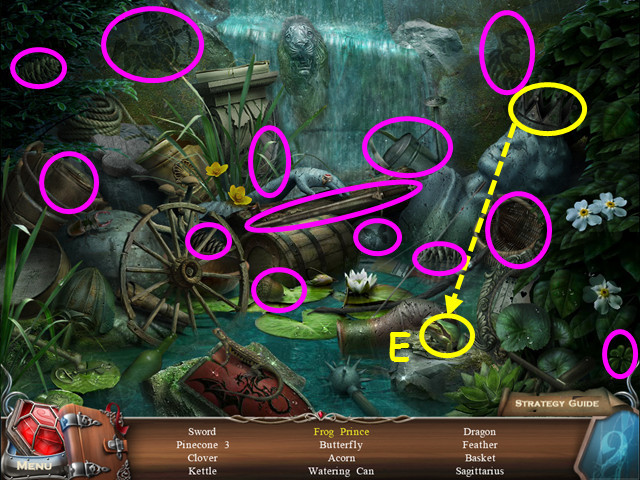 Select the broken statue on the right for a HOS.
Locate all the items on the list.
Place the crown on the frog to make the frog prince (E).
You will earn the KNIGHT'S SWORD.
Walk down 4 times, go to the right then forward.
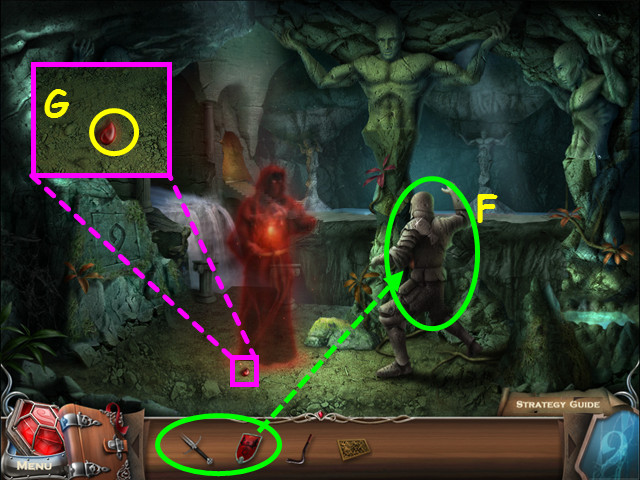 Give the SHIELD and the KNIGHT'S SWORD to the knight (F).
Look at the ground and take the TEAR of BLOODSHED (G).
Return to the garden.
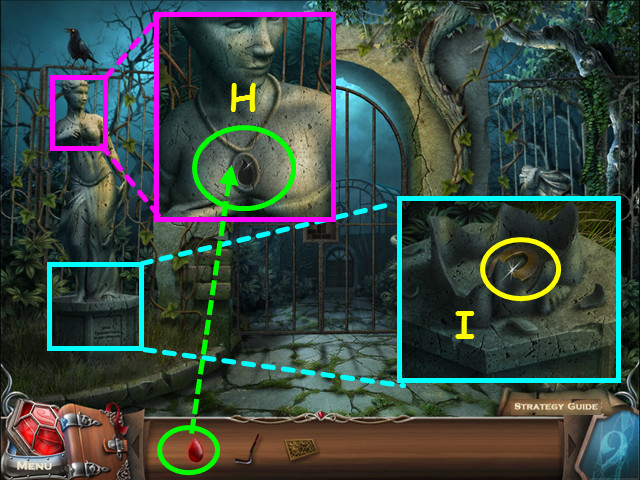 Look at the statue on the left and place the TEAR of BLOODSHED into the pendant (H).
Lady Anna will give you the TEAR of BLOODSHED MEDALLION.
Look at the base of the now broken left statue and take the NINE TOKEN (I).
Return to the underground area and go through the hole in the wall.
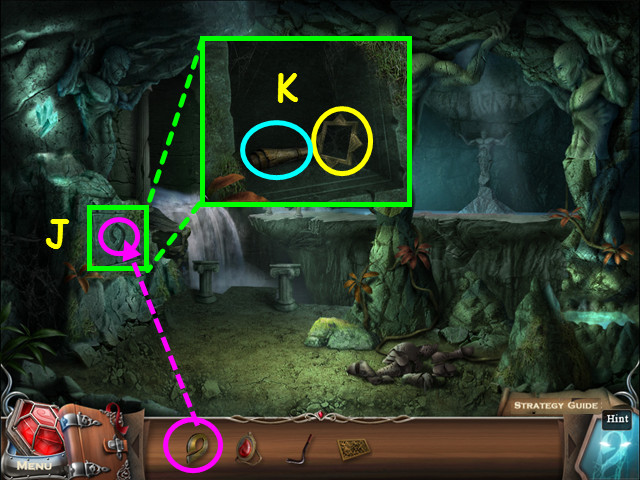 Place the NINE TOKEN into the '9' space on the rock (J).
Look in the compartment, read the scroll and take the STEEL FRAME (K).
Return to the upper level, go through the doors and look at the locked door on the left.
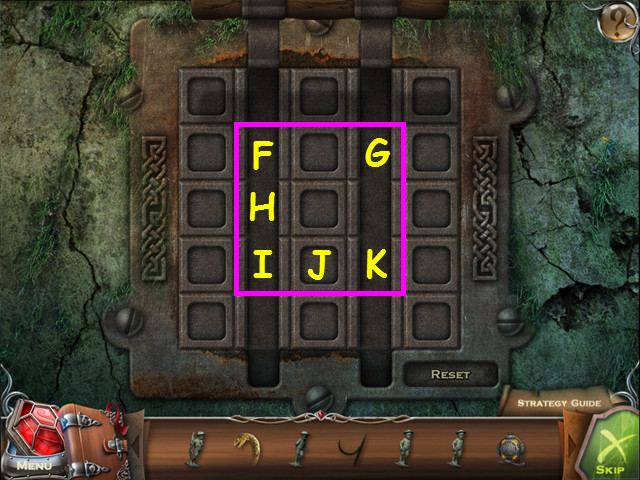
 Place the STEEL FRAME on the lock for a mini-game.
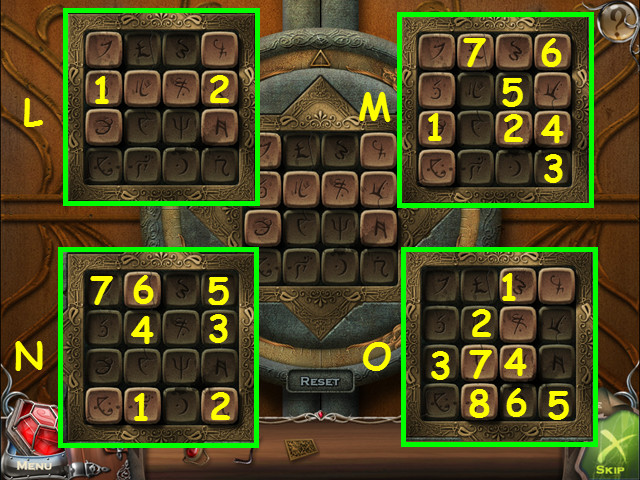
Press the tiles so that all tiles are down.
Pressing a tile will affect the surrounding tiles.
There are 4 levels to this mini-game (L-O).
Click on the tiles in numerical order.
Walk left, then go forward to the library.
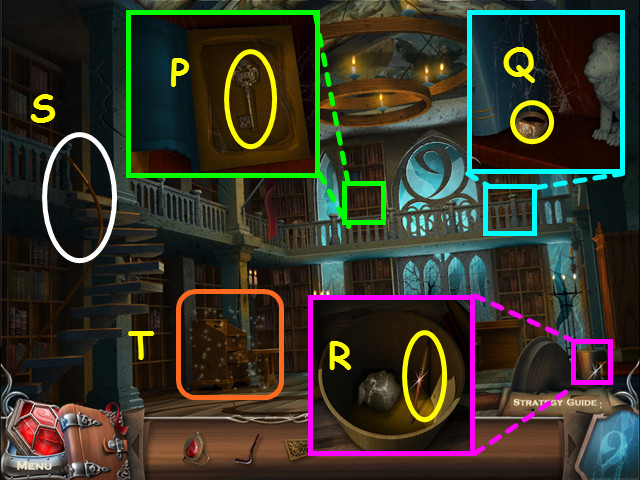 Look at the upper left bookcase, open the book and take the KEY (P).
Look at the upper right bookcase and take the PAINTER'S SIGNET RING (Q).
Look in the wastebasket and take the BRUSH (R).
Note the stairs going to the upper level (S).
Select the desk for a HOS (T).
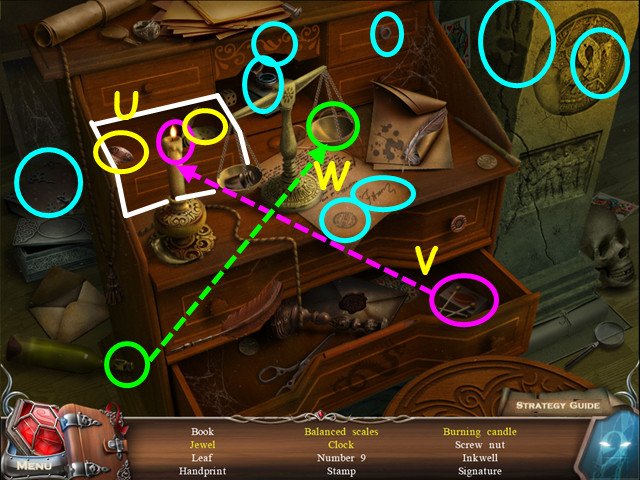 Locate all the items on the list.
Open the drawer to find the jewel and the clock (U).
Use the matches on the candle to make the burning candle (V).
Take the cork from the bottle to make the balanced scales (W).
You will earn the 1st BOOK.
Walk up the stairs.
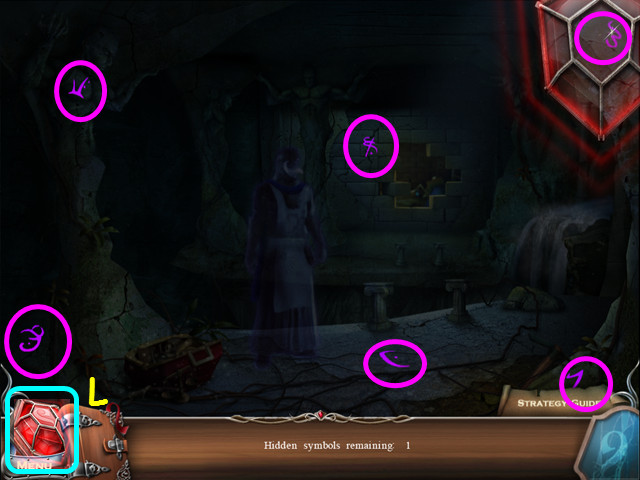
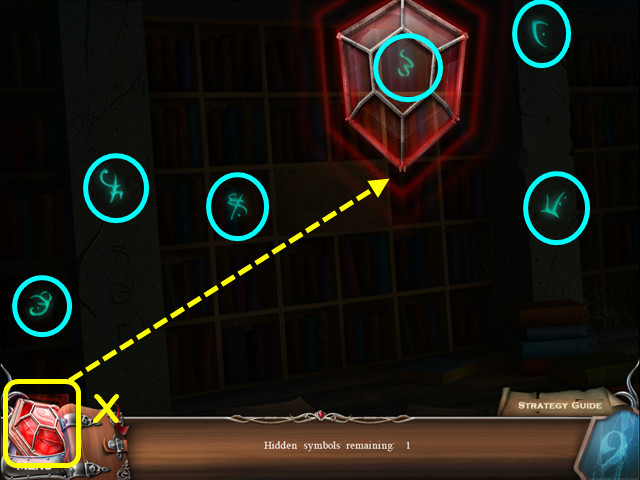 Select the red amulet in the lower left corner (X).
Locate the 6 runes.
Return to the laboratory desk.
 Use the KEY to open the metal box (A).
Take the REVITALIZING CONCENTRATE and the ACID (B).
Exit the desk.
Look at the floor grate and use the ACID on the latch (C).
Use the CROWBAR to open the grate (D) then take the LEVER (E).
Return to the upper level, go through the doors then enter door on the left.
 Look at the chest and place the BRUSH into the glass (F).
Use the PAINTER'S SIGNET RING on the drawer (G).
Use the LEVER on the bottom area for a mini-game (H).
 Move the lever (I) to the hole (J) by sliding it along the tracks.
Click on one of the arrows around the lever to move it in that direction.
The lever will move until stopped by a wall.
Move the lever in the indicated path.
Take the METAL TILE from inside the drawer.
Exit to the garden.
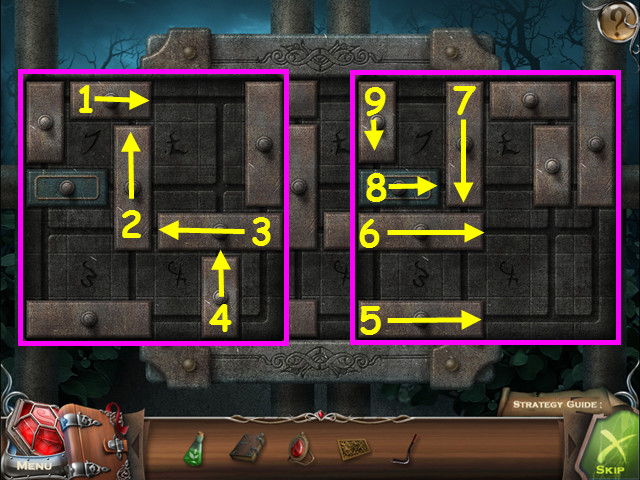 Look at the lock on the gate and use the METAL TILE to trigger a mini-game.
Slide the bricks so the blue brick can exit on the right.
Move the bricks as far as possible in the direction indicated except for step 9 (1-8).
Move the brick in step 9, 1 space down only (9).
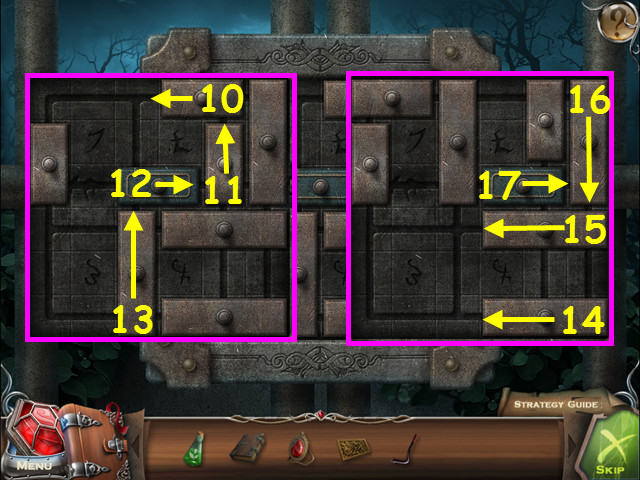 Slide the bricks so the blue brick can exit on the right.
Steps 10-17 are shown here.
Walk forward through the gate.
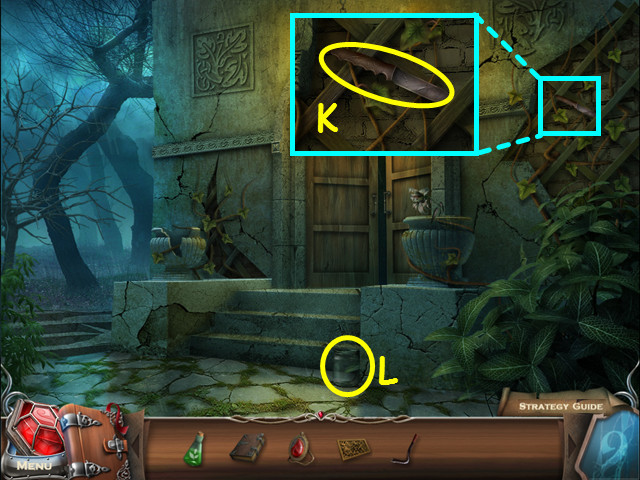 Look at the trellis and take the knife (K).
Take the GLASS JAR (L).
Walk down twice.
 Look at the font and pour the REVITALIZING CONCENTRATE into the basin (M).
Use the GLASS JAR on the green liquid to get the GROWTH CHEMICAL (N).
Walk to the right then go forward.
 Look at the urn and use the GROWTH CHEMICAL on the plant (O).
Take the FLOWER (P).
Enter the building.
 Select the red amulet in the lower left corner (Q).
Locate the 6 runes.
 Look at the urn; use the KNIFE to cut the vines and take the 2nd STAR FRAME (R).
Take the SPADE (S).
Note the tree entrance (T).
Select the painting for a HOS (U).
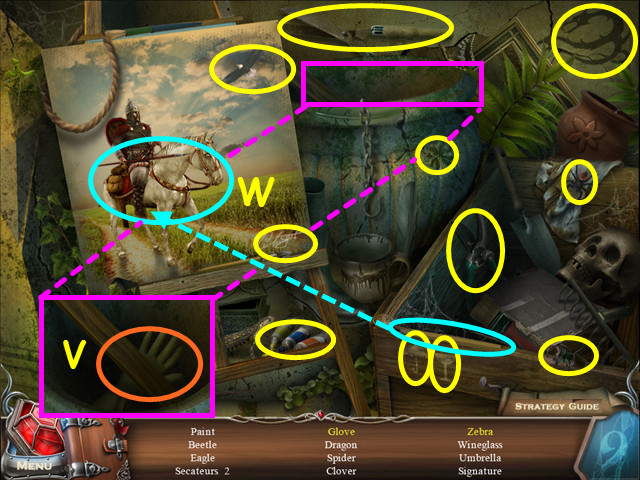 Locate all the items on the list.
Look inside the urn for the glove (V).
Use the pencil on the horse to make the zebra (W).
You will earn the PAINT SET.
Exit the building and walk to the left.
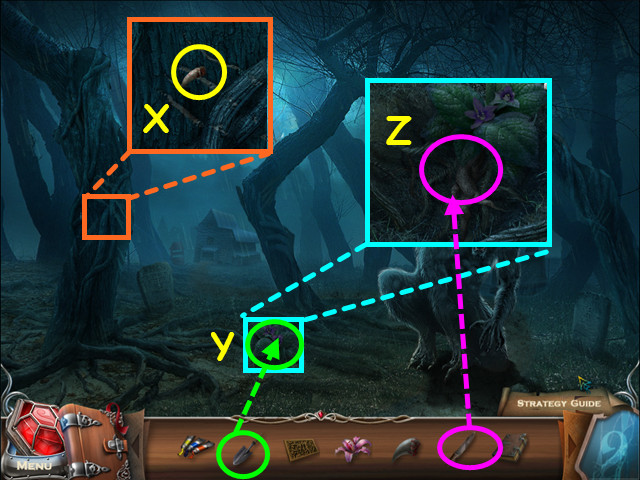 Look at the tree and take the WEREWOLF CLAW (X).
Use the SPADE to dig up the ground (Y).
Look at the close-up and use the KNIFE to take the MANDRAGORA ROOT (Z).
Walk down 3 times, then go to the left.
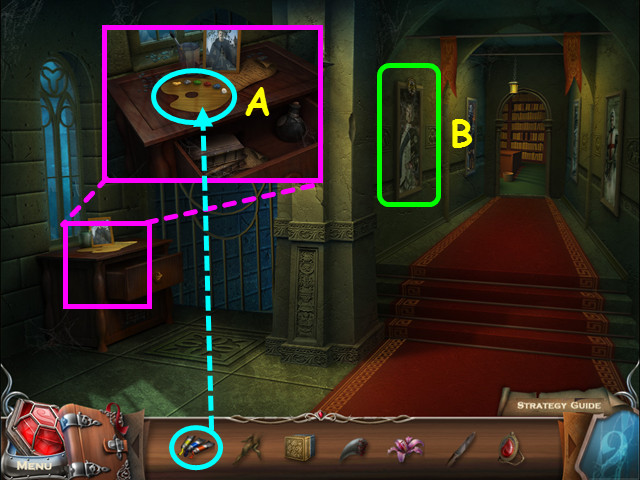 Look at the chest and use the PAINT SET on the palette; take the PAINTER'S PALETTE (A).
Look at the painting of Sir Henry (B).
After the cut-scene, use the PAINTER'S PALETTE on the painting for a mini-game.
 Paint the coat of arms with the correct colors.
Refer to your journal for the coat of arms (C).
Use the brush on a color (D), then paint on the coat of arms (E).
You will receive the COAT of ARMS.
Look behind the painting and take the 2nd BOOK.
Return to the library.
 Look at the large table in front of the window for a mini-game.
Place the 2 STAR FRAMES into the empty spots to trigger the mini-game.
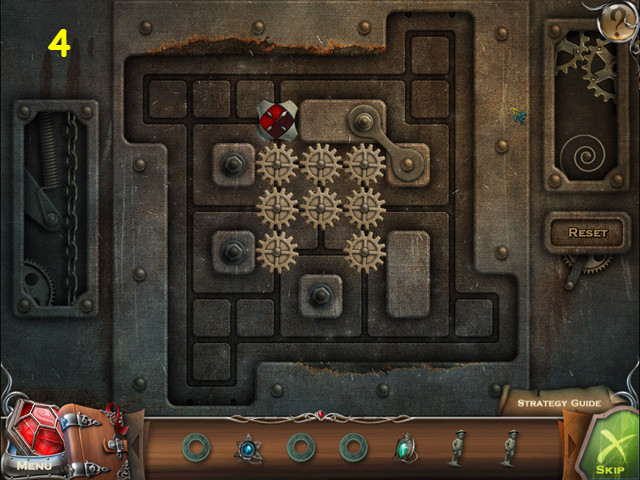
You must push down all the plates; pushing one plate will affect other plates.
Press the panels in numerical order (1-3).
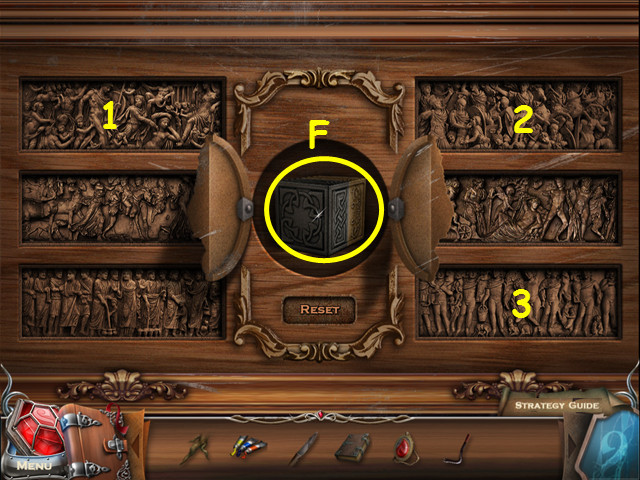
Take the BI-COLOR CUBE (F).
Travel to the tree entrance.
Use the BI-COLOR CUBE on the grid for a mini-game.
 Roll the cubes so the gray side faces up.
Click on a cube to roll it to the adjacent empty spot.
Click on the cubes in the following locations: 8-7-4-5-6-3-2-1-4-5-2-3-6-5-2-1-4-5-2-3-6-9-8-5-4-7-8-5-4-1-2-5-6-3-2-5.
Enter the tree.
 Note the diagram on the back wall (A).
Use the KNIFE to take a MUSHROOM (B).
Take the FUNNEL (C).
Take the 3rd BOOK (D).
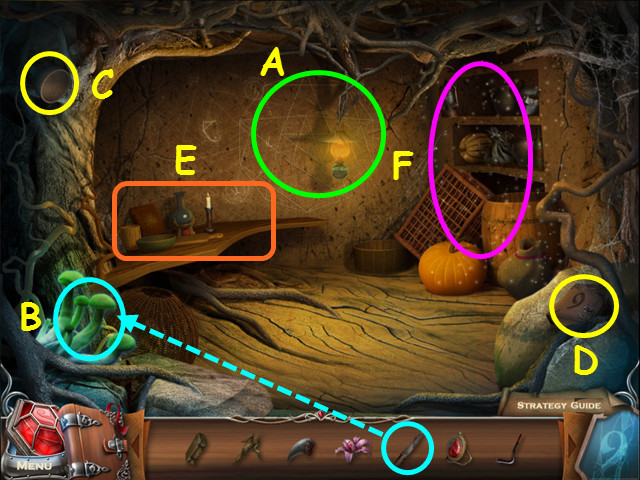
Note the desk (E).
Select the bookcase for a HOS (F).
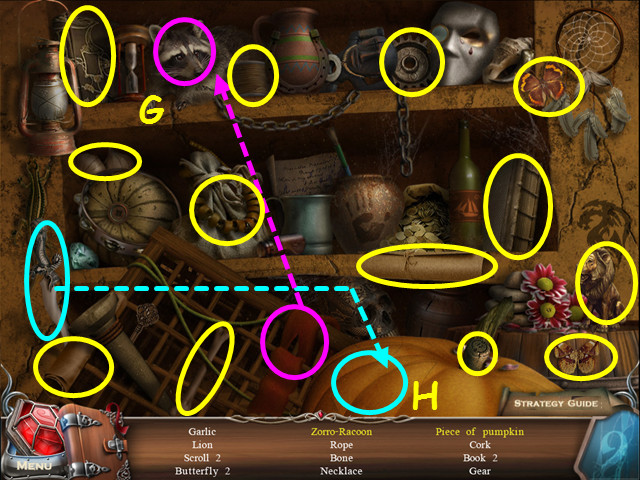 Locate all the items on the list.
Use the mask on the raccoon to make the Zorro-raccoon (G).
Use the knife on the pumpkin for the piece of pumpkin (H).
You will earn the GARLIC.
Look at the desk.
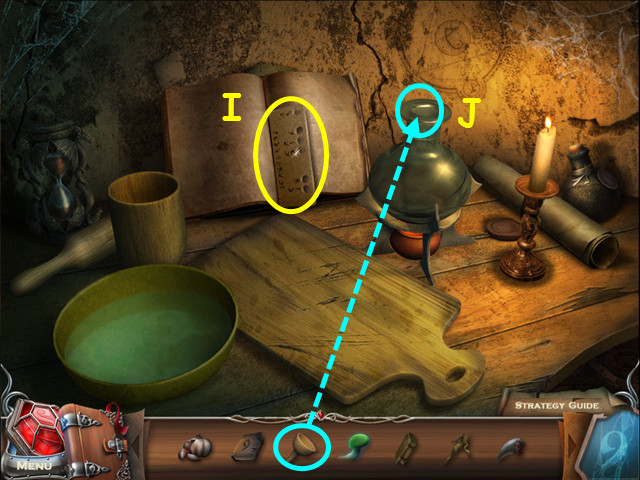 Open the book and take the PATTERN PLATE (I).
Place the FUNNEL in the flask (J).
Return to the library and go up the stairs.
 Click on the light blue symbol in the center of the bookcase to reveal some hidden books.
Look at the close-up and place the 3 BOOKS on the shelf for a mini-game.
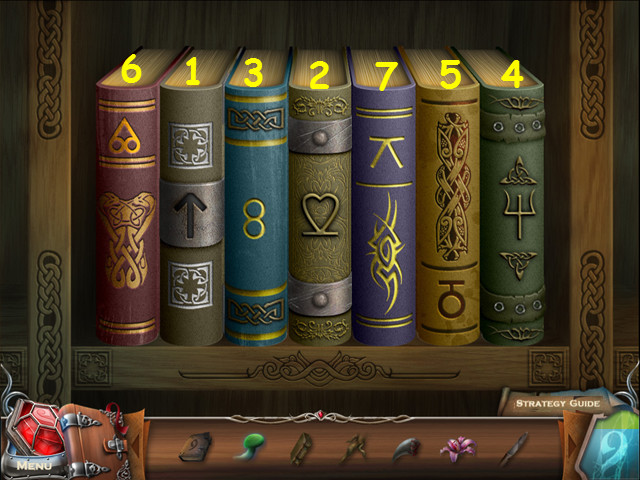
Each book has a symbol on the spine that is made of a number and its reflection.
Click on the books in numerical order (1-7).
Walk forward into the hidden room.
 Take the PATTERN with MAGIC LINES (K).
Look at the box and use the PATTERN PLATE on it for a mini-game (L).
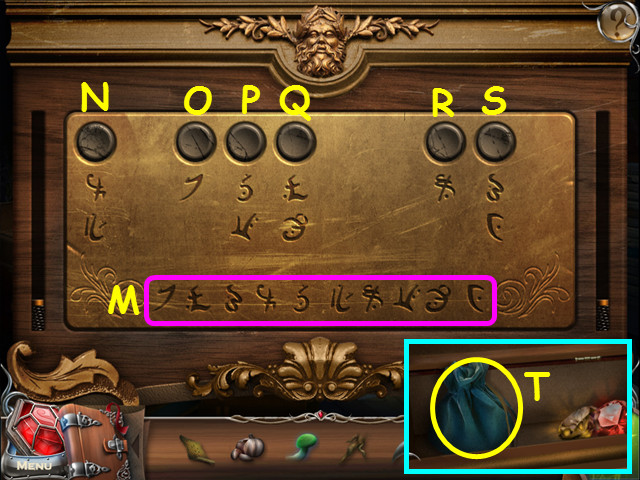 The symbols shown at the base of the plate is the order to push the buttons (M).
Push the buttons in in this order: O-Q-S-N-P-N-R-P-Q-S.
Look inside the box and take the REVEALING POWDER (T).
Return to the room inside the tree.
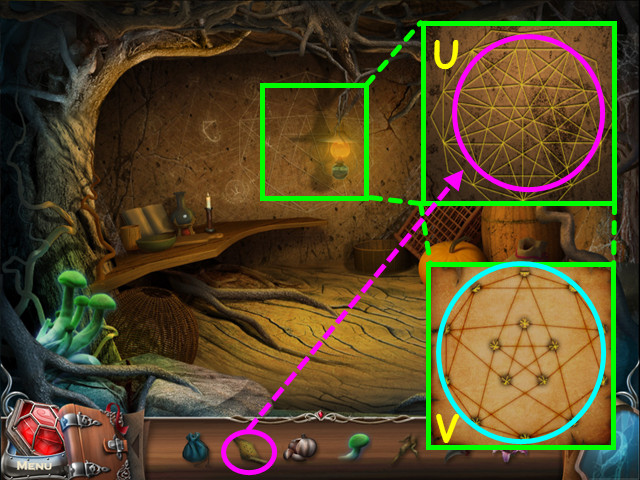 Look at the drawing on the wall and place the PATTERN with MAGIC LINES on it (U).
Take the MAGIC STAR PATTERN (V).
Look at the desk.
 Use the REVEALING POWDER on the book (W).
Select the book for a mini-game (X).
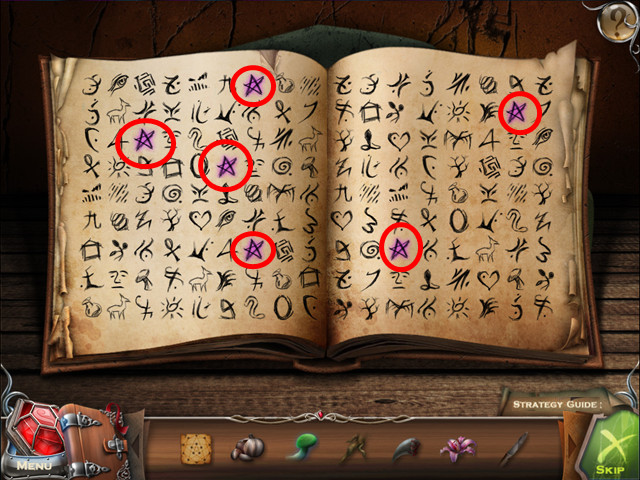 Find all the instances of each symbol.
Select all of one symbol by clicking on each instance.
Repeat this process until all the symbols are removed from the book.
Read the instructions for the recipe then exit the close-up of the book.
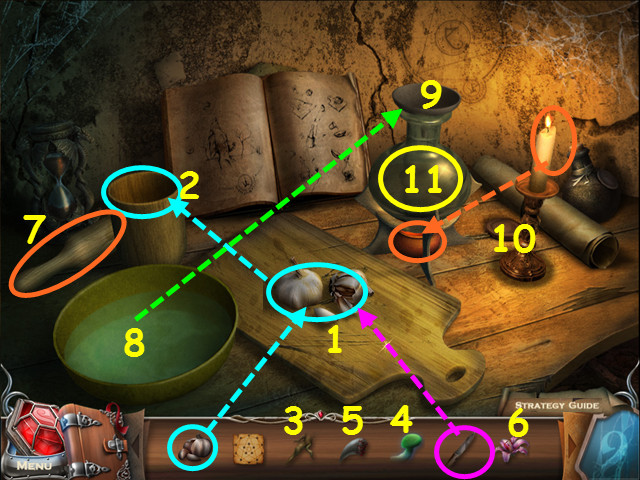 Place the GARLIC on the cutting board, the use the KNIFE to chop it up (1).
Place the chopped garlic into the cup (2).
Chop the MANDRAGORA ROOT and place it into the cup (3).
Chop the MUSHROOM and place it into the cup (4).
Place the WEREWOLF CLAW (5) and the FLOWER into the cup (6).
Use the mortar to grind everything in the cup (7).
Pour the cup into the bowl (8).
Pour the bowl into the flask (9).
Use the candle to light under the flask (10).
Take the ANTI-WEREWOLF POTION (11).
Return to the upper level of the library and enter the hidden room.
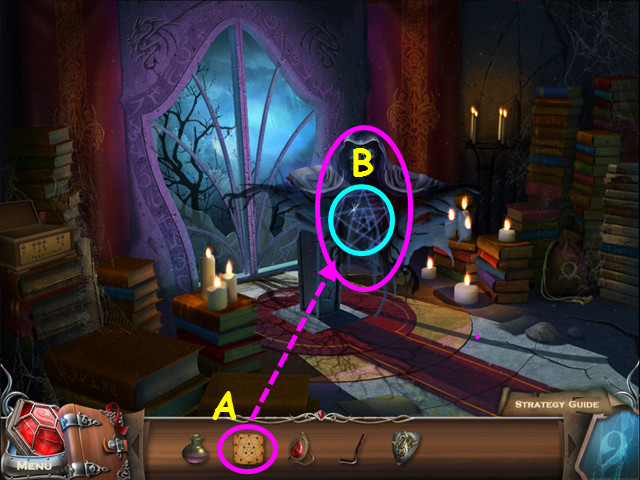 Use the MAGIC STAR PATTERN on the demon (A).
Click on the star on the demon for a mini-game (B).
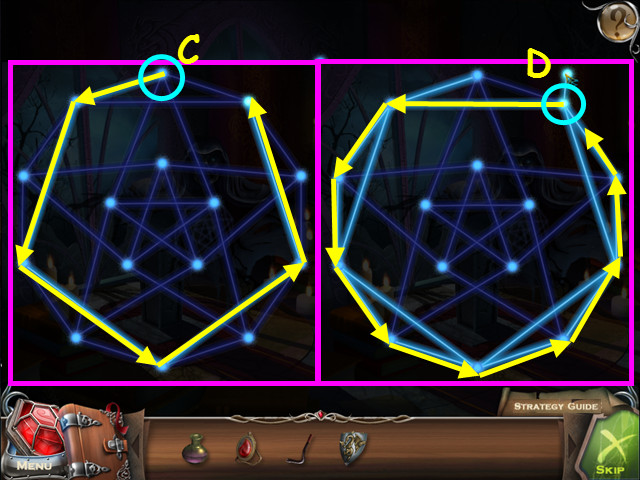 Starting from any point on the star, draw a continuous line crossing every point once.
Our solution starts at the top of figure, then follow the arrows around (C).
Continue from point (D).
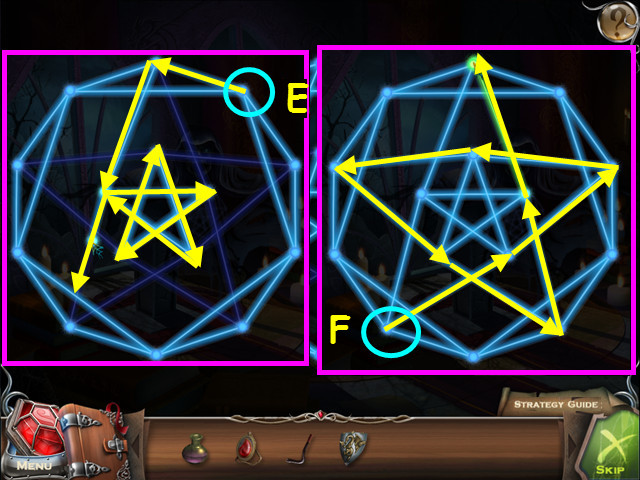 Continuing our star mini-game, follow the arrows from point (E).
The final steps in the solution start at point (F).
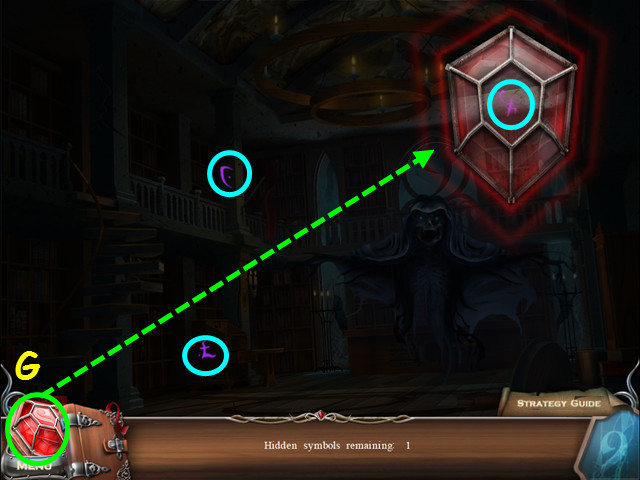 Select the red amulet in the lower left corner (G).
Locate the 3 runes.
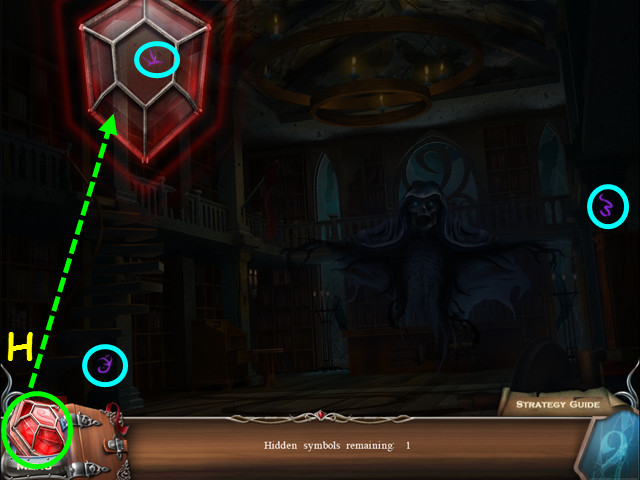 You need to try the amulet again.
Select the red amulet in the lower left corner (H).
Locate the 3 runes.
Note the hole in the floor.
Climb the stairs, enter the secret room and take the ENCRYPTED BOOK of SECRETS that was behind the demon.
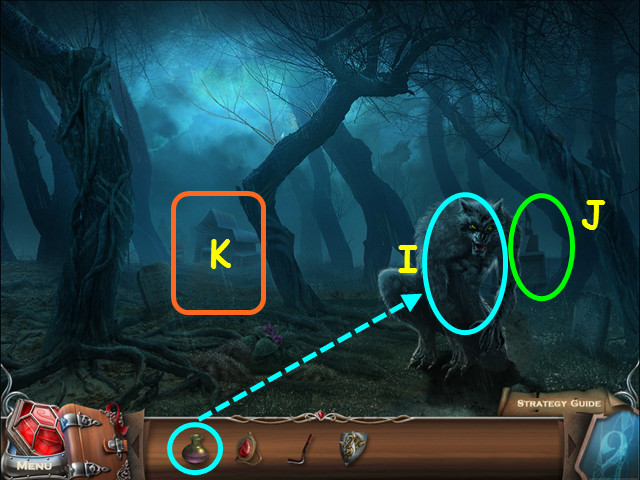 Return to the scene with the werewolf.
Use the ANTI-WEREWOLF POTION on the werewolf (I).
Alistan will give you the WEREWOLF MEDALLION.
Note the grave on the right (J).
Walk forward (K).
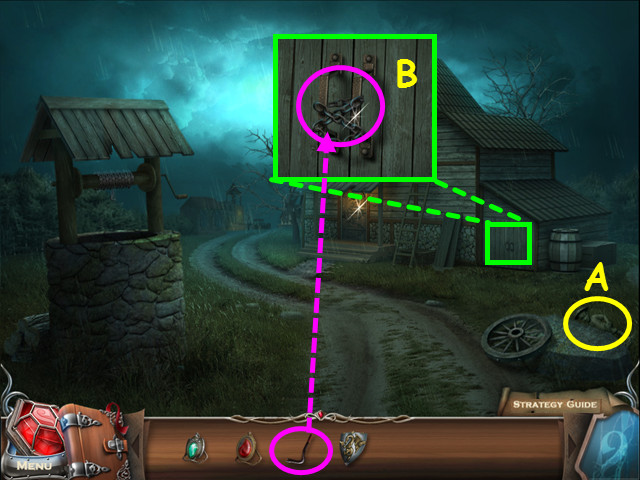 Take the 1st STATUETTE (A).
Look at the blacksmith's shed and use the CROWBAR to remove the chains (B).
Enter the blacksmith's shed.
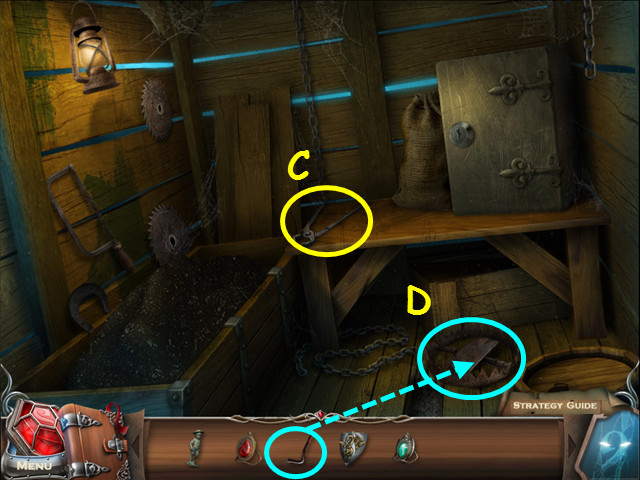 Take the TONGS (C).
Use the CROWBAR to spring the trap (D).
Exit the shed, walk forward to the village then enter the arch on the left.
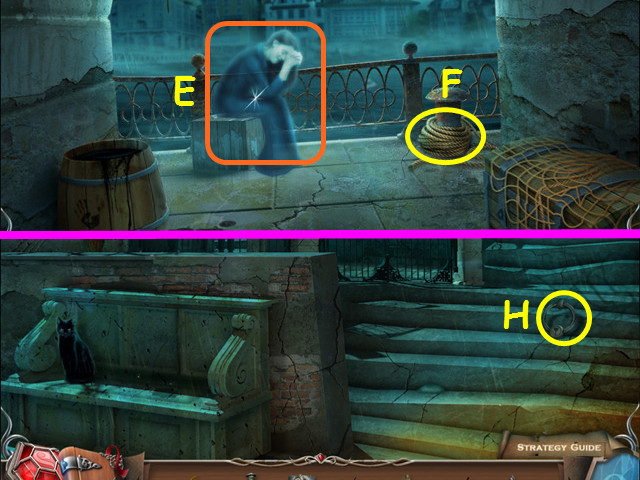 Talk to the ghost Bianca (E).
Take the ROPE (F).
Walk down then go forward between the buildings.
Take the WINEGLASS RING (H).
Return to the library and look at the hole in the floor.
 Use the ROPE on the hole (I).
Take the 2nd STATUETTE (J).
Climb down the rope.
 Take the DISFIGURED LILY (K).
Look at the top of the sarcophagus and place the COAT of ARMS into the niche (L).
Use the CROWBAR on the disk that appears (M).
Take the DISC that falls to the floor (N).
Return to the blacksmith's.
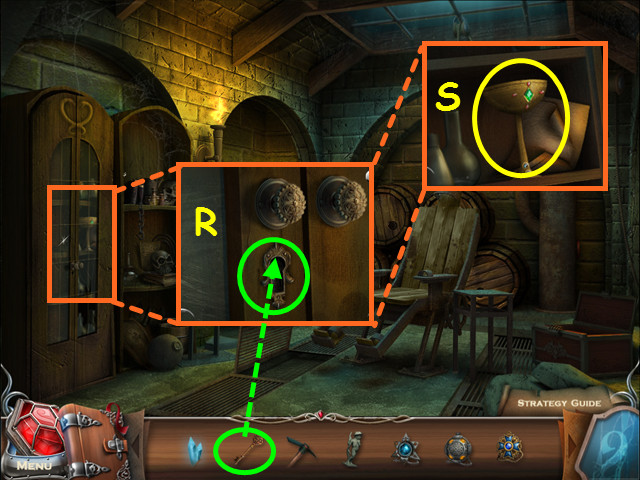
 Look at the door and use the DISC on the lock (O).
Enter the building, talk to the blacksmith and he will give you the EMPTY WINE JUG.
Walk forward to the village.
Look at the tavern window and use the CROWBAR to break the glass (P).
Enter the tavern.
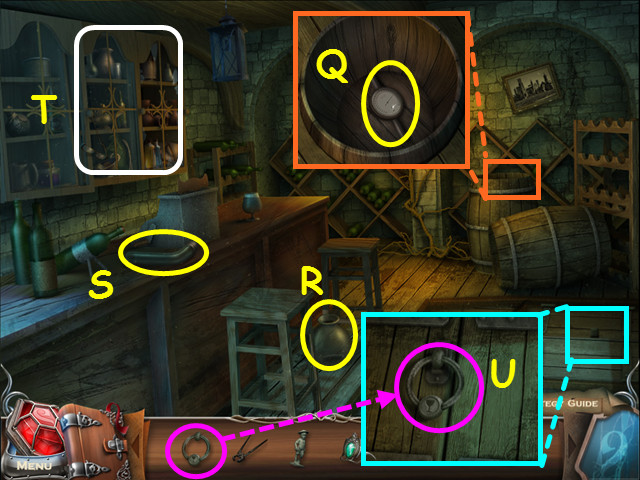 Look in the barrel and take the PRESSURE GAUGE (Q).
Take the EMPTY JAR (R).
Take the GLASS TUBE (S).
Note the locked cabinet (T).
Look at the trapdoor and place the WINEGLASS RING on the latch (U).
Climb down to the cellar.
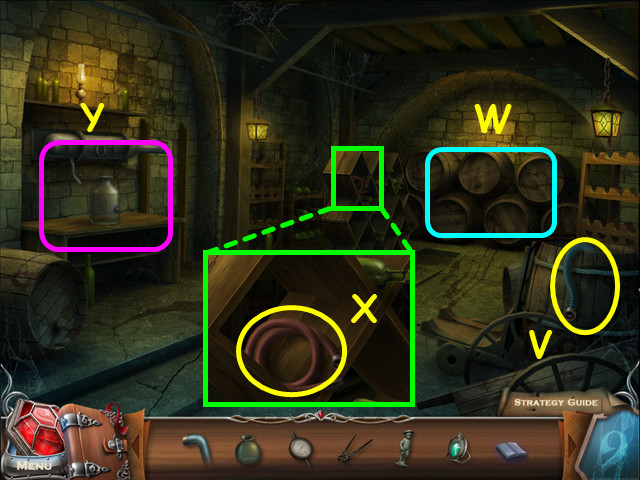 Take the BLUE TUBE (V).
Note the barrels (W).
Look at the wine rack and take the RED TUBE (X).
Look at the table on the left (Y).
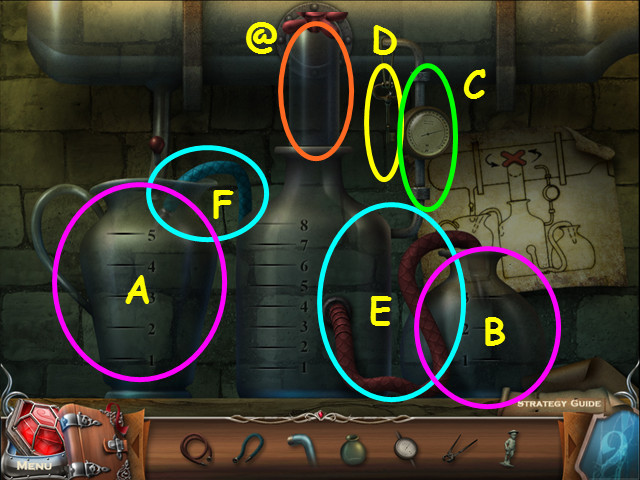 Place the GLASS TUBE into the top of the center jar (@).
Place the EMPTY WINE JUG on the left (A).
Place the EMPTY JAR on the right (B).
Place the PRESSURE GAUGE into the tubes over the jar (C).
Take the KEY (D).
Place the RED TUBE into the jar (E).
Place the BLUE TUBE into the jug (F).
Return upstairs to the tavern.
Use the KEY on the locked cabinet then select the cabinet for a HOS.
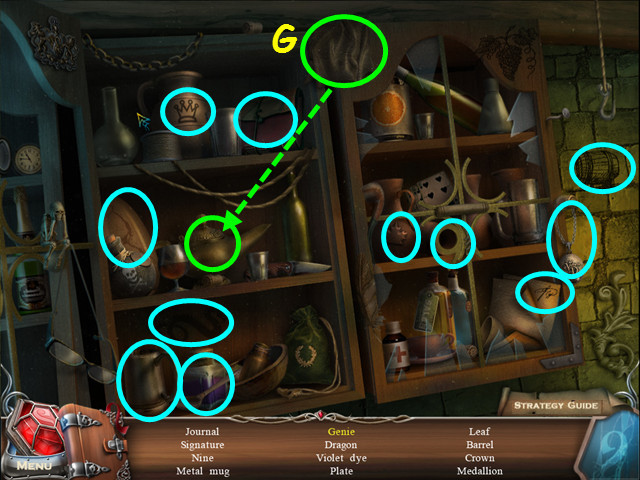 Locate all the items on the list.
Use the cloth on the lamp to find the genie (G).
You will earn the WINEMAKER'S JOURNAL.
Return to the cellar and look at the barrels in the back.
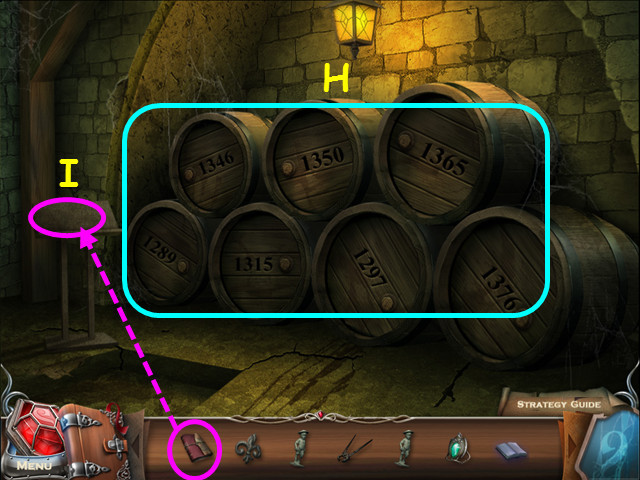 Note the dates on the barrels (H).
Place the WINEMAKER'S JOURNAL on the book stand (I).
Look at the journal for a mini-game.
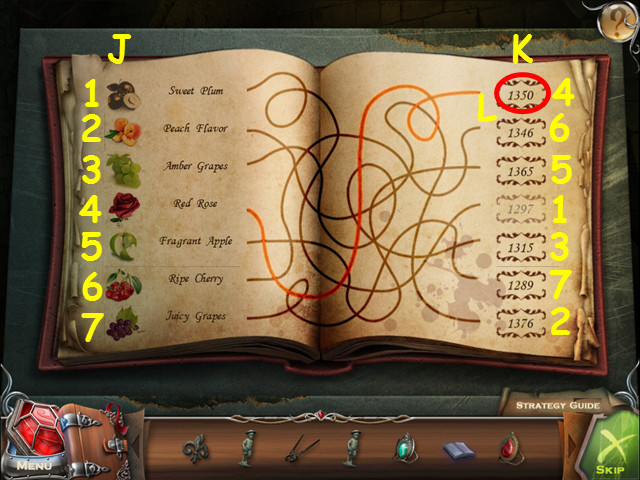 Click on a flavor on the left (J), then follow the line to the date on the right (K).
Click on the date after each flavor to determine the barrel you need (1-7).
The Red Rose is 1350 (L).
Exit the journal and click twice on the barrel labeled 1350.
Look at the table on the left.
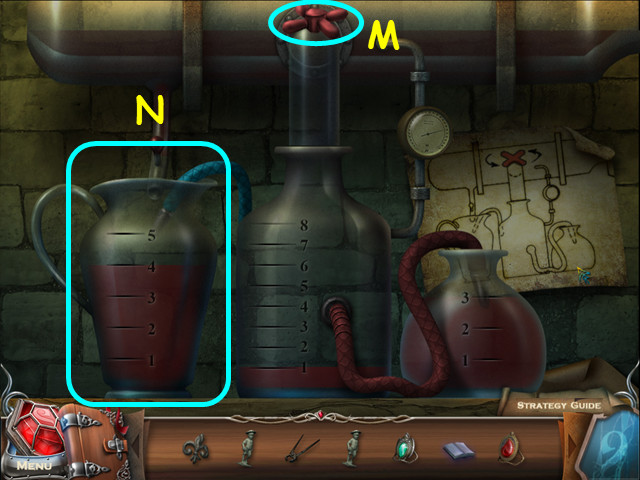 You need 4 liters of wine in the jug on the left.
Click on the valve (M) to fill the center jar.
Click on a jar you want to pour, then click on the jar you want to pour it into.
Click on the center jar, then the left.
Click the left jar, then the right.
Click on the right jar, then the center.
Click the left jar, then the right.
Click on the center jar, then the left.
Click the left jar, then the right.
Take the FULL WINE JUG from the left (N).
Return to the blacksmith's.
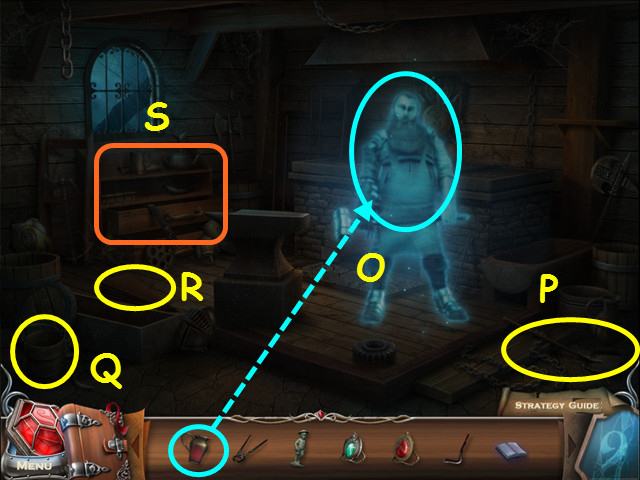 Give the FULL WINE JUG to the blacksmith (O).
Take the SHOVEL (P).
Take the EMPTY BUCKET (Q).
Take the BELLOWS (R).
Select the drawers for a HOS (S).
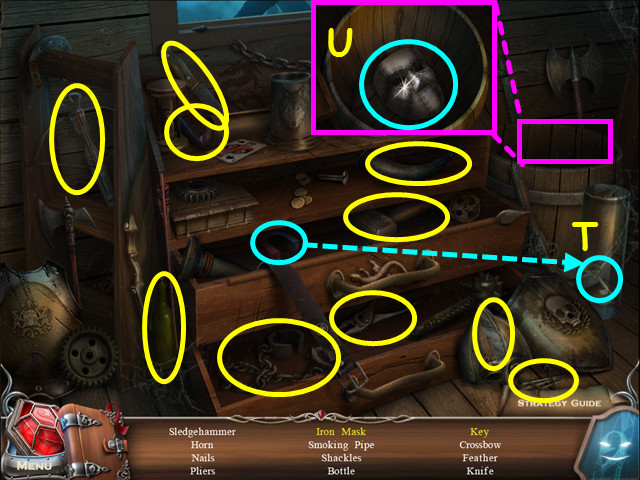 Locate all the items on the list.
Use the magnet to get the key (T).
Look in the barrel to find the iron mask (U).
You will earn the SLEDGEHAMMER.
Exit the blacksmith's.
 Use the EMPTY BUCKET on the well (V).
Click on the crank to lower the bucket (W).
Take the BUCKET of WATER once it returns.
Enter the shed.
Use the SHOVEL on the coal bin to get the SHOVELED COAL (X).
Return to the blacksmith's.
 Placed the SHOVELED COAL into the fireplace (A).
Use the BELLOWS on the fireplace (B).
Look at the grill and place the DISFIGURED LILY on top (C).
Use the TONGS on the lily to get the HOT METAL LILY (D).
Look at the anvil and place the HOT METAL LILY on top (E).
Use the SLEDGEHAMMER on it, then take the HOT METAL LILY (F).
Look at the water trough and pour the BUCKET OF WATER into it (G).
Place the HOT METAL LILY into the water then take the GOOD METAL FIGURE from the trough (H).
The blacksmith will appear and give you the BLACKSMITH'S MEDALLION.
Return to the library and go down the hole in the floor.
 Look at the side of the sarcophagus and place the GOOD METAL FIGURE into the indentation (I).
Sir Charles will give you the TOKENS of LOGIC.
Return to where you saw the cat.
Look at the gate and use the TOKENS of LOGIC on the lock for a mini-game (J).
 Place the tokens in the lock so the symbols on the 3 smaller tokens (K) equal the symbol on the larger token (L).
Walk forward through the gates to the cemetery.
 Look at the fence and take the 1st STONE RING (M).
Take MARTIN'S POCKET-WATCH (N).
Walk down twice then go left into the archway.
 Give MARTIN'S POCKET-WATCH to Bianca (O).
She will give you BIANCA'S MEDALLION.
Look at the crate and take the HANDLE (P).
Walk down, look at the tower door and use the HANDLE on the door (Q).
Enter the tower.
 Take the 2nd STONE RING (R).
Note the stairs going up (S).
Select the shelves for a HOS (T).
 Locate all the items on the list.
Place the clock hands on the clock to find the cuckoo (U).
You will earn the SCISSORS.
Return to the archway.
 Look at the chest and use the SCISSORS on the ropes (V).
Take the CLOCK SPRING (W).
Return to the tower and go up the stairs, then climb the ladder to the bell tower.
 Take the 3rd STONE RING (X).
Take the PLATE of BELL TILES (Y).
Walk down 5 times to where you saw the werewolf and look at the tomb on the right.
Use the PLATE of BELL TILES on the grid for a mini-game (Z).
 Restore the mosaic by rotating the tiles (A).
Click on each tile to rotate it in place.
Take the BELL CLAPPER from inside the mosaic.
Return to the bell tower.
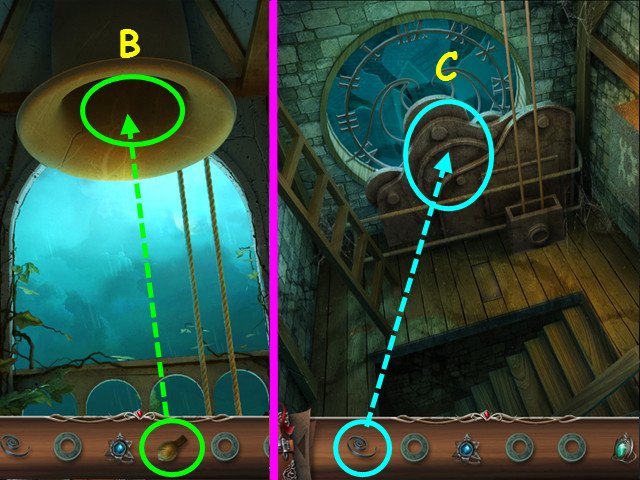 Place the BELL CLAPPER inside the bell (B).
Click on the bell to learn it must be in sync with the clock.
Climb down one level.
Use the CLOCK SPRING on the clock mechanism for a mini-game (C).
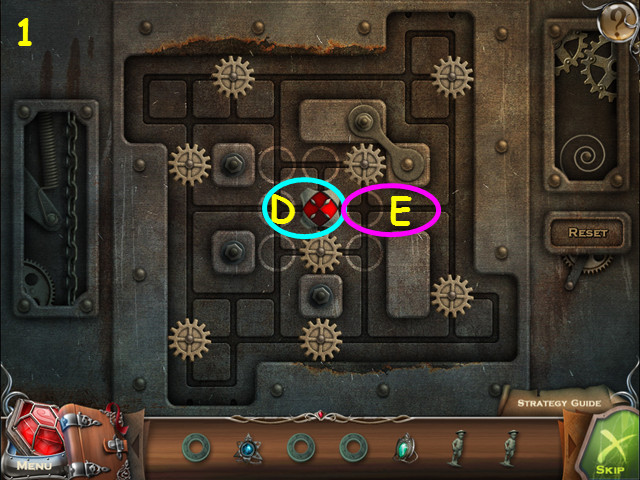 Use the red shield (D) to push the gears to the white circles in the center (E).
Click on the path ahead of the shield in the direction you want to move.
You can also click on the lighted edge of the red shield.
Left, Right, Up, and Down are abbreviated as L, R, U, and D.
Make the following moves to get in the position shown in the screenshot (1): D1, L4, D2, R1, D2, L1, U1, D2, L2, U2, R3, D1, R1, U1, R2, U2, L1, U1, L3, D2, R1, D2, L1, D1, L2, U2, R2, U1, R1, and D1.
 Left, Right, Up, and Down are abbreviated as L, R, U, and D.
Make the following moves to get in the position shown in the screenshot (2): L1, U2, L2, U1, R1, D1, R1, D2, L2, U1, D1, R2, U2, L1, U1, L2, D1, R2, L1, D4, R1, D2, L1, U4, R4, D3, L2, U1, L2, D2, R1, U1, L1, U1, R1, D1, R1, U2, D1, L2, U2, R2.
 Left, Right, Up, and Down are abbreviated as L, R, U, and D.
Make the following moves to get in the position shown in the screenshot (3): D3, R2, U3, R2, D2, R1, D1, L5, U2, R1, U1, R3, U2, L1, U2, R1, D6, R1, D1, L4, R3, U3, L6, D4, R1, U1, L1, U1, R1, L1, U2, R6, D3, L4, U2, D1, L2, U2, R3.
 Left, Right, Up, and Down are abbreviated as L, R, U, and D.
Make the following moves to get the solution shown (4): L3, D4, R1, U1, L1, U1, R1, D1, R1, U2, D1, L2, U2, R2, D3, R4, U6, L4, D2, U1, L2, U1, R5, U1, R1, D6, R1, D1, L5, U1, L2, D2, R1, U1, L1, U1, R1, D1, R1, U1, L2, U3, D4, R6, U6, L7, D1, R2, U1, R1, D1.
Return to the cemetery.
 Select the red amulet in the lower left corner (F).
Locate the 7 runes.
You will receive MARTIN'S MEDALLION.
Look at the ground by the pillars for a mini-game (G).
 Rotate the arrows so they all point to the center.
Click on an arrow to rotate it; doing so may affect other arrows.
Click on the following arrows, H x 3, I x 2, and J x 3.
Look at the pillar that rises and place the 3 STONE RINGS into the circle for a mini-game.
 Rotate the rings to put the correct symbols in alignment.
Alternate black and white as well as the number of sides, but have a similar quality like a dot in the center (K).
Enter the passageway.
 Take the UNLIT TORCH (A).
Take the GAFF (B).
Walk forward.
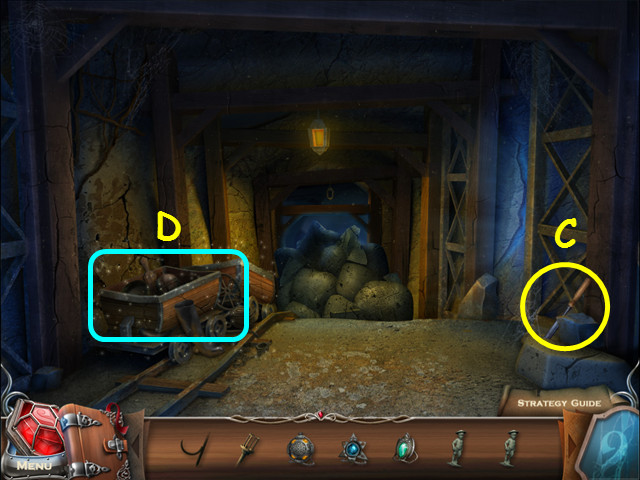 Take the CHISEL (C).
Select the mine car for a HOS (D).
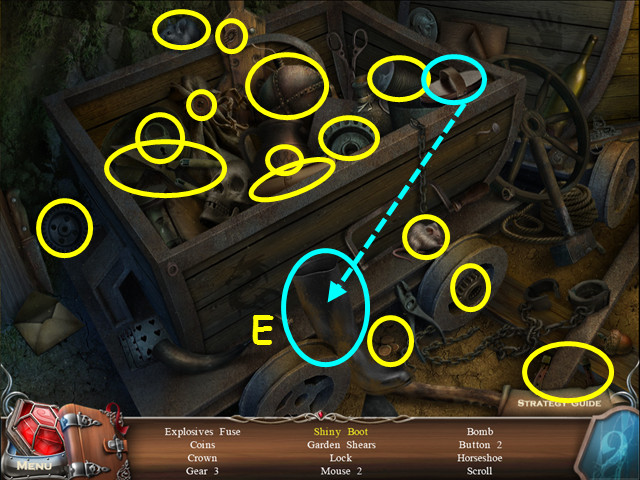 Locate all the items on the list.
Use the shoe-brush on the boot to make the shiny boot (E).
You will earn the FUSE.
Walk down 4 times and enter the archway.
 Use the UNLIT TORCH on the barrel to get the TORCH WITH RESIN (F).
Walk down, then go to the second level of the bell tower.
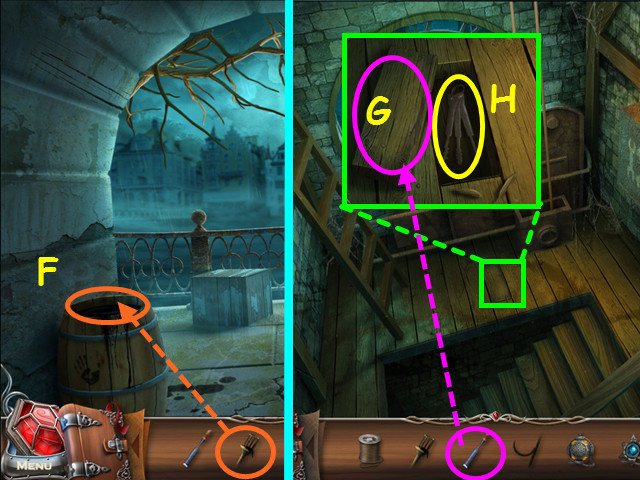
Look at the floor and use the CHISEL on the board (G).
Take the LOCKPICKS from the hole (H).
Return to the blacksmith's shed.
 Use the LOCKPICKS on the safe (I).
Take the BARREL of GUNPOWDER (J).
Return to the cemetery and enter the underground.
Use the TORCH with RESIN on the wall torch to get the LIT TORCH (K).
Note the Staff of Asclepius (L).
Walk forward.
 Look at the rubble and place the BARREL of GUNPOWDER on the ground (M).
Use the FUSE on the barrel (N).
Use the LIT TORCH on the fuse (O).
Walk forward.
 After talking to Hederik (P), you will receive HEDERIK'S SEAL.
Look in the mine car and take the WRENCH (Q).
Walk forward.
 Take the GOLDEN SNAKE (R).
Take the STONE TILES (S).
Walk down 5 times.
 Look at the bench and place HEDERIK'S SEAL in the niche (T).
Take the 3rd STATUETTE (U).
Return to the second level of the church tower.
 Look at the lock box and use the WRENCH on the bolt (V).
Take the OILCAN (W).
Return to the scene with Hederik.
 Note the waterwheel axle (X).
Look at the platform to the right of the water wheel and place the STONE TILES atop the others (Y).
Select the panel that opened for a mini-game (Z).
 Move the weights from the left to the right platform.
Move one weight at a time; weights cannot be placed on a smaller weight.
Drag the weight you wish to move to another platform.
Labeling the 3 platforms A, B, and C, move the top weight in the stack in the order below.
A to C, A to B, C to B, A to C, B to A, B to C, A to C, A to B, C to B, C to A, B to A, C to B, A to C, A to B, C to B, A to C, B to A, B to C, A to C, B to A, C to B, C to A, B to A, B to C, A to C, A to B, C to B, A to C, B to A, B to C, A to C.
Look at the water wheel and use the OILCAN on the gears.
Walk forward.
 Look in the crate and take the 4th STATUETTE (D).
Look at the control for a mini-game (E).
 Rotate the tiles to create 2 vertical pathways so the lever can go down.
Clicking on 1 of the inner 9 tiles will cause the surrounding tiles to rotate around it.
Click on the following locations: H x 3, G x 4, F, I, J, K, G, K, G, F, I x 3, F x 3, G x 2, K x 7, I, Gx6, and Fx2.
Walk through the right archway.
 Select the red amulet in the lower left corner (L).
Locate the 6 runes.
 Note the newly formed bridge (M).
Take the PICKAXE (N).
Select the chest for a HOS (O).
 Locate all the items on the list.
You will earn the CABINET KEY.
Walk forward across the bridge.
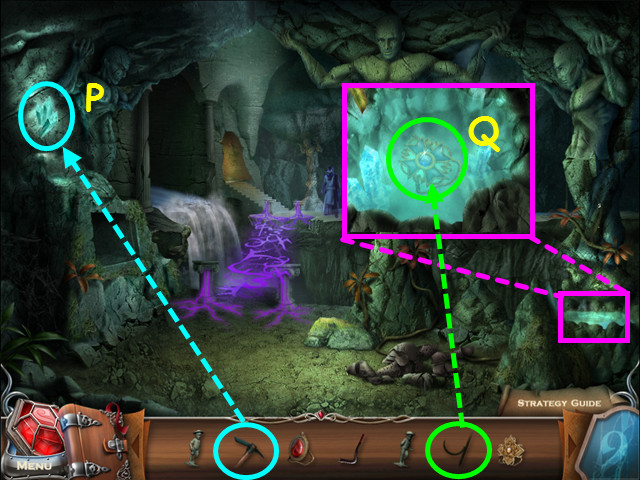 Use the PICKAXE to get the 1st GLOWING CRYSTAL (P).
Look in the pool; use the GAFF to retrieve CHARLES' MEDALLION (Q).
Walk down, right, then go forward.
 Look at the cabinet and use the CABINET KEY on the lock (R).
Look inside the cabinet and take the GOLDEN GOBLET (S).
Walk down, right, go forward twice, then down once more.
 Use the PICKAXE to get the 2nd GLOWING CRYSTAL (T).
Walk down 3 times.
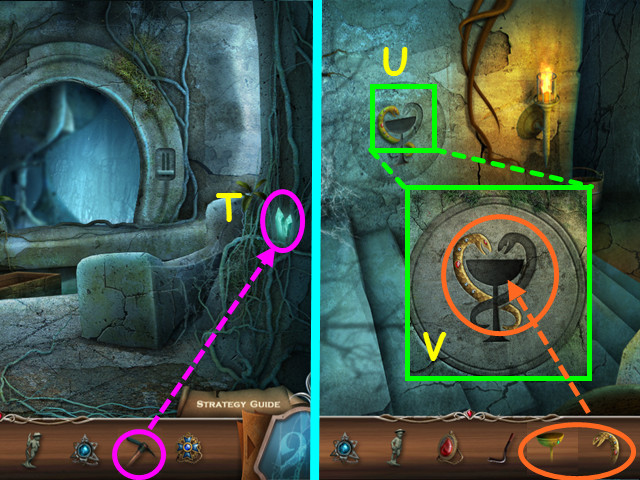
Look at the Staff of Asclepius on the wall (U).
Place the GOLDEN SNAKE and the GOLDEN GOBLET in the indentations for a mini-game (V).
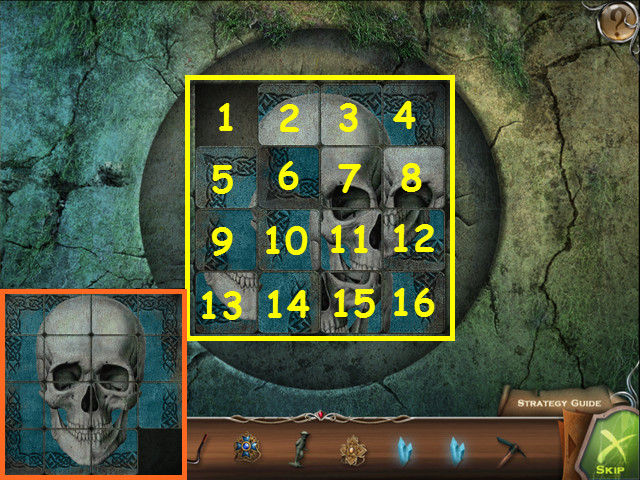 Restore the mosaic by sliding the tiles into position.
Click on a tile to slide it into the adjacent empty spot.
This mini-game is randomized- your solution may vary.
Click on the tiles in this order:
5-9-10-6-7-11-15-14-13-9-5-1-2-3-4-8-12-11-15.
16-12-8-7-11-15-16-12-8-4-3-2-1-5-9-13-14-15-16-12.
8-7-6-5-9-1-14-13-9-5-6-10-11-12-16.
15-14-13-9-5-1-2-3-4-8-7-6-10-11-12-8-7-6-10-11.
12-8-4-3-2-1-5-9-13-14-15-16-12-8-7-11-1.
9-13-14-15-16-12-8-4-3-2-1-5-6-10-11-15-14-13-9.
5-1-2-3-4-8-12-11-9-5-6-10-9-5-6-10-11-12.
Take the SKULL from the compartment that opens.
Exit the close-up then walk down 3 times to the village center and look at the fountain.
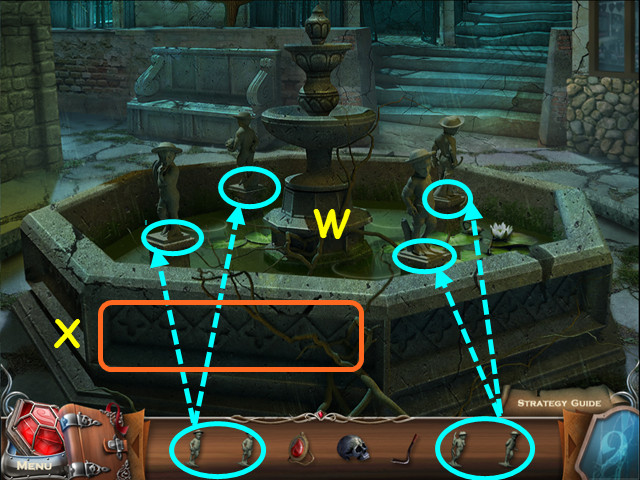 Place the 4 STATUETTES on the 4 pedestals in the fountain (W).
Look at the front panel of the fountain for a mini-game (X).
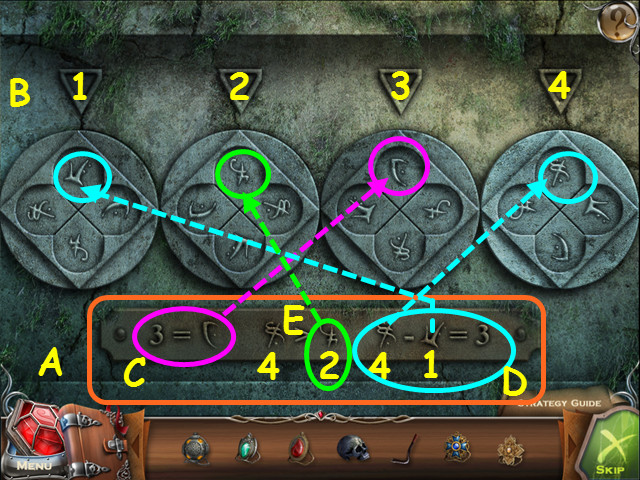 Solve the equations at the bottom (A) and turn the upper dials to the correct symbol (B).
The first equation tells us what symbol equals 3, so turn the 3rd dial to that symbol (C).
The third equation has a symbol subtracted from another to equal 3. Since we already have the symbol for 3, these two symbols must be 4 and 1 so change the 1st and 4th dial to these symbols (D).
Process of elimination gives us the second symbol (E).
Click on the fountain to collect the SYMBOL of LIFE.
Return to the scene with Hederik.
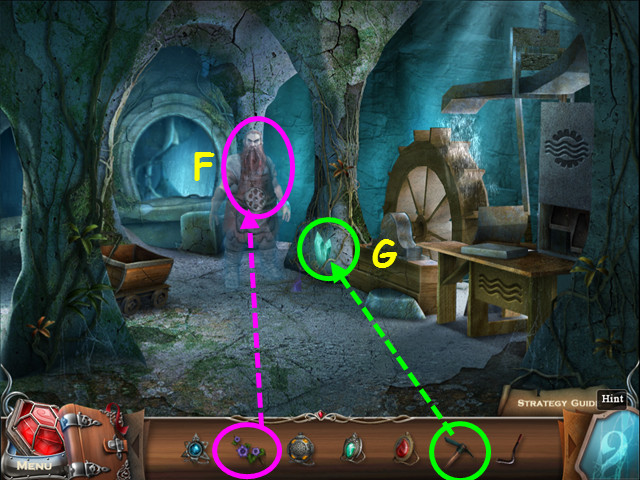 Give the SYMBOL of LIFE to Hederik (F).
You will receive HEDERIK'S MEDALLION.
Use the PICKAXE to take the 3rd GLOWING CRYSTAL (G).
Walk forward then enter the left opening.
 Look at the pillar in the center of the room for a mini-game.
Rotate the stone rings to create a path down the center.
Click on the rings to turn them; clicking on a ring will affect other rings.
Click on the following rings: H x 2, J x 1, K x 2, I x 2, H x 2, and L x 1.
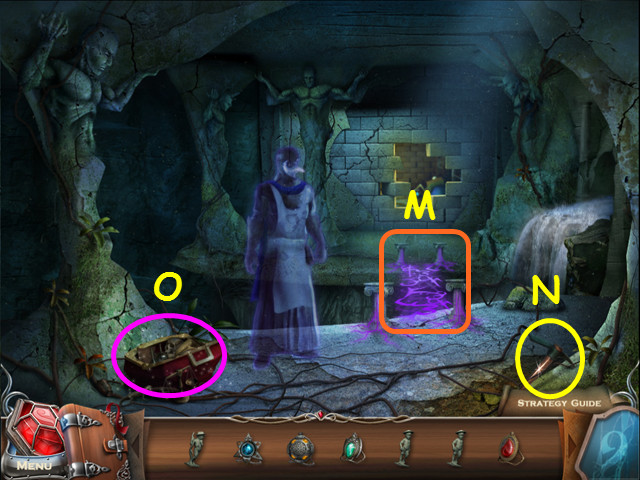
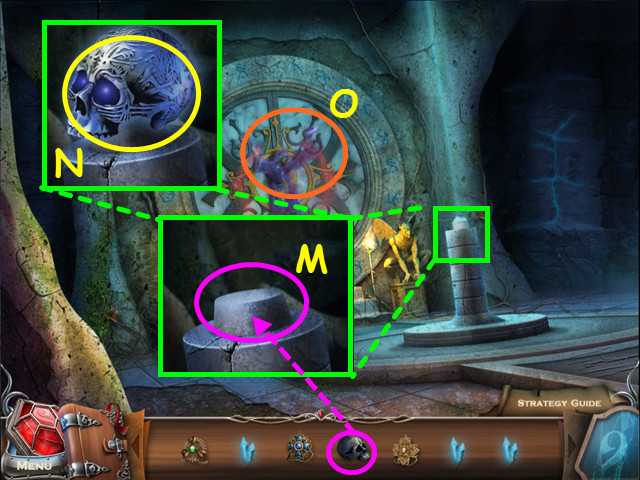 Look at the column and place the SKULL on top (M).
Once the purple energy goes into the skull, look at the column again and take the SYMBOL of DEATH (N).
Walk forward to Arckivius (O).
 Place the 3 GLOWING CRYSTALS in to the 3 holes (P).
Note the right square (Q).
Select the left square for a mini-game (R).
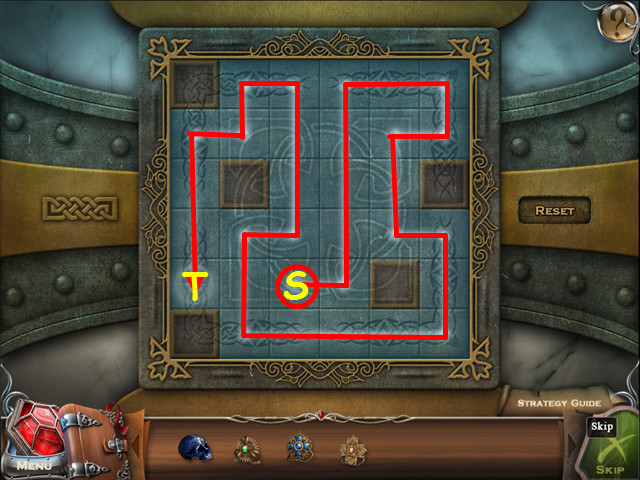 Fill in all the rows with light.
Click on a square then go in any direction; light will stop only when it meets an obstruction.
Click on the starting square (S) and follow the path to the end (T).
Select the right box for another mini-game.
 Fill in all the rows with light.
Click on a square then go in any direction; light will stop only when it meets an obstruction.
Click on the starting square (U) and follow the path to the end (V).
You will receive ARCKIVIUS' MEDALLION.
Walk down and go through the right arch.
 Give the SYMBOL of DEATH to Lorenzo (W).
You will receive LORENZO'S MEDALLION.
Walk down 12 times then go forward to the great hall and look at the table.
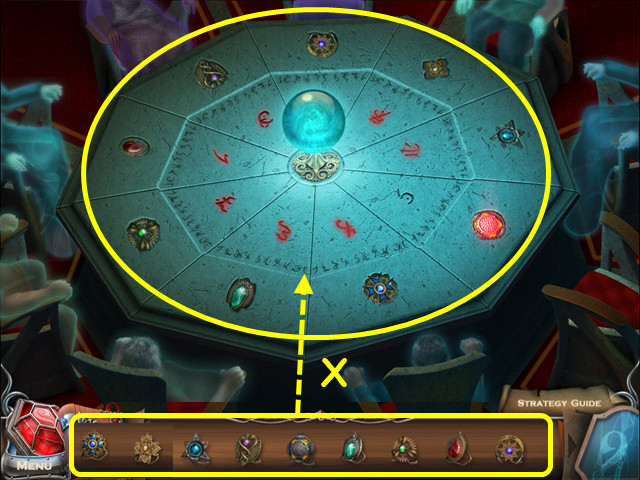 Place each of the 9 MEDALLIONS into the table indentations (X).
You will hear from each guardian as you place them.
Return to the table after the cut-scene and place the next MEDALLION.
Walk down the stairs under the table.
 Place the ENCRYPTED BOOK of SECRETS on the pedestal (A).
Click on the '9' panel to open it (B).
Look inside the panel and take the MAGIC GLASS (C).
Use the MAGIC GLASS on the book (D).
 Move the magic glass back and forth to reveal the text and picture (E).
Move the glass until it is taken away from you.
Note the highlighted symbols on the left (F).
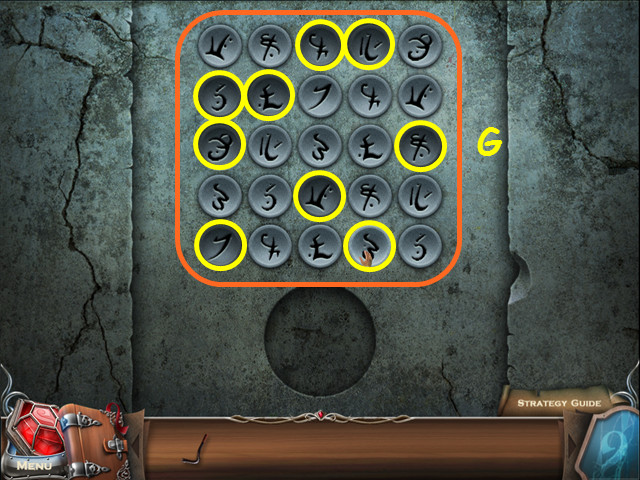 Look inside the panel and press the symbols that were highlighted in the book (G).
The glass will break around the artifact.
 Select the red amulet in the lower left corner (H).
Locate the 7 runes.
Take the DARK SIDE ARTIFACT (I).
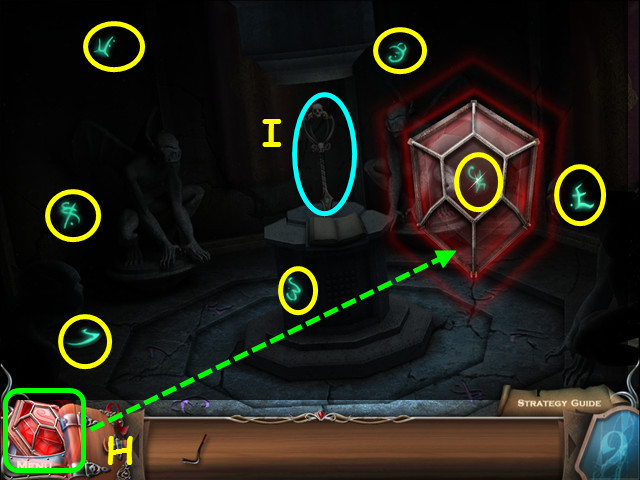
Return to the round door in which you placed the 3 glowing crystals.
 Use the DARK SIDE ARTIFACT on the dragon (J).
You cursor will look like the artifact (K).
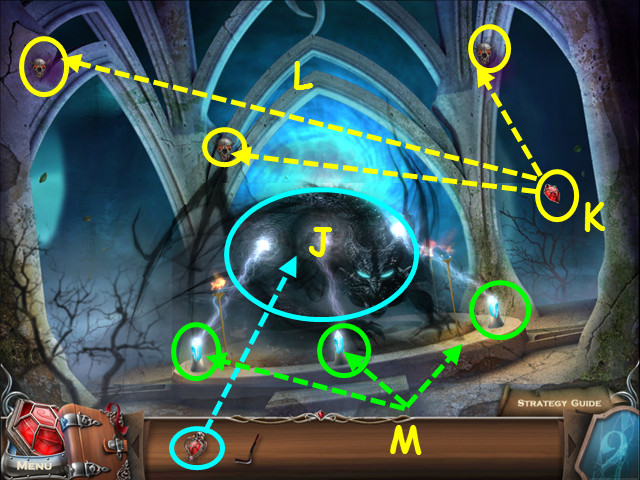
Click on the flying skulls to destroy them (L).
One you destroy a wave of flying skulls, one of the crystals will start zapping the dragon (M).
There are 3 waves of flying skulls to destroy.
Note – the dragon sometimes can be defeated by clicking on the 3 crystals.
Congratulations! You have completed 9: The Dark Side.
No comments:
Post a Comment