
Welcome to the Shattered Minds: Masquerade Walkthrough
Stop the villainous Visage from ruining Mardi Gras in Shattered Minds: Masquerade, an incredible Hidden Object Puzzle Adventure game!
Whether you use this document as a reference when things get difficult or as a road map to get you from beginning to end, we’re pretty sure you’ll find what you’re looking for here.
This document contains a complete Shattered Minds: Masquerade game walkthrough featuring annotated screenshots from actual gameplay!
We hope you find this information useful as you play your way through the game. Use the walkthrough menu below to quickly jump to whatever stage of the game you need help with.
Remember to visit the Big Fish Games Forums if you find you need more help. Have fun!


This walkthrough was created by prpldva, and is protected under US Copyright laws. Any unauthorized use, including re-publication in whole or in part, without permission, is strictly prohibited.
 This is the official guide for Shattered Minds: Masquerade Standard Edition.
Hidden Object Scenes and mini-games are often randomized - your solution may vary.
Hidden Object Scenes will be referred to as HOS in this walkthrough.
Objects listed in green require you to combine items, while objects listed in yellow are hidden inside a box or other items.
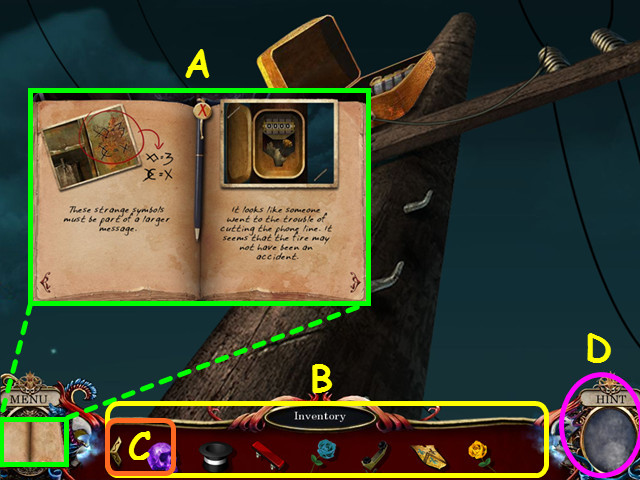
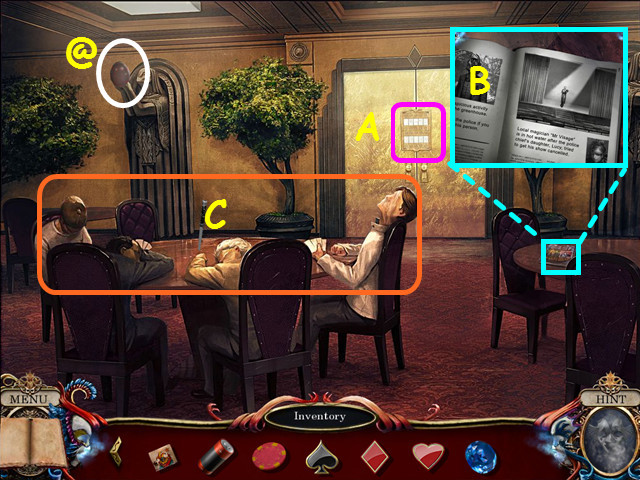
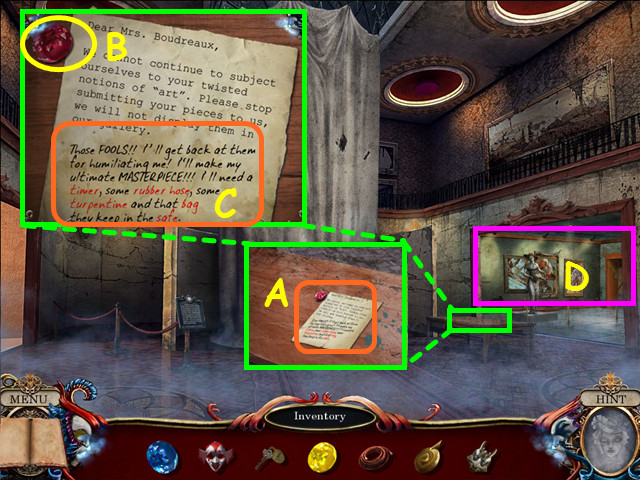
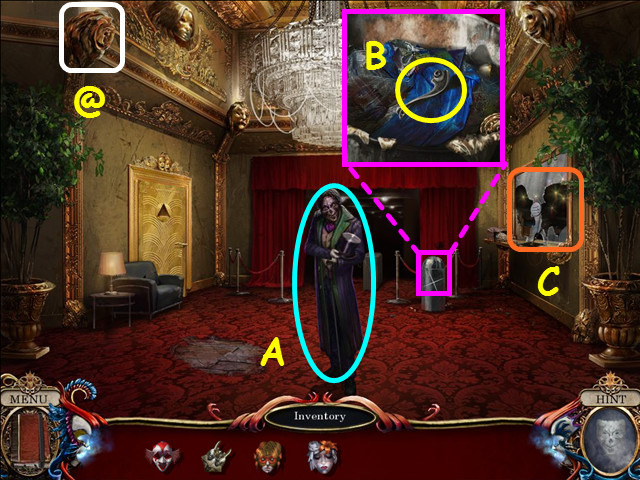
Inside the journal you will find the clues and information you have found (A).
Your inventory is in the bottom panel - click on an item to select it for use (B).
Use the arrows to scroll through the inventory (C).
Hints are unlimited, but you must wait for the hint meter to recharge (D).
There are morphing/changing objects throughout the game, find them to unlock extra bonus material.
 You will have the option of some interactive help.
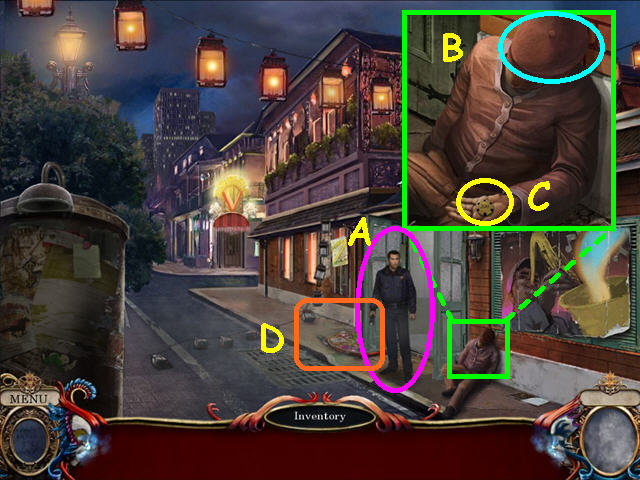
Talk to Officer Lafayette (A).
Look at the man on the sidewalk and remove his hat (B).
Open his hand and take the 1/5 $200 GOLD CHIP (C).
Select the decoration on the sidewalk for a mini-game (D).
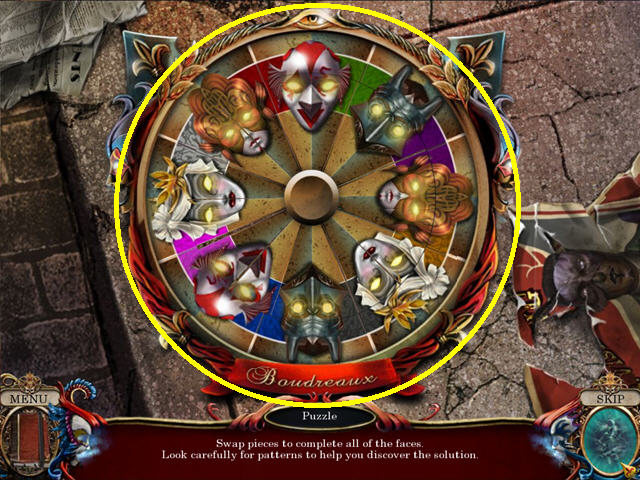 Swap pieces until all the masks are intact.
Click on 2 mask pieces to swap position.
There are 2 of each mask, so note the color bands they sit upon.
The mask eyes will glow when correctly placed.
Walk forward.
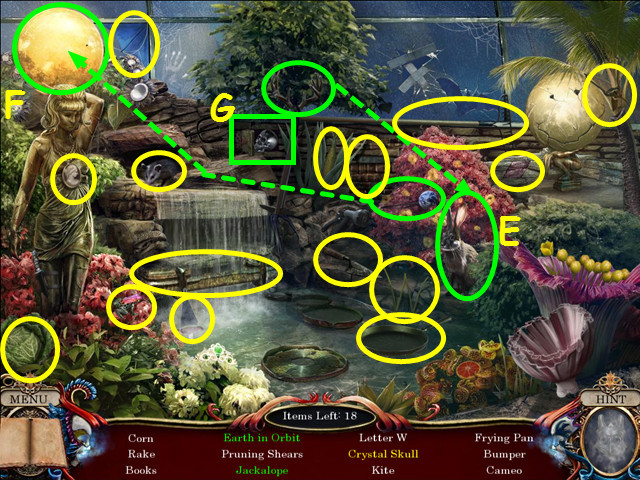
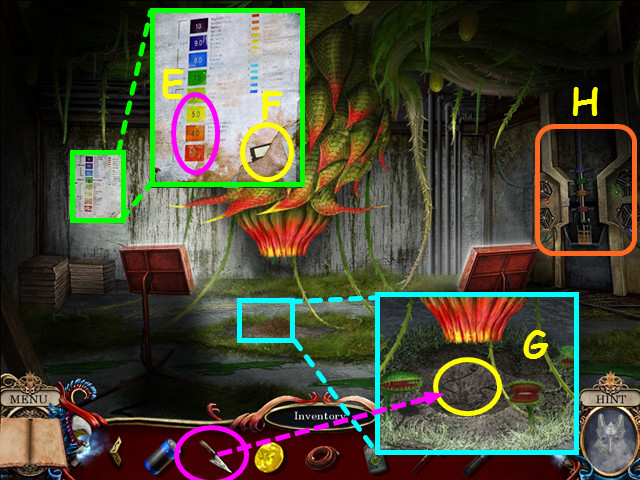
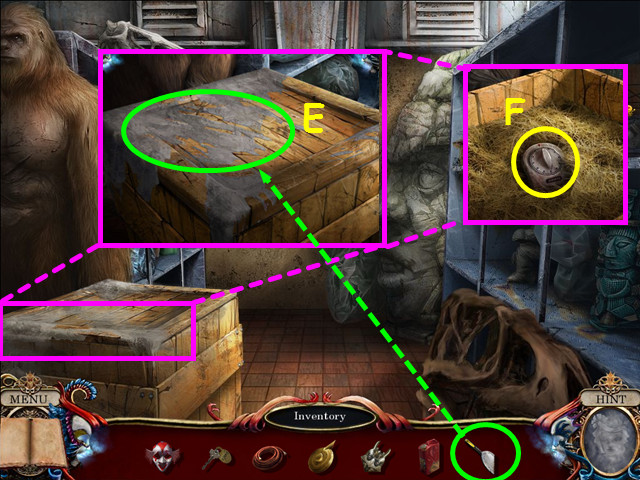
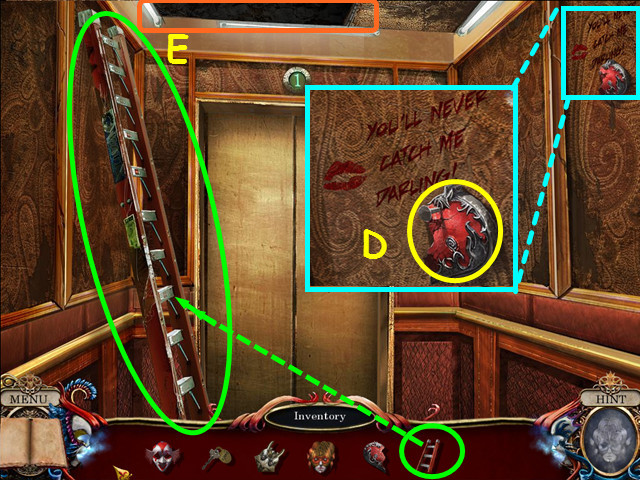
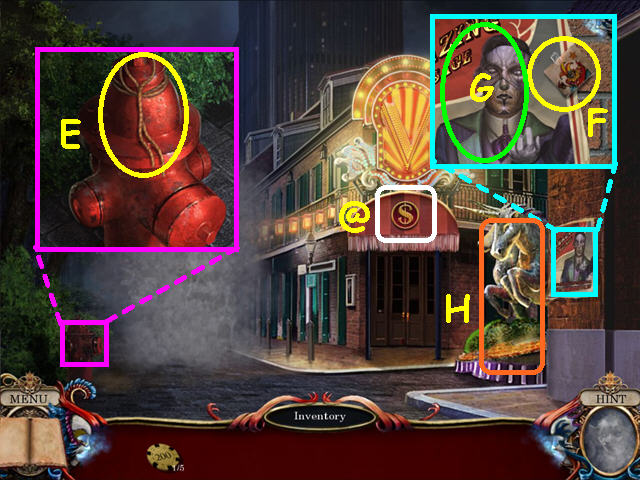 Look at the fire hydrant and take the TWINE (E).
Find the 1/20 Illusion Object (@).
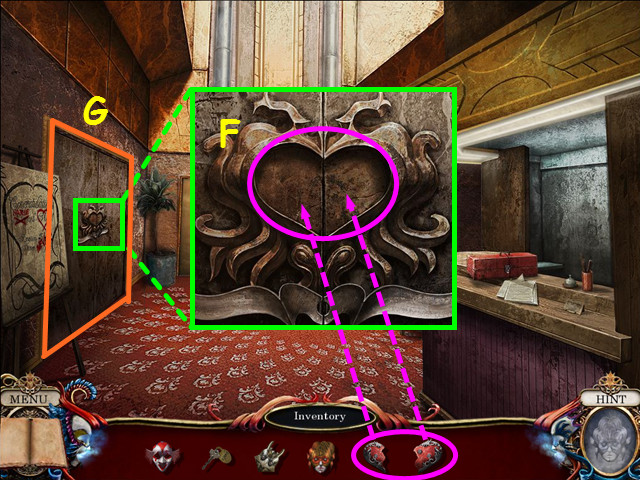
Look at the poster and take the JOKER CARD TOP (F).
Make sure to click on the poster (G).
Select the unicorn float for a HOS (H).
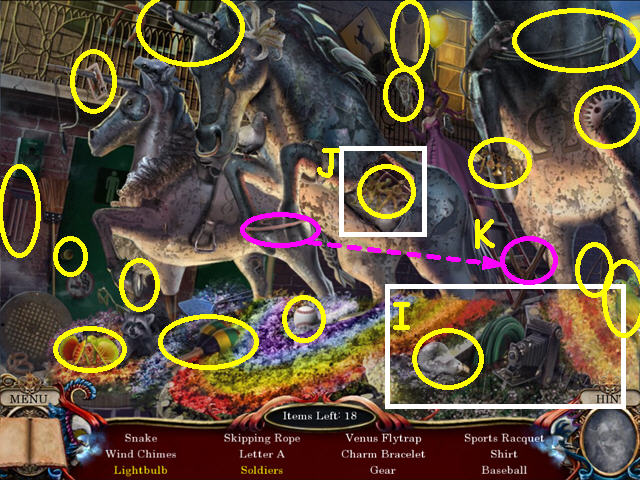 Locate all the items on the list.
You will need to open or move some items, as well as combine pieces.
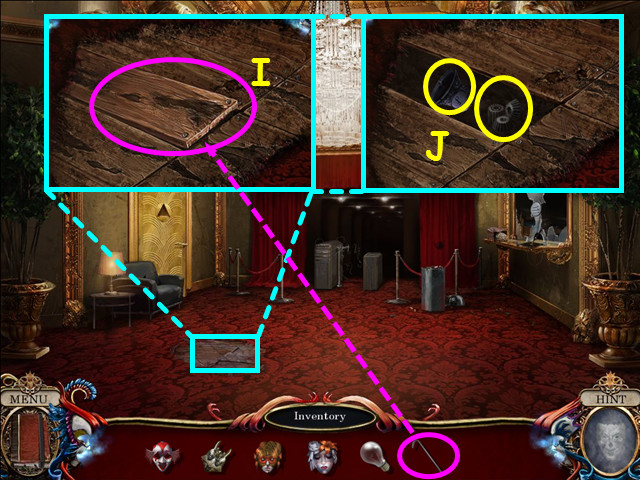
Click on the lower left flowers to remove them from the scene (I).
Open the panel on the horse (J).
Move the rubber band to the y-shaped stick to make the slingshot (K).
You will earn the LIGHT BULB.
Walk down.
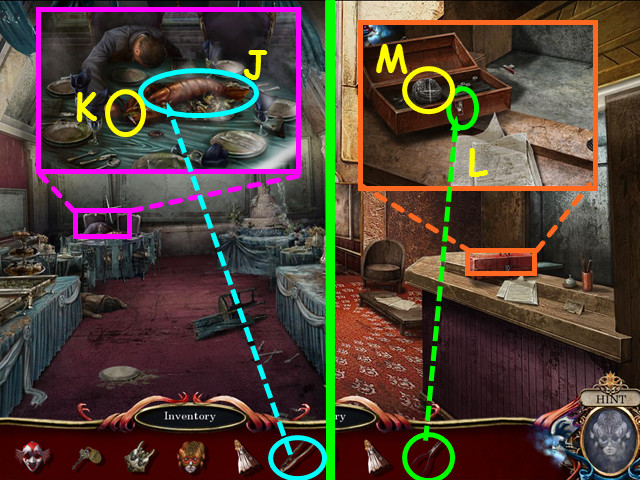
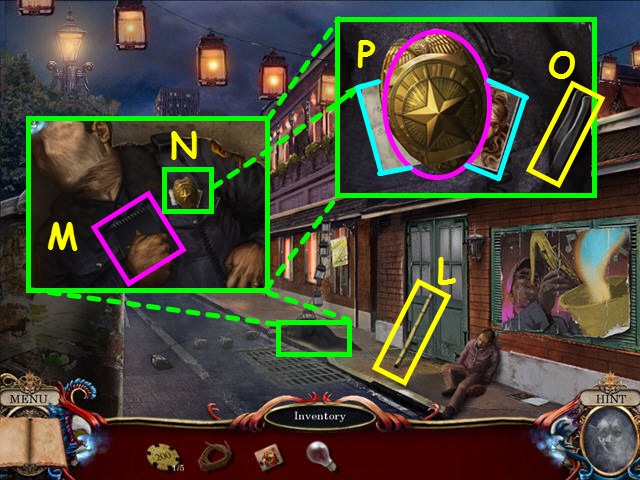 Take the BAMBOO POLE holding the doors shut (L).
Look at Officer Lafayette and read his notebook (M).
Look closer at his badge (N).
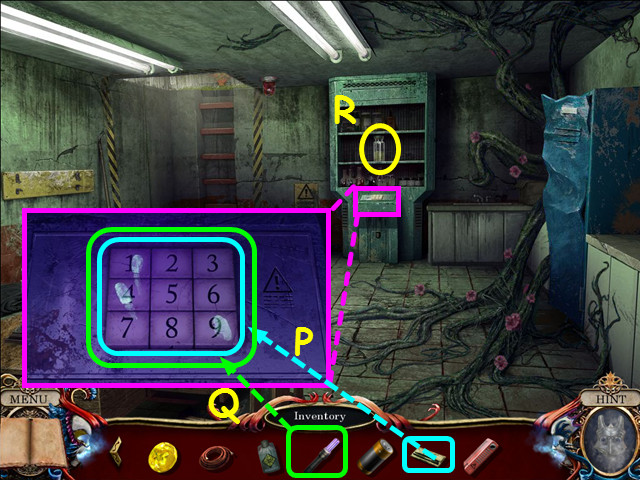
Take the TWEEZERS (O).
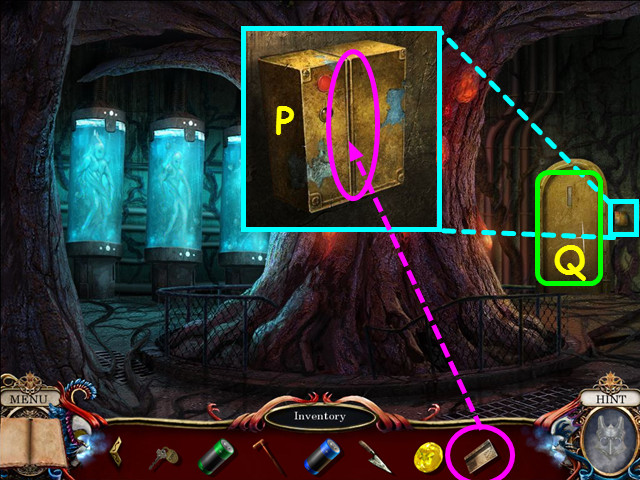
Remove the badge, then read the note (P).
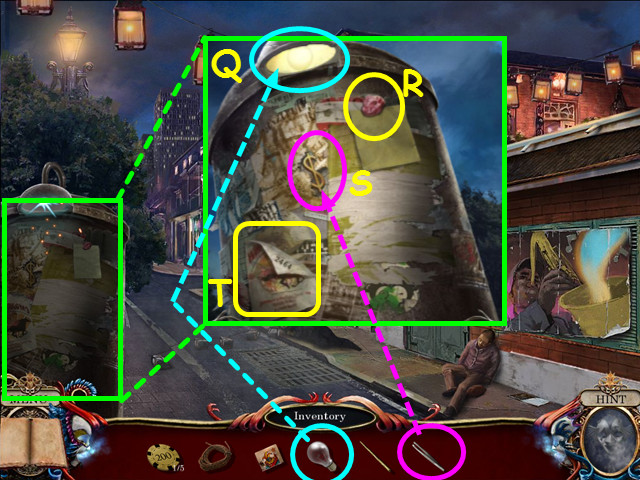 Look at the signpost and place the LIGHT BULB into the fixture (Q).
Take the CHEWING GUM (R).
Use the TWEEZERS to take the DOLLAR EMBLEM (S).
Take the poster with the code (T).
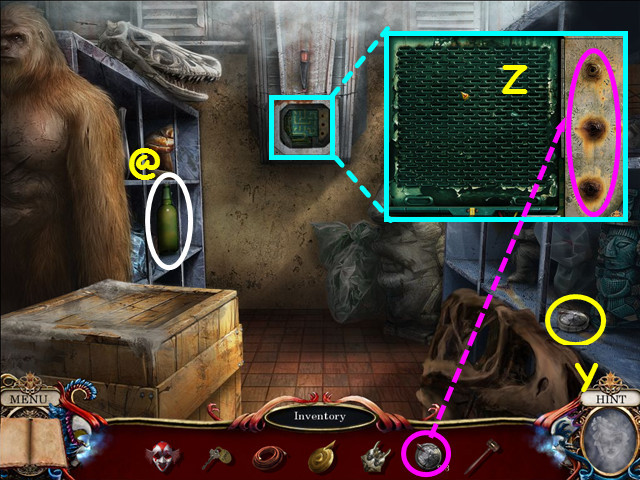
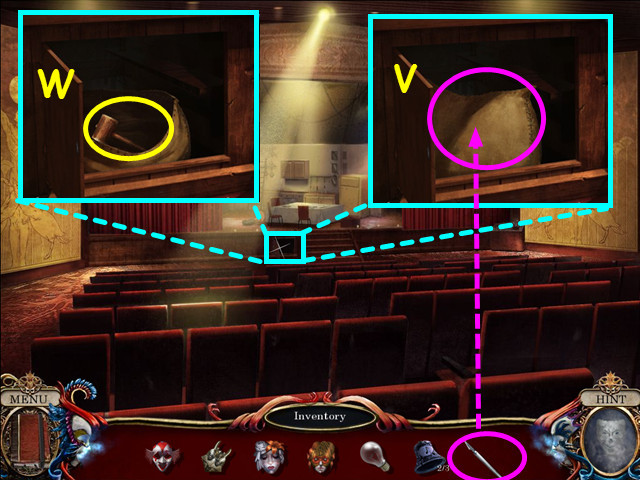
 Place the BAMBOO POLE next to the drain (U).
Place the CHEWING GUM next to the drain (V).
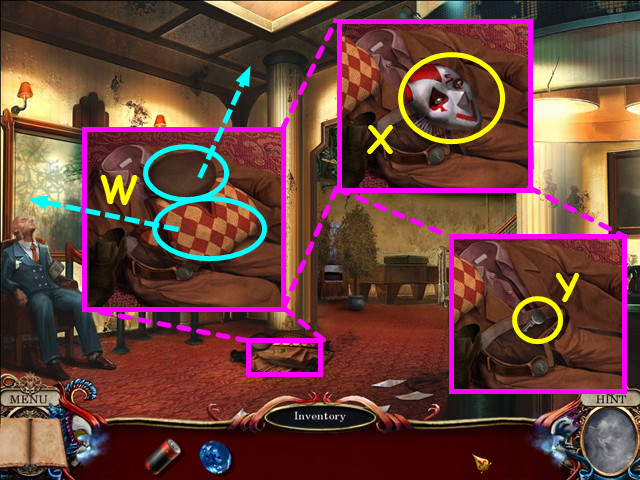
Place the TWINE next to the drain (W), then take it and use it on the bamboo pole (X).
Take the chewing gum and place it on the end of the twine (Y).
Take the 'fishing pole' and use it to retrieve the GAMBLER'S KEY (Z).
Walk forward.
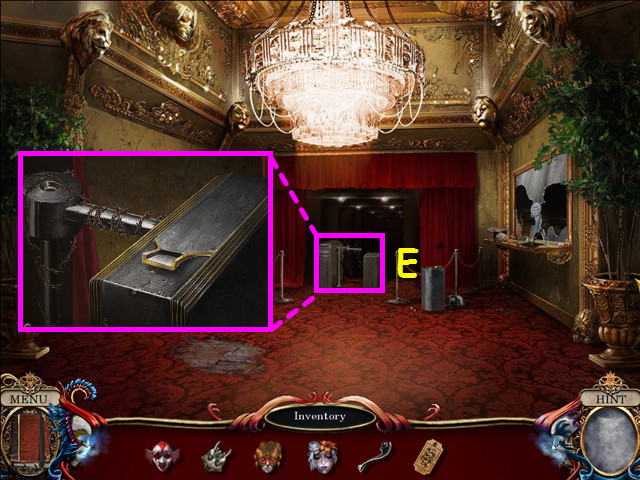
 Look at the casino door and use the DOLLAR EMBLEM in the dollar sign spot (A).
Place the GAMBLER'S KEY into the keyhole and click on the key to unlock the door (B).
Enter the casino.
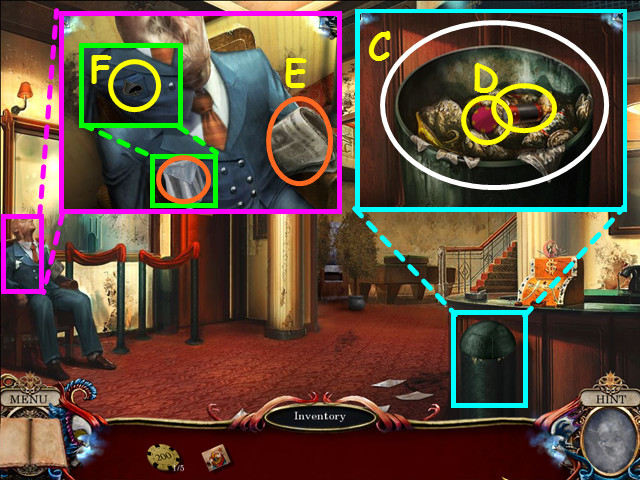 Look at the wastebasket and remove the lid (C).
Take the RED BATTERY and the SLOT TOKEN (D).
Look at the man in the chair and read the newspaper (E).
Remove the handkerchief from his pocket and take the SPADE PIN (F).
Walk forward to the stairs.
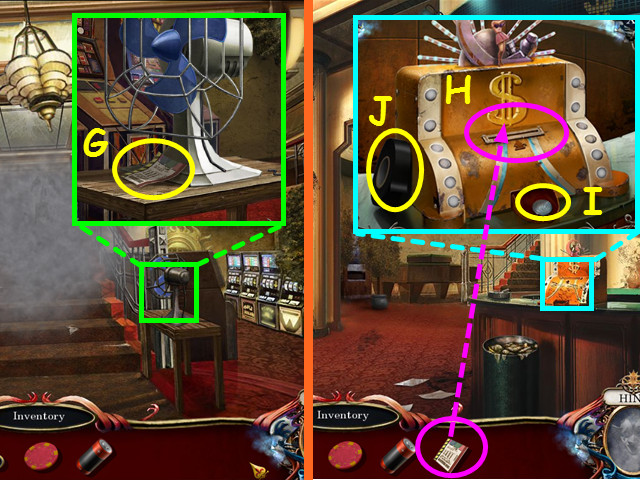 Look at the fan and take the LOTTERY TICKET (G).
Walk down to return to the lobby.
Look at the machine on the counter and use the LOTTERY TICKET in the slot (H).
Take the NICKEL (I) and the ELECTRICAL TAPE (J).
Walk forward to the stairs, then go left towards the craps table.
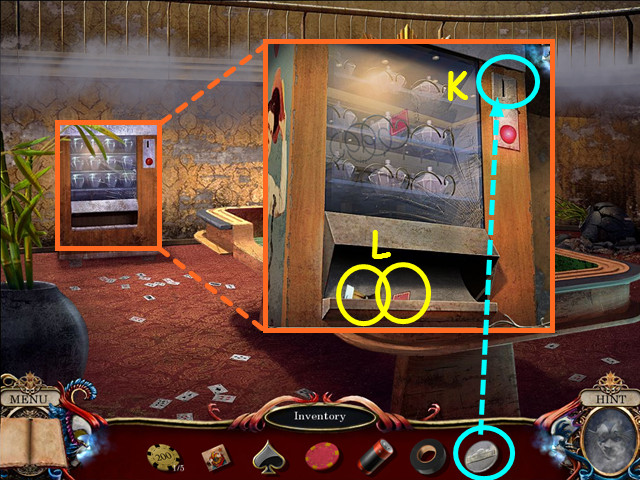 Look at the vending machine and use the NICKEL on the slot (K).
Take the MATCHES and the DIAMOND PIN (L).
Walk down, then go right towards the slot machines.
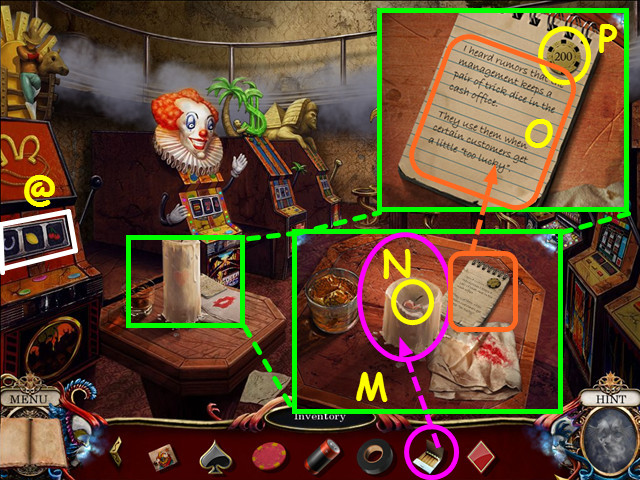 Look at the table and use the MATCHES on the candle (M).
Take the HEART PIN from inside the candle (N).
Look at the notepad and read the note about the trick dice (O).
Take the 2/5 $200 GOLD CHIP (P).
Find the 2/20 Illusion Object (@).
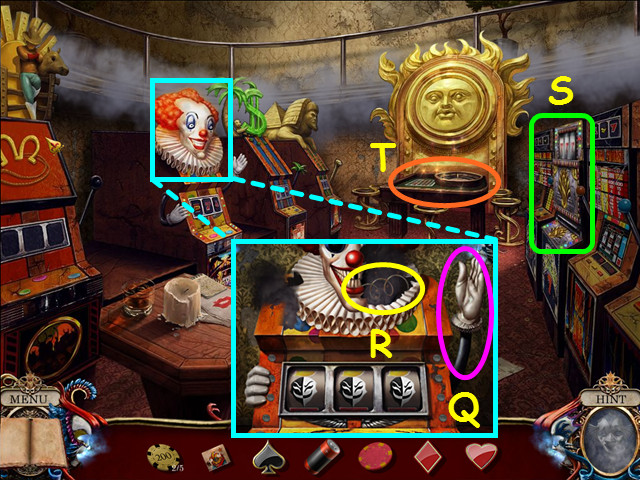 Look at the clown slot machine on the left and pull the lever (Q).
Take the COPPER WIRE (R).
Note the slot machine on the right (S).
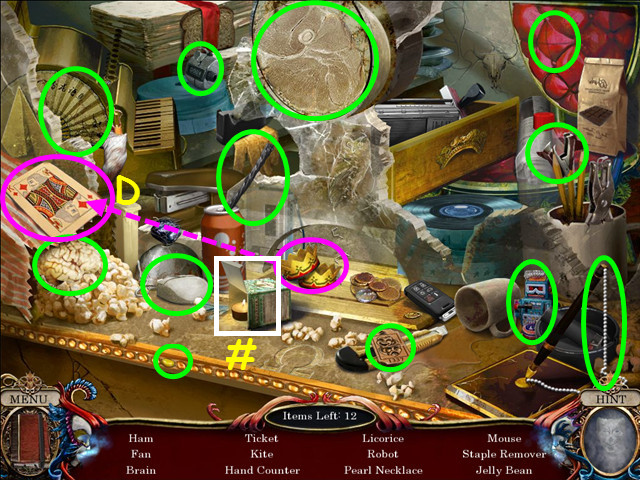
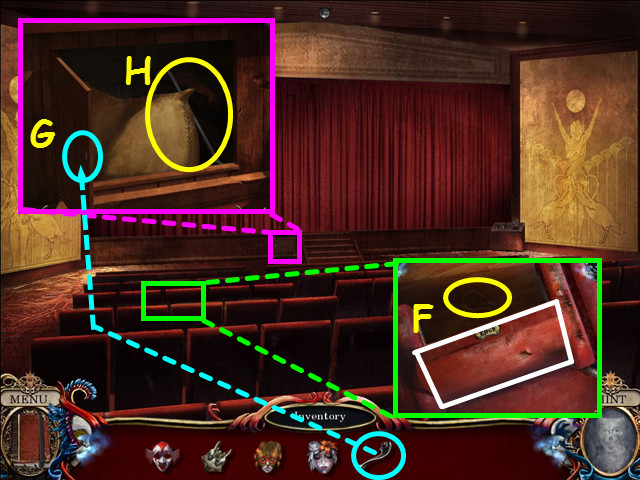
Select the roulette table for a HOS (T).
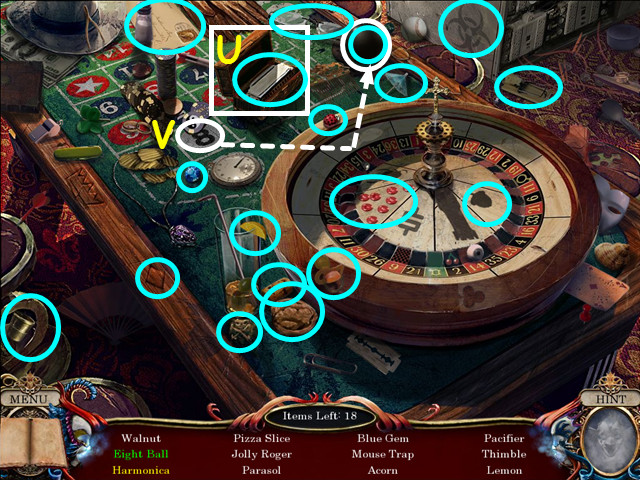 Locate all the items on the list.
Open the box to find the harmonica (U).
Drag the '8' to the ball to make the eight ball (V).
You will earn the BLUE GEM.
Walk down to the stairs area.
 Look at the fan and use the COPPER WIRE on the cut wire (W).
Use the ELECTRICAL TAPE on the wire (X).
Turn on the fan (Y).
Walk up the stairs.
 Find the 3/20 Illusion Object (@).
Note the lock on the door (A).
Look at the magazine, click on the cover, then click to 'read' the article (B).
Look at the table of players (C).
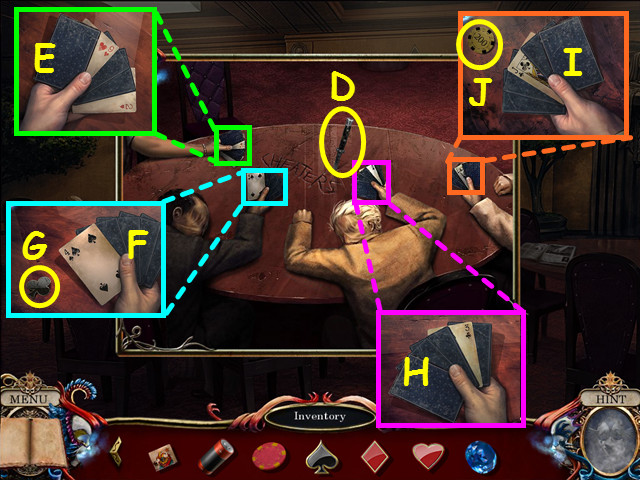 Take the SWITCHBLADE (D).
Look at the players hands from left to right.
Look at the first hand to see the second card is the 9 of Hearts and the fifth card is the 2 of Hearts (E).
Note – make sure to click on the cards so the information goes into your diary.
Look at the second hand to learn the first card is the 4 of Spades (F).
Take the CLUB PIN (G).
Look at the third hand to see the 3 of Clubs is the fourth card (H).
Look in the fourth hand to see the Jack of Clubs is the third card (I).
Take the 3/5 $200 GOLD CHIP (J).
Walk down twice to the lobby area.
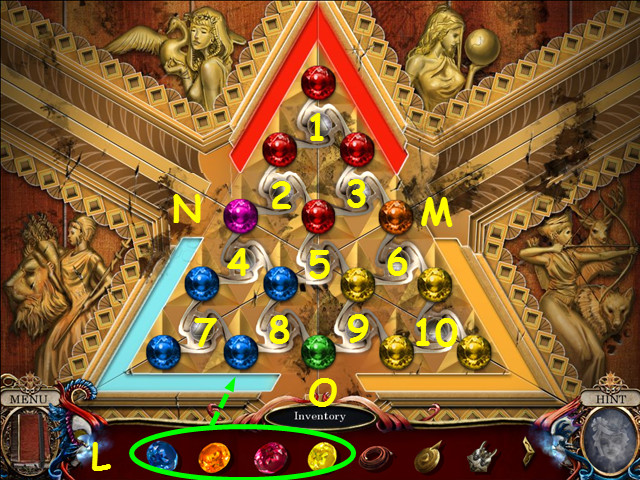
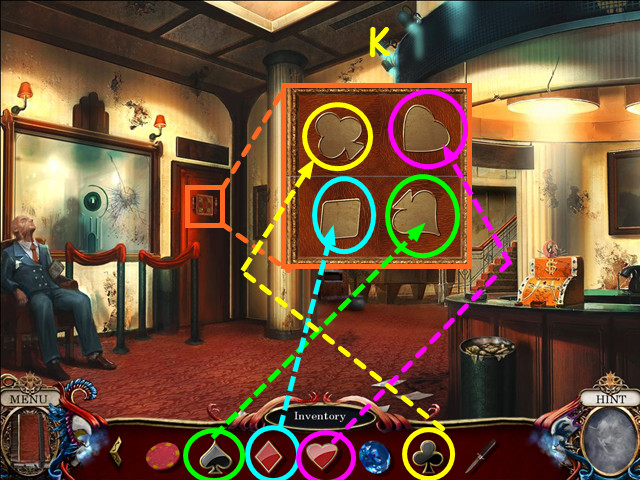 Look at the door and place the HEART PIN, CLUB PIN, DIAMOND PIN, and SPADE PIN into the suit shaped indents (K).
This will trigger a mini-game.
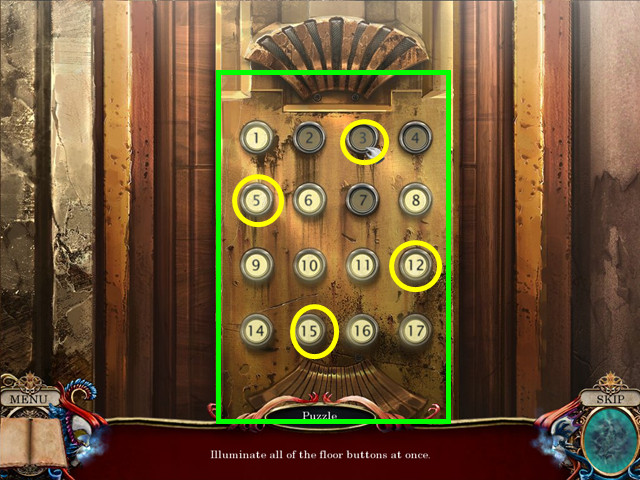
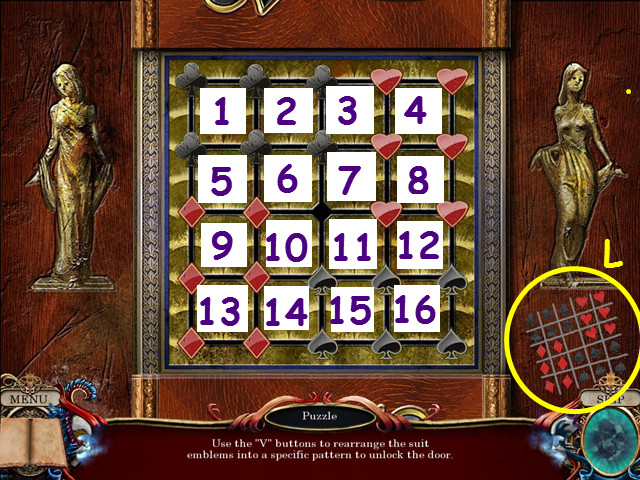 Click on the 'V' buttons to move the tiles into the position that matches the drawing on the lower right (L).
Clicking on a 'V' button will rotate the 4 surrounding tiles.
Numbering the buttons 1-16, our solution was: 1-5-5-10-10-15-15-6-10-10-2-6-3-3-4-3-12-8-11-8-15.
16-14-13-10-10-10-9-15-11-11-14-12-12-11-10-10-14.
16-16-12-15-12-11-11-11-15-11.
Enter the back room.
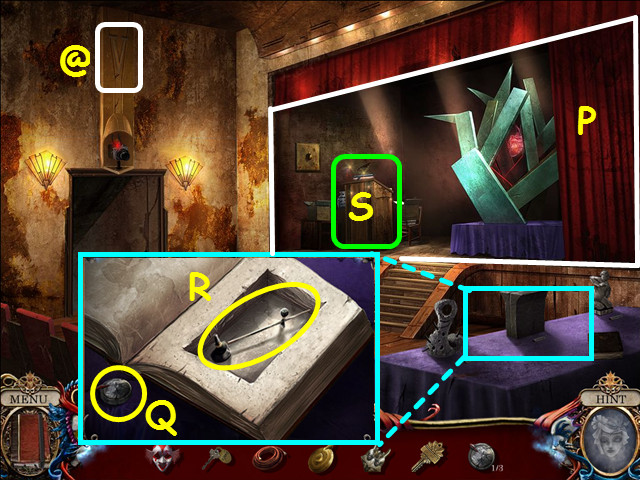
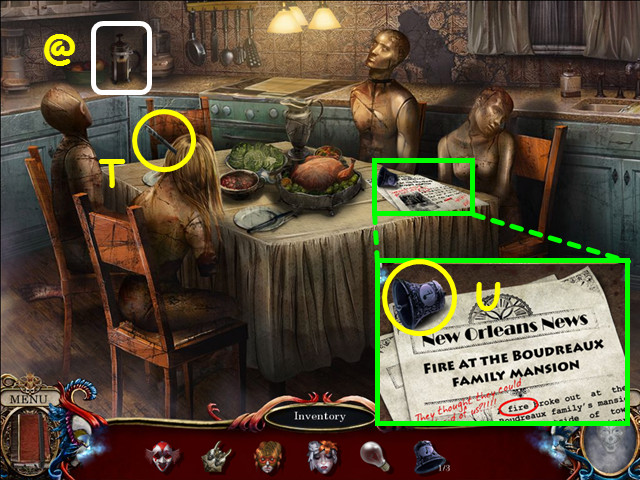
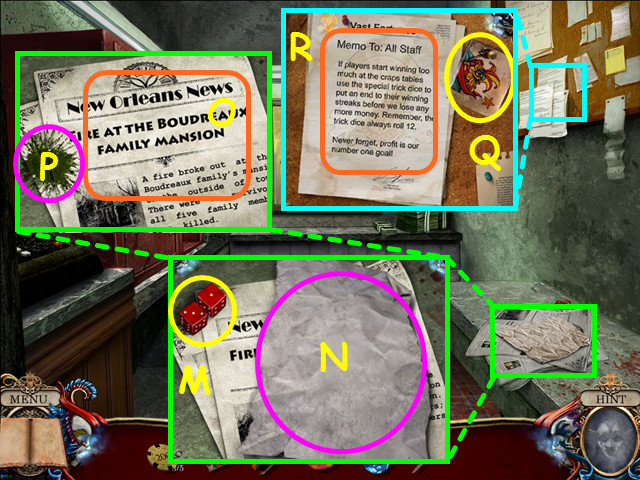 Look at the bench and take the TRICK DICE (M).
Remove the white paper (N).
Read the newspaper (O).
Note – you can squish a bug if you like (P).
Look at the bulletin board and take the JOKER CARD BOTTOM (Q).
Read the memo about the trick dice always rolling 12 (R).
 Look at the bags on the floor (S).
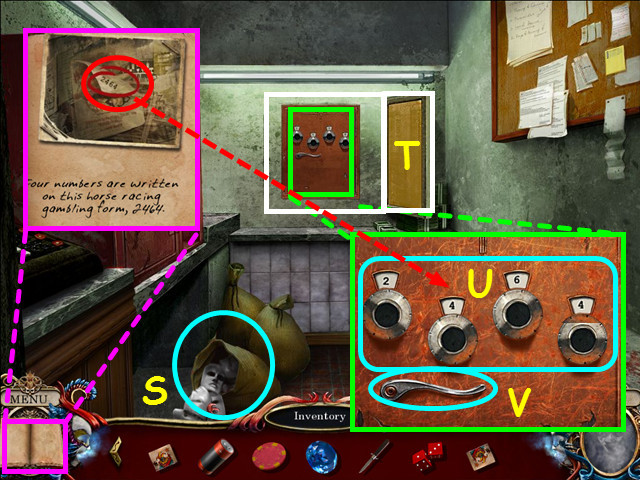
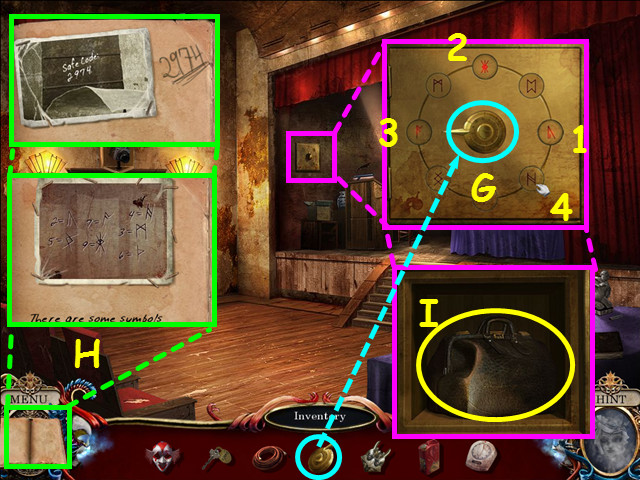
Open the unicorn painting (T).
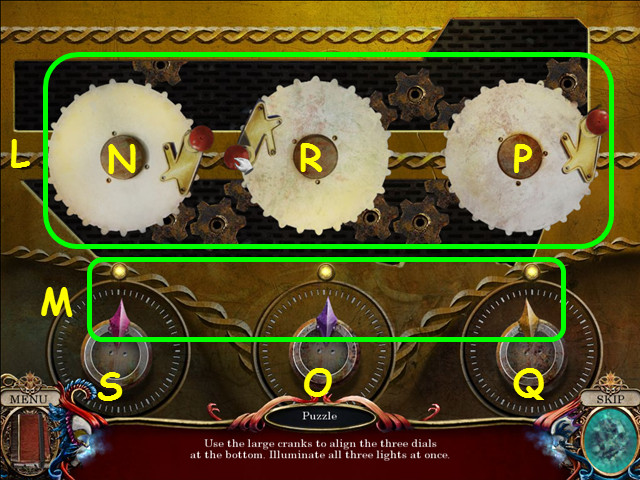
Refer to your journal for the code found on the signpost then look at the safe and enter the code using the dials (U).
Click on the handle to open the safe (V).
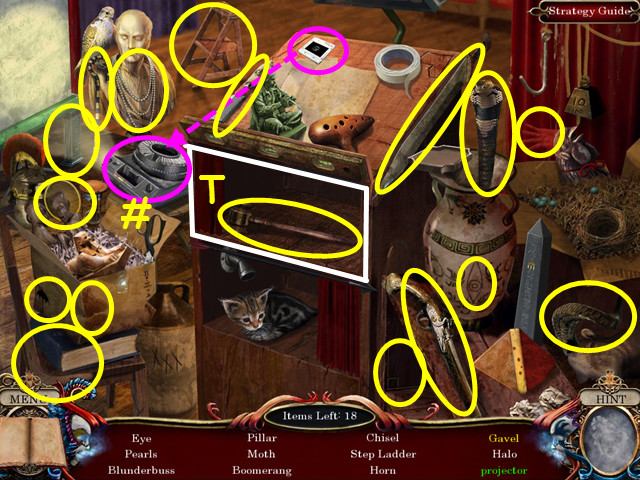
Select the inside of the safe for a HOS.
 Locate all the items on the list.
Open the bag to find the coins (W).
Open the drawer to find the crystal (X).
Open the box to find the diamond ring (Y).
Place the medal on the soldier to make the war hero (Z).
You will earn the HIGH ROLLER KEY.
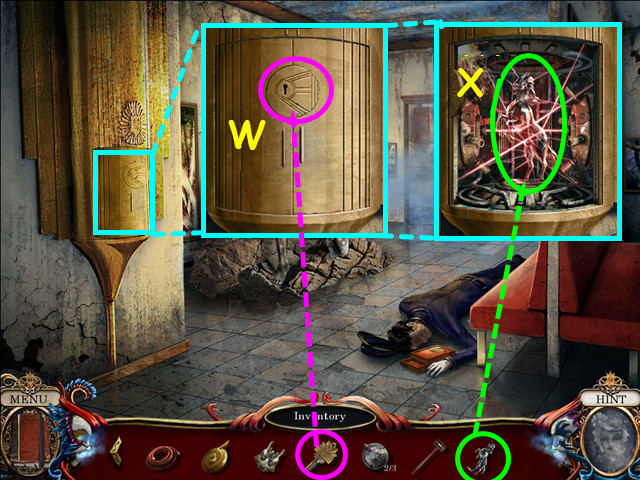
Exit the room, walk forward, go up the stairs and look at the lock on the door.
 Using the arrows, enter the correct numbers and suits (A).
Refer to your journal for the cards in the players hands (B).
When the panel opens, use the HIGH ROLLER KEY in the keyhole (C).
Click on the key to unlock the door, then walk forward.
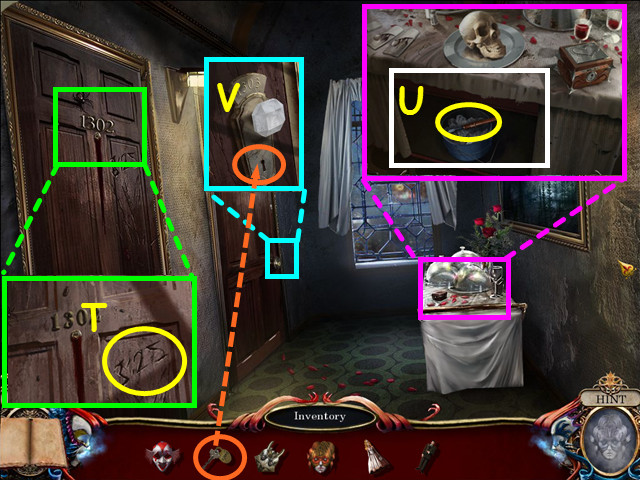
 Look at the note on the dresser top and take the 4/5 $200 GOLD CHIP (D).
Look at the lock on the wardrobe and place the JOKER CARD TOP and JOKER CARD BOTTOM into the slots (E).
Look inside the wardrobe and click on the clothing until you see the jacket with the stitched pocket (F).
Use the SWITCHBLADE on the pocket 3 times, then take the DRAWER KNOB (G).
Look at the drawer, place the DRAWER KNOB into the hole and click on the knob to open the drawer (H).
Select the open drawer for a HOS.
 Locate all the items on the list.
Open the can to find the wedding ring (I).
Open the box to find the bottle cap (J).
Place the wings on the horse to make Pegasus (K).
You will earn the SCREWDRIVER.
Exit the room and go down the stairs.
Walk right, then select the slot machine on the right.
 Use the SLOT TOKEN on the slot (L), then pull the lever (M).
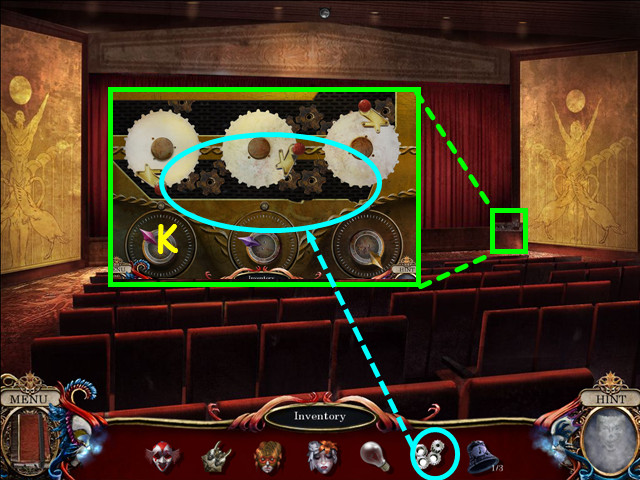
Use the SCREWDRIVER on the screws for a mini-game (N).
 Turn the gears so that all the 7s are at the top (O).
Turning one gear effects another.
Our solution was - click on the center gear once (P), then click on the right gear 3 times (Q).
 Look at the pile of chips on the floor and drag chips away 4 times (R).
Take the 5/5 $200 GOLD CHIP (S).
Exit the slot area, then walk left to the craps table.
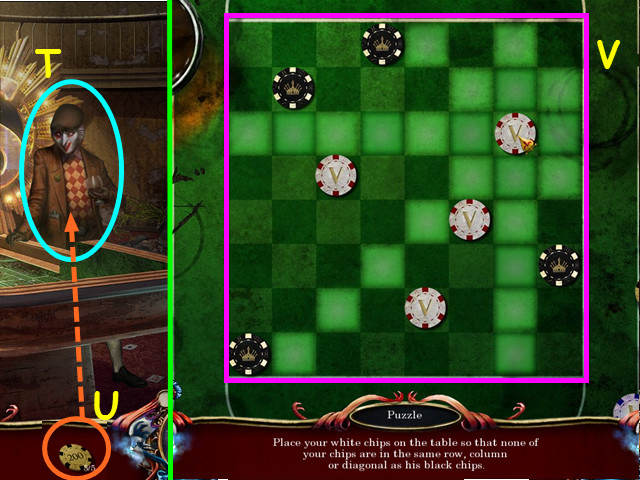 Talk to Francois Boudreaux (T).
Give the 5 $200 GOLD CHIPS to him for a mini-game (U).
Place the chips on the board so that none are in the same vertical, horizontal or diagonal line (V).
After Francois throws the dice, use the TRICK DICE on the table.
Walk down twice to the lobby.
 Look at the pile of clothing and move the hat and sweater (W).
Take the FRANCOIS MASK (X).
Take the SUITCASE KEY (Y).
Walk forward 3 times to the bedroom suite.
 Look at the suitcase and use the SUITCASE KEY on the lock (A).
Click on the key to open the case.
Take the HAMMER and the ROOM 1303 KEY (B).
Walk down 3 times to the lobby, then enter the back room.
Look at the locker and use the HAMMER on the padlock twice (C).
Remove the padlock and open the locker.
Take the GREEN BATTERY and the HEAVY DUTY WRENCH (D).
Walk down twice to exit the casino.
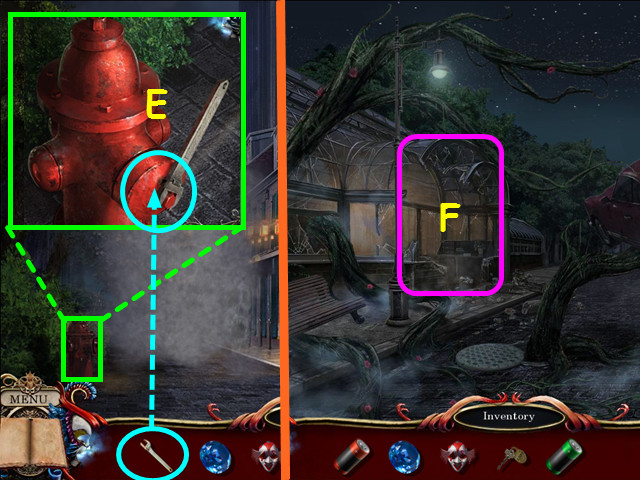 Look at the fire hydrant and use the HEAVY DUTY WRENCH on the cap (E).
Walk forward, up the street.
After the cut-scene, enter the greenhouse (F).
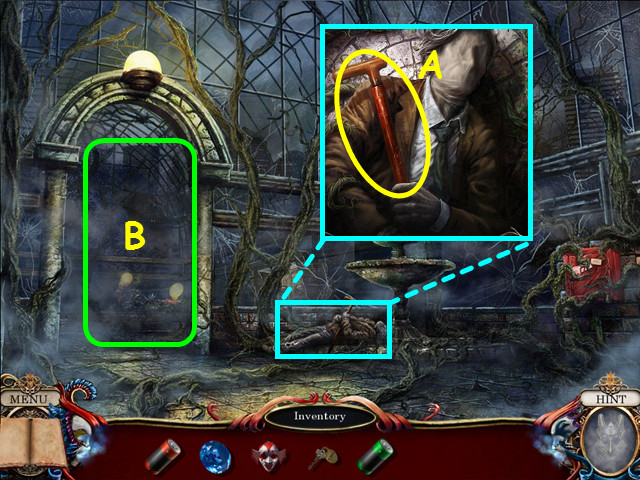 After talking to Theo Boudreaux, look at the man by the fountain and take the CANE (A).
Walk forward (B).
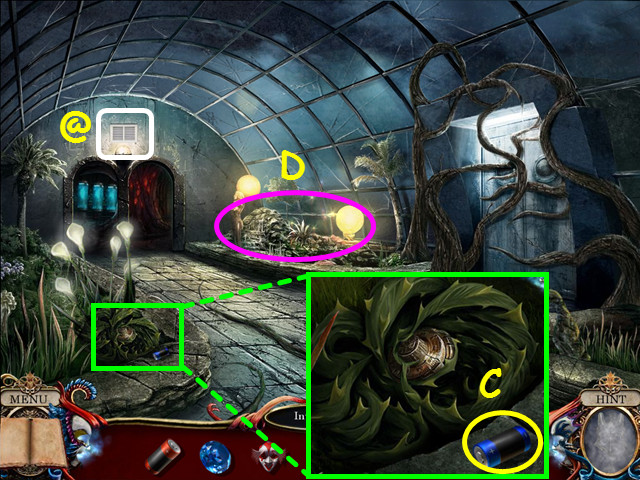 Look at the plant and take the BLUE BATTERY (C).
Find the 4/20 Illusion Object (@).
Select the waterfall area for a HOS (D).
 Locate all the items on the list.
Place the antlers on the jack rabbit to make the jackalope (E).
Place the model Earth on the Sun to make Earth in orbit (F).
Open the cubbyhole to find the crystal skull (G).
You will earn the TROWEL.
Walk forward.
 Look at the sparking tank and take the SHEARS (H).
Walk down, then use the SHEARS on the vine (I).
Take the TANK VALVE that falls to the floor (J).
Walk forward.
Look at the tank, place the TANK VALVE on the stem and click on the valve (K).
Take the MAINTENANCE KEY that falls to the ground (L).
Walk down twice to the fountain area.
 Look at the lock box on the wall and use the SHEARS to cut the 5 vines (M).
Use the MAINTENANCE KEY in the lock; click on the key then open the box (N).
Take the YELLOW GEM and the PASSCARD (O).
Walk forward twice.
 Look at the card reader to the right of the door and use the PASSCARD on the slot (P).
Enter the doorway (Q).
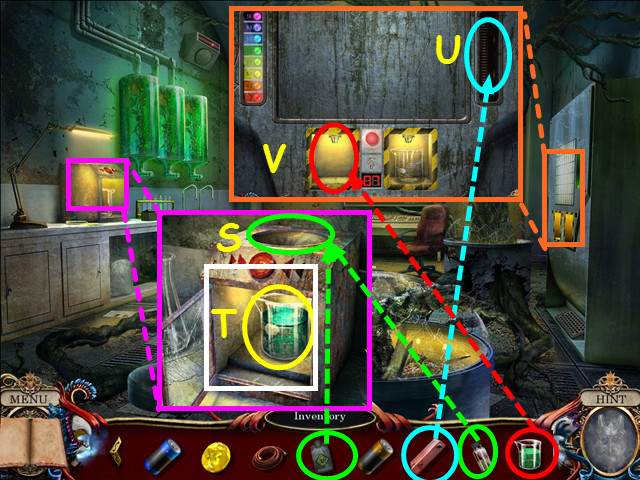
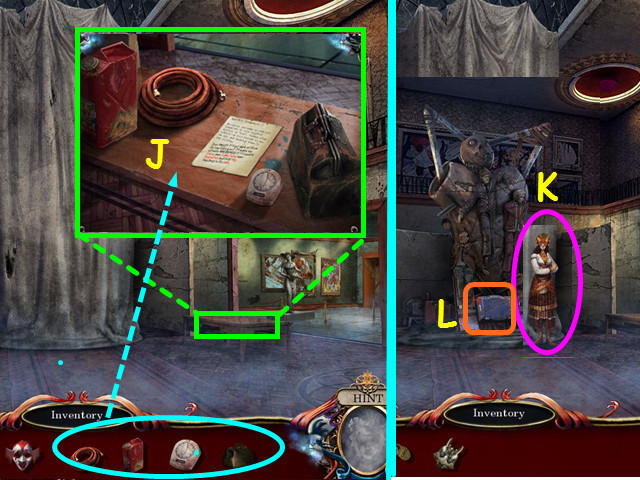
 Open the drawer and take the KNIFE (R).
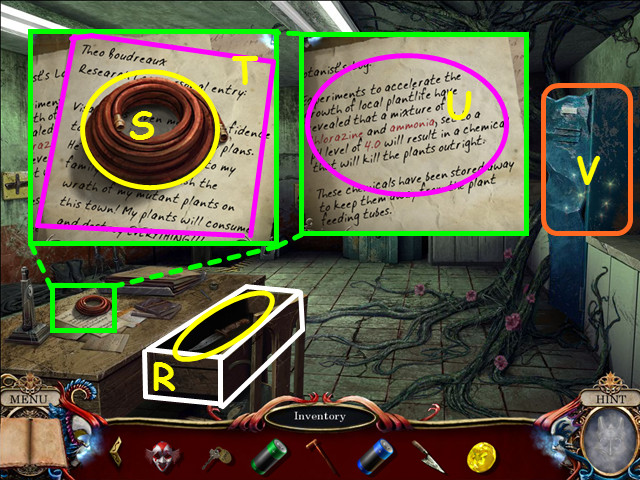
Look at the table and take the RUBBER HOSE (S).
Remove the top paper (T).
Read about the chemicals needed to kill the plants (U).
Select the locker for a HOS (V).
 Locate all the items on the list.
Open the flower to find the bee (W).
Place the dress on the figure to make the woman (X).
Pour the red vial into the blue liquid to make the purple potion (Y).
You will earn the CHLORAZINE.
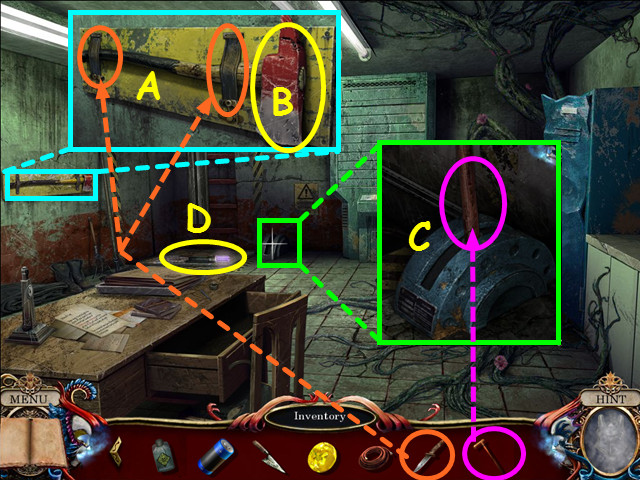 Look at the axe on the wall and use the KNIFE to cut the 2 straps (A).
Take the AXE (B).
Look at the lift control and use the CANE on the hole (C).
Click on the cane to lower the lift.
Take the BLACK LIGHT (D).
Climb up the ladder in the back.
 Look at the chart and learn that a pH of 4 should be orange (E).
Tear the corner of the chart and take the FLOPPY DISC (F).
Look at the pile of soil under the plant and use the TROWEL 4 times to find the POWER CORD (G).
Note the machine in the back (H).
Walk down 3 times.
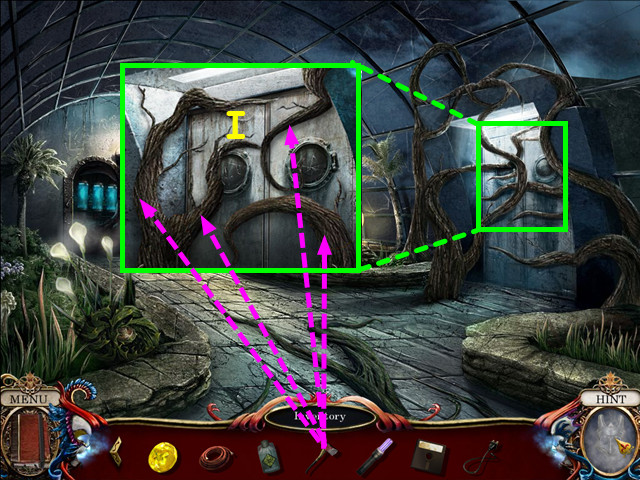 Look at the double doors and use the AXE 4 times on the branches (I).
Enter the room.
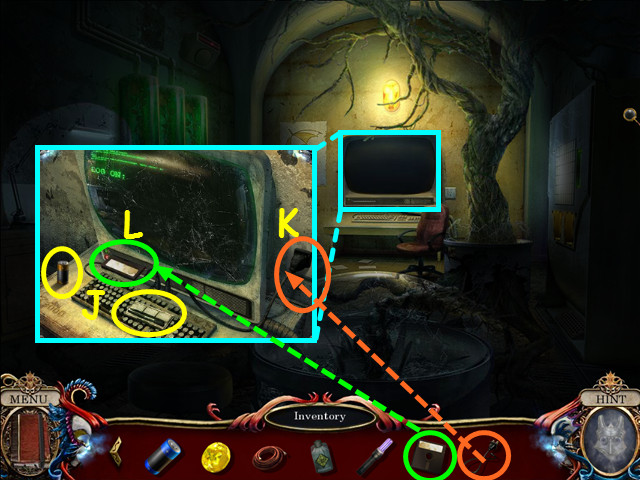 Look at the computer terminal in the back then take the ORANGE BATTERY and the POWDER KIT (J).
Plug in the POWER CORD (K).
Insert the FLOPPY DISC into the drive (L).
 Look at the counter and take the FUSE (M).
Exit the room, then go forward to the area with the tanks.
Look at the sparking tank base and place the FUSE into the slot (N).
Take the POWER CARTRIDGE (O).
Enter the door on the right.
 Look at the keypad and use the POWDER KIT on the keys (P).
Use the BLACK LIGHT on the keys (Q).
The code will be a combination using the numbers 1-4-9, ours was 4-1-9.
Press the keys 4-1-9.
Take the AMMONIA (R).
Walk down twice, then enter the double doors on the right.
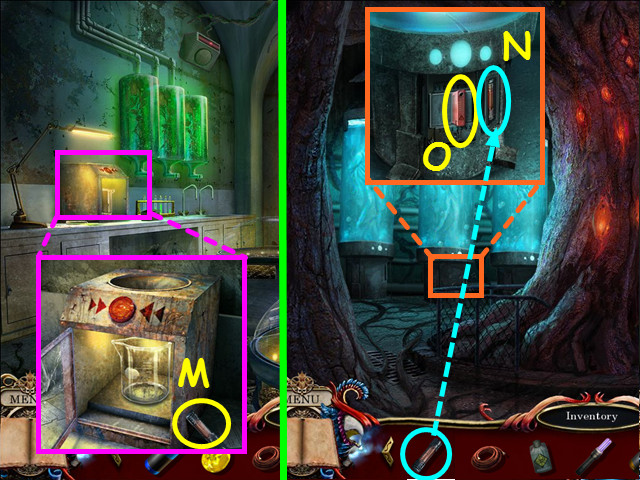
 Look at the mixer on the left then pour the AMMONIA and the CHLORAZINE into the top (S).
Click on the mixer to activate it, then take the CHEMICAL SOLUTION (T).
Look at the machine on the right and place the POWER CARTRIDGE into the slot (U).
Place the CHEMICAL SOLUTION in the opening for a mini-game (V).
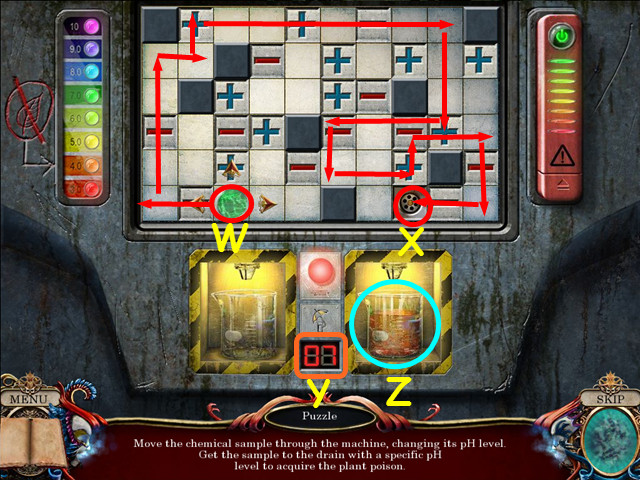 Move the chemical through the machine from the start (W) to the end with 4 pH (X).
The pH level is noted at the bottom (Y).
Our solution was: left-up-right-up-right-down-left-down-right-up-right-down-left.
Take the PLANT KILLER (Z).
Exit the room and return to the upper level with the giant plant.
Look at the machine on the right for a mini-game.
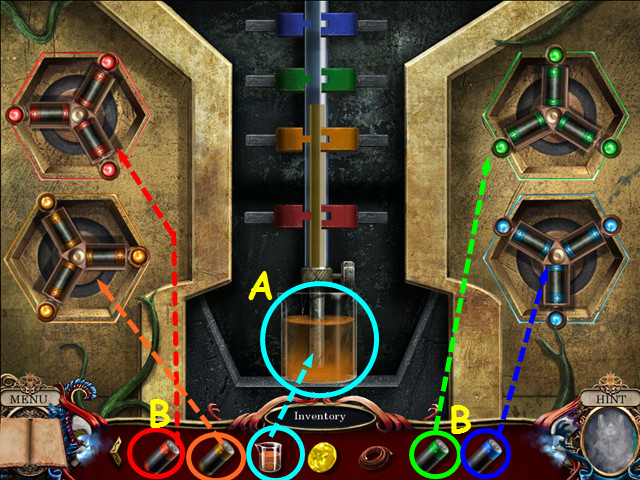 Place the PLANT KILLER under the tube (A).
Place the RED BATTERY, ORANGE BATTERY, GREEN BATTERY and the BLUE BATTERY into the matching color spots on the battery dials (B).
Turn the battery dials to line up on the colored dots.
Clicking one dial will cause another to turn.
Our solution was: red-orange-orange-green-green.
After talking to Theo, walk down 3 times.
 Look at the dead plant and take the SAFE DIAL (C).
Take the THEO MASK (D).
Walk down twice to exit the greenhouse, then walk forward, up the street.
Enter the art gallery on the left.
 After talking to Maxime Boudreaux, look at the table and click on the note (A).
Take the RED GEM (B).
Read the note to learn the 4 items Maxime wants you to collect (C).
Walk into the right gallery (D).
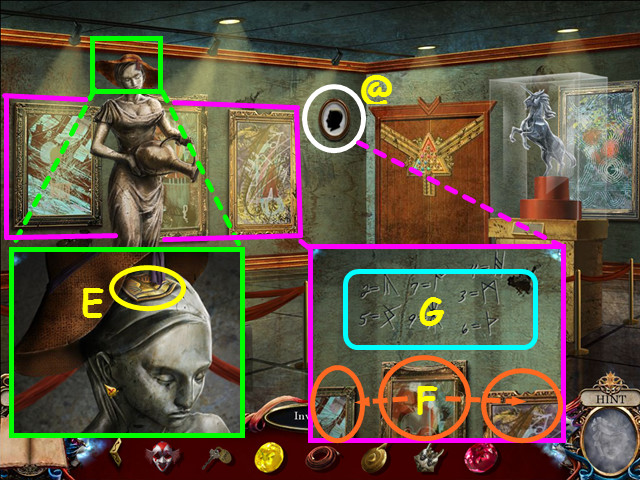 Find the 5/20 Illusion Object (@).
Look at the statue, move the hat and take the SECURITY BADGE (E).
Look at the 3 paintings on the left wall, then click on each to remove from the wall (F).
Click on the symbols on the wall to enter them into the journal (G).
Exit the room, then walk to the left.
 Look at the officer and take the ORANGE GEM (H).
Place the SECURITY BADGE into the top of the box (I).
Click on the box to open it and take the SECURITY KEY (J).
Select the sculpture for a HOS (K).
 Locate all the items on the list.
You may need to open drawers to find the sushi or gun (marked in white).
You will earn the 1/3 CONTROL KNOB.
Exit the room, walk to the right and select the double doors for a mini-game.
 Place the RED GEM, BLUE GEM, ORANGE GEM, and the YELLOW GEM onto the grid to start the mini-game (L).
Click on the silver buttons to rotate the gems into the correct positions.
The red, yellow and blue gems go in the triangle points.
The orange gem needs to be on the right side between the red and yellow (M).
The purple gem goes on the left between the red and blue (N).
The green gem belongs on the bottom between the blue and yellow (O).
Numbering the buttons from 1-10, our solution was: 1-2-9-8-5-3-5-10-9-8-8-4-4-7-9-8-10-9-8-6-6.
Enter the next room through the double doors.
 Click on the stage curtains to open them up (P).
Find the 6/20 Illusion Object (@).
Look at the table and take the 2/3 CONTROL KNOB (Q).
Open the book and turn the pages until you find the GLASS CUTTER (R).
Select the podium for a HOS (S).
 Locate all the items on the list.
Open the curtain to find the gavel (T).
Drag the slide to the machine to make the projector (#).
You will earn the GAVEL.
Exit the room.
 Look at the unicorn display and use the GLASS CUTTER on the case (U).
Remove the glass circle and take the CRYSTAL STATUE (V).
Walk down to exit the room, then walk to the left.
 Look at the panel and use the SECURITY KEY in the lock (W).
Place the CRYSTAL STATUE in the compartment (X).
Walk down, then right, through the double doors and forward through the door under the camera.
 Find the 7/20 Illusion Object (@).
Take the 3/3 CONTROL KNOB (Y).
Look at the control panel and place the 3 CONTROL KNOBS onto the stems for a mini-game (Z).
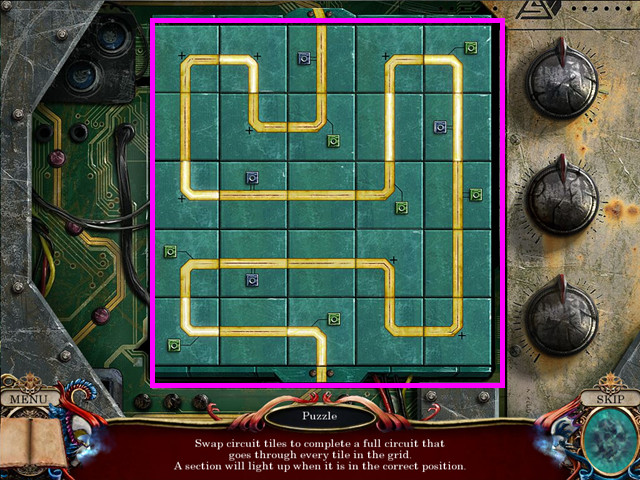 Make a continuous path from top to bottom.
Click on 2 circuit tiles to swap positions.
Brighter yellow paths are not movable.
Walk down 3 times, then walk to the left and go forward to the new area.
 Find the 8/20 Illusion Object (@).
Look at the globe and use the GAVEL twice to break it open (A).
Take the TURPENTINE (B).
Look at the wall and tear down the wallpaper to find the safe code (C).
Select the shelf area for a HOS (D).
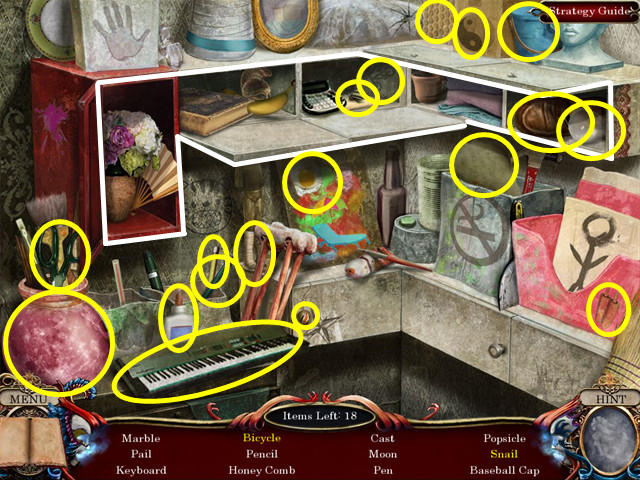 Locate all the items on the list.
Open all the cabinet doors (marked in white).
You will earn the PLASTER KNIFE.
Return to the basement storeroom.
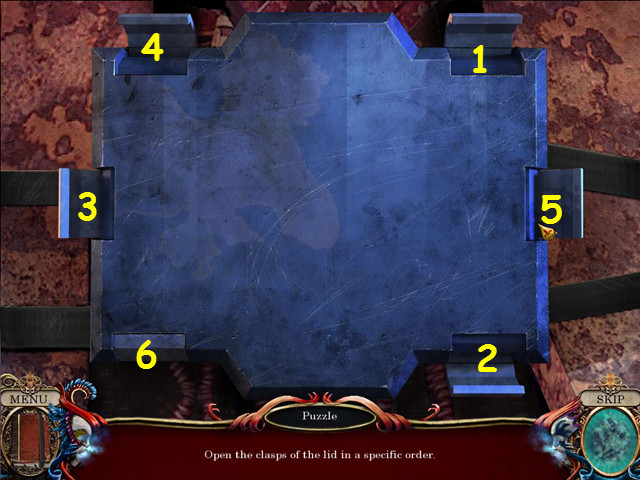
 Look at the crate and use the PLASTER KNIFE 3 times to remove the white substance (E).
Click on the crate lid, then take the TIMER (F).
Exit the room.
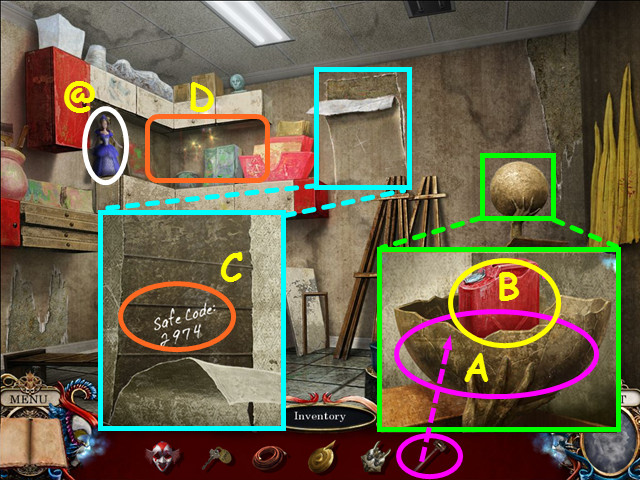
 Look at the safe and place the SAFE DIAL on the face (G).
Look in your journal for the safe code and the symbols from the wall (H).
Find the symbols that match the safe code and enter them on the safe.
Push the symbols in numerical order (1-4).
Take the LEATHER BAG (I).
Walk down twice.
 Look at the table and place the RUBBER HOSE, TIMER, TURPENTINE, and the LEATHER BAG on the table (J).
Exit the close-up.
Talk to Maxime (K).
Look at the base of her 'masterpiece' for a mini-game (L).
 Open the switches in the correct order.
Find the switch that stays open, then find the second switch that stays open.
Should all the switches close, start over.
Open the switches in numerical order (1-6).
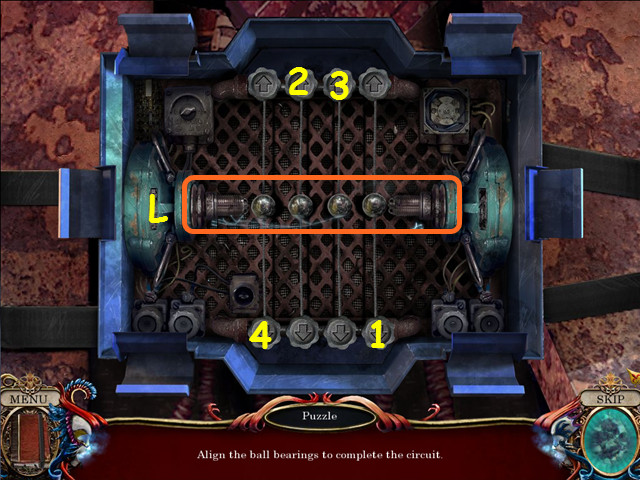 Move the bearings level with the center charge (L).
Use the arrow buttons to move the bearings up or down.
Pushing a button will affect 1 or more bearings.
Push the buttons in numerical order (1-4).
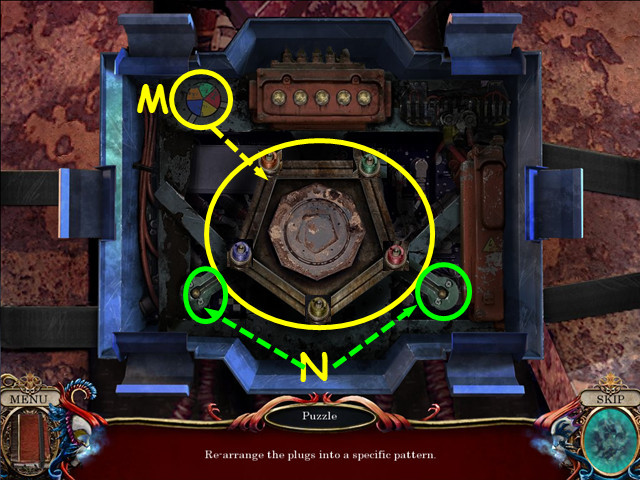 Move the colored plugs so they match the positions on the color wheel (M).
There are 2 'alleys' where you can place a piece, so another can go by (N).
Click on a peg, then the empty adjacent path to move pieces.
 Take the HACKSAW (O).
Walk down to exit the gallery.
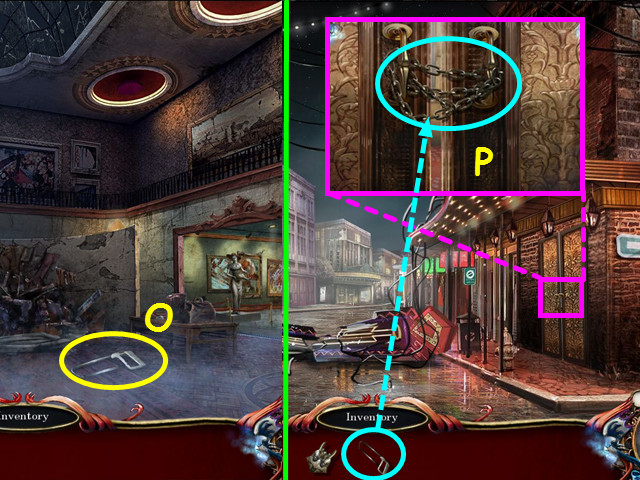
Look at the hotel doors and use the HACKSAW on the chains (P).
Enter the hotel.
 Talk to Marie Boudreaux.
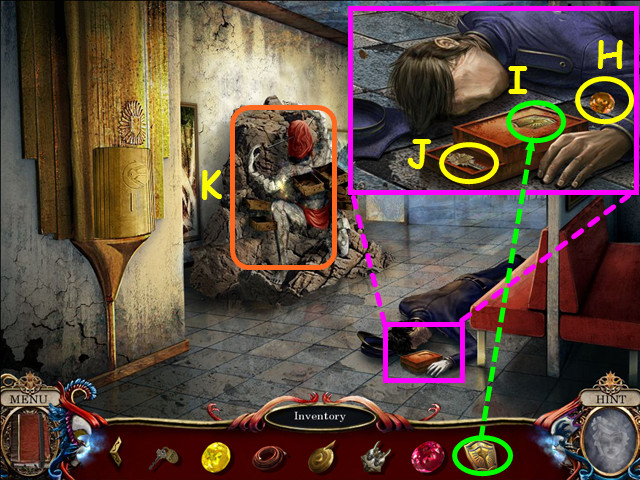
Look at the announcement board and take the left HEART HALF (A).
Look at the reception desk and take the LADDER (B).
Enter the open elevator (C).
 Look at the wall and take the right HEART HALF (D).
Look at the roof exit and place the LADDER on the left (E).
Walk down to exit the elevator on the main floor.
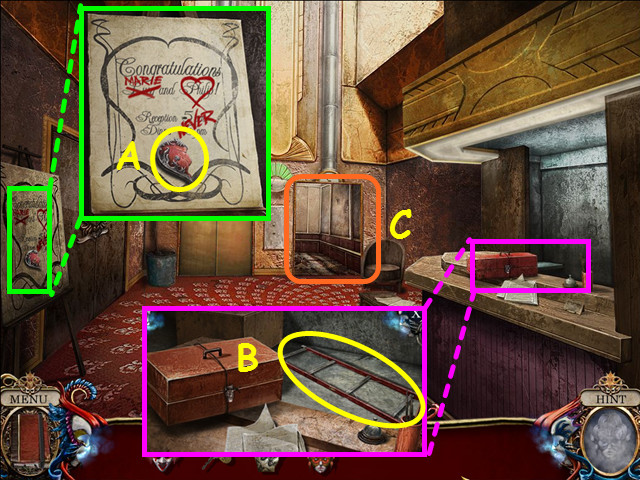
 Look at the double doors and place the 2 HEART HALVES into the heart on the door (F).
Walk left to enter the banquet hall (G).
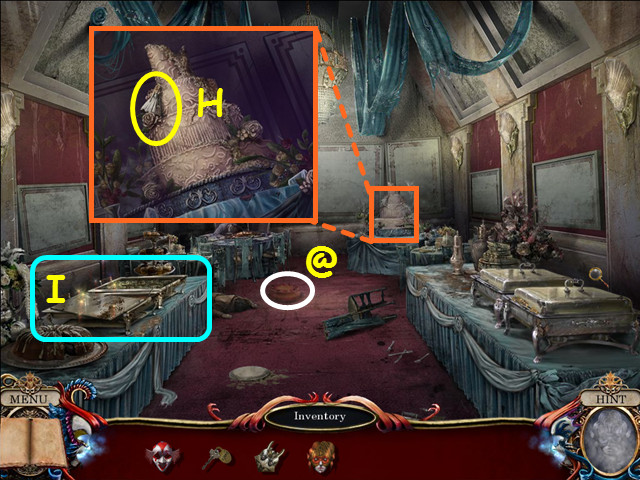 Find the 9/20 Illusion Object (@).
Look at the wedding cake and take the BRIDE FIGURE (H).
Select the left buffet table for a HOS (I).
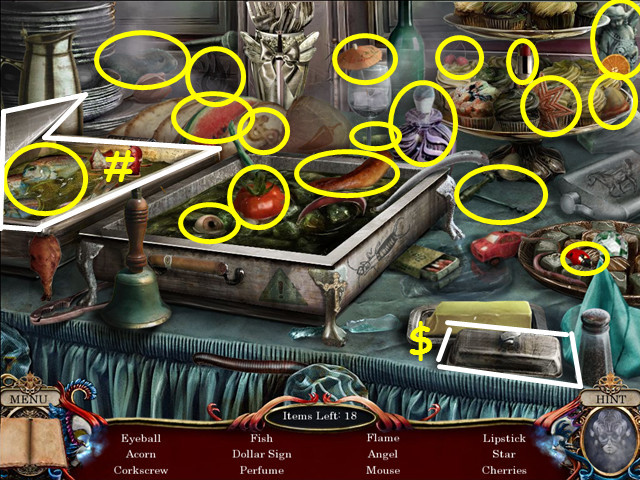 Locate all the items on the list.
Remove the tray from the buffet tray to find the fish (#).
Remove the butter dish top to find the butter ($).
You will earn the LOBSTER CRACKER.
 Look at the rear table and use the LOBSTER CRACKER on the lobster claw (J).
Take the PLIERS (K).
Exit the room.
Look at the reception desk and use the PLIERS on the tool box (L).
Take the SCRUBBING SPONGE (M).
Return to the banquet hall.
 Look at the buffet trays and use the SCRUBBING SPONGE on the right tray (N).
Remove the lid of the second tray (O).
Take the CHAIN (P).
Walk to the elevator and climb the ladder.
 Take the GROOM FIGURE (Q).
Place the CHAIN on the gears (R).
Climb down the ladder and look at the elevator control (S).
 Press the buttons so all are lit.
The button you push will light itself, plus those surrounding numbers.
Press the 5-15-12-3 buttons to solve.
Exit the elevator on the 13th floor.
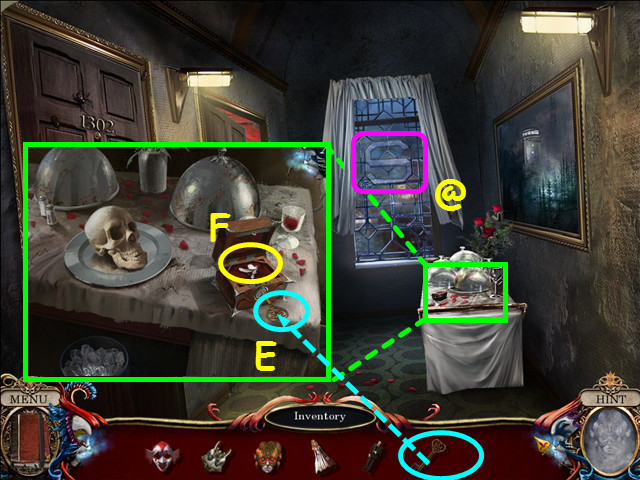
 Look at the door on the left and note the time 3:25 carved there (T).
Look at the meal trolley, open the bottom curtains and take the PICK (U).
Look at the right door and use the ROOM 1303 KEY on the lock (V).
Enter room 1303.
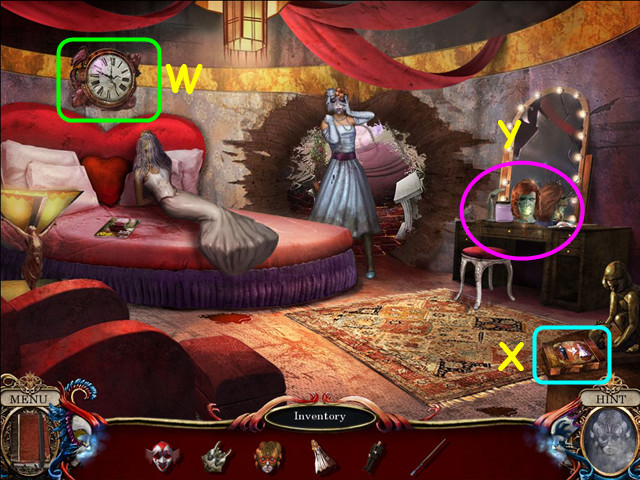 Note the clock over the bed (W).
Note the box on the table (X).
Select the vanity for a HOS (Y).
 Locate all the items on the list.
Remove the wig from the mannequin head to find the gnome (Z).
You will earn the LADLE.
Walk down 3 times to return to the lobby, then enter the banquet room.
 Look at the buffet trays and use the LADLE in the filled tray to find the CLOCK HANDS (A).
Exit the room and return to room 1303.
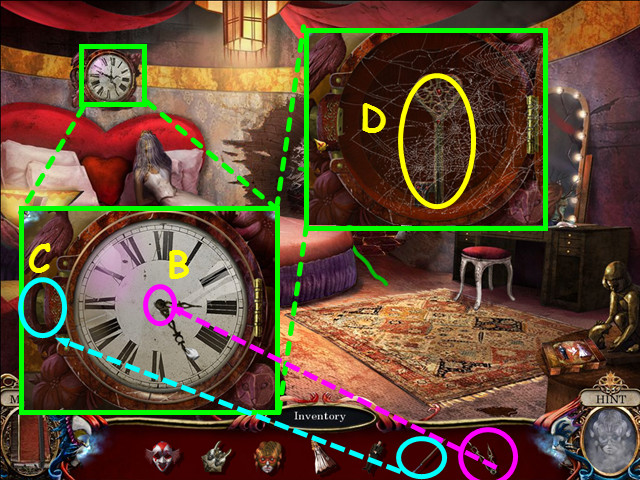 Look at the clock and place the CLOCK HANDS on the face (B).
Per the time carved into the door of 1302, move the hands to 3:25.
Use the PICK on the side to open the face (C).
Take the HEART KEY (D).
Exit to the hall.
 Find the 10/20 Illusion Object (@).
Look at the food trolley and use the HEART KEY on the box (E).
Open the box and take the DOVE (F).
Enter room 1303.
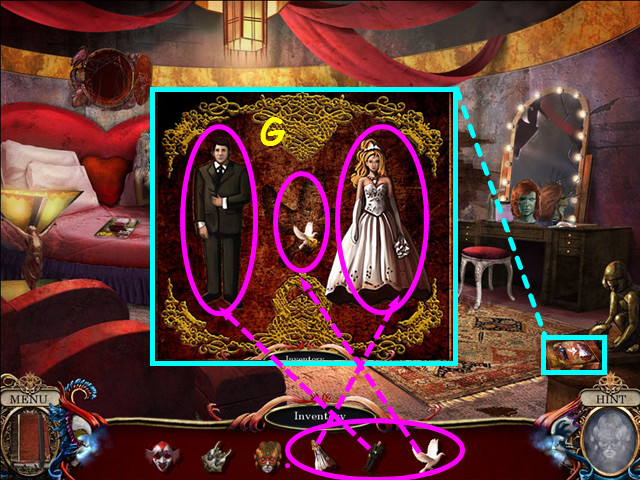 Look at the box on the table and place the GROOM FIGURE, BRIDE FIGURE and the DOVE into the indentations (G).
This will trigger a mini-game.
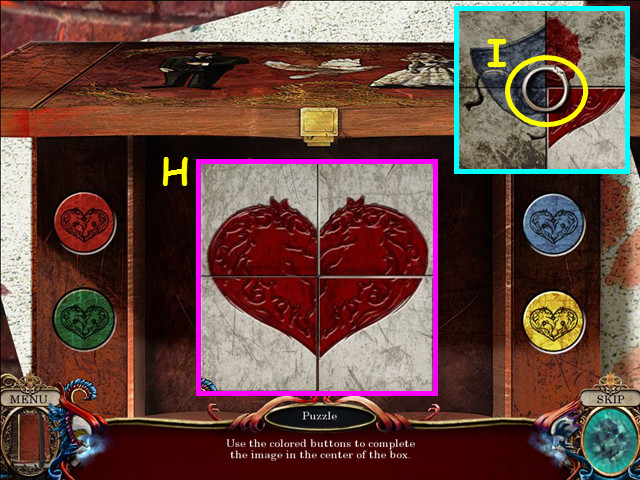 Press the colored buttons to form a heart in the center (H).
Press red-green-yellow-yellow-yellow.
Take the ENGAGEMENT RING (I).
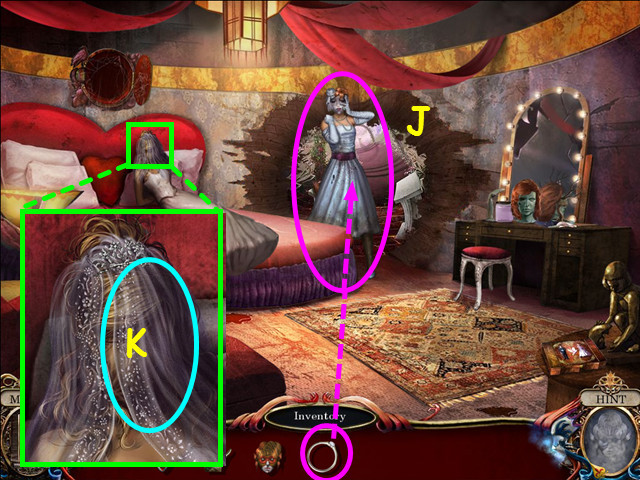 Give the ENGAGEMENT RING to Marie (J).
Look at the the girl on the bed and remove the veil (K).
Click on her face and you will call the chief.
Walk down 3 times to return to the lobby.
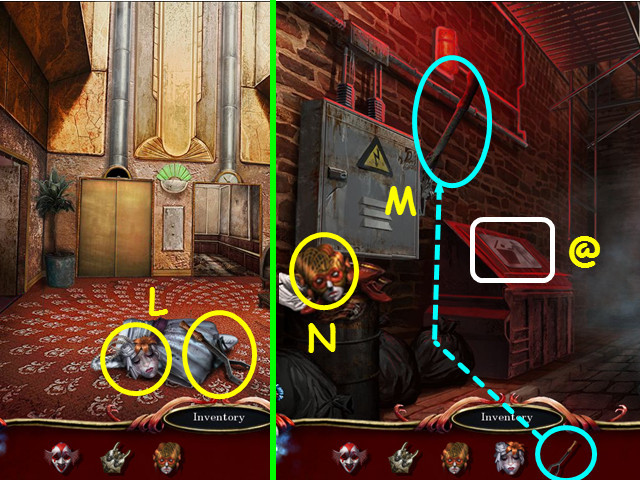 Take the MARIE MASK and the POWER BOX HANDLE (L).
Walk down to exit the hotel, then walk right into the alley.
Find the 11/20 Illusion Object (@).
Use the POWER BOX HANDLE on the power box, then pull the handle down (M).
Take the MAXIME MASK (N).
Walk down to exit the alley.
 Walk forward up the street (O).
Find the 12/20 Illusion Object (@).
Enter the theater (P).
 Try to talk to Visage (A).
Find the 13/20 Illusion Object (@).
Look at the trash can, remove the lid, move the garbage and take the HANDLE (B).
Select the ticket booth for a HOS (C).
 Locate all the items on the list.
Place the crowns on the card to make the playing card (D).
Open the box to find the tea-light candle (#).
You will earn the TICKET.
 Look at the turnstile and use the TICKET in the slot (E).
Walk forward.
 Look at the chair, lift the seat and take the LIGHT BULB (F).
Look at the compartment left of the steps and use the HANDLE on the door (G).
Take the PRYBAR (H).
Return to the lobby.
 Look at the floorboards and use the PRYBAR to remove the board (I).
Take the 1/3 BELL and the WINCH COGS (J).
Walk forward.
 Look at the control podium and use the WINCH COGS on the machinery (K).
This will trigger a mini-game.
 Turn the upper cogs (L) so that all the lower dials point up and light up (M).
The first step of our solution was to turn the left cog clockwise (N) until the center dial pointed up (O).
Secondly, we turned the right cog clockwise (P) until the right dial pointed up (Q).
Next, we turned the middle cog clockwise (R) until the left dial pointed up (S); then turn the left cog clockwise (N) until the center dial(O) and right dial (Q) pointed up.
Note – the dials are a little touchy, so you may have to 'tweak' the cogs a bit to turn on each light.
Walk forward onto the stage.
 Find the 14/20 Illusion Object (@).
Take the SCALPEL (T).
Look at the news and take the 2/3 BELL (U).
Walk down.
 Look in the cupboard next to the stairs and use the SCALPEL 4 times on the sack (V).
Take the MALLET (W).
Return to the scene on the stage.
 Look at the turkey and use the MALLET to crack it open (X).
Take the EYE EMBLEM (Y).
Walk down twice to the lobby.
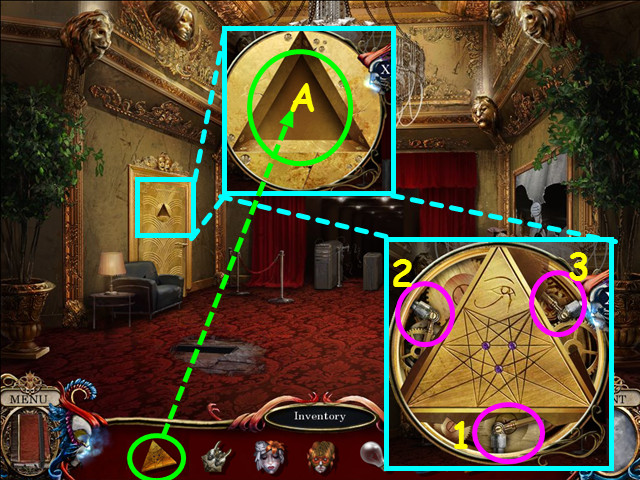 Look at the golden door and place the EYE EMBLEM in the triangle (A).
Press the pistons in numerical order (1-3).
Enter the gold door.
 Talk to Visage.
Look at the darkened vanity and use the LIGHT BULB to shed some light (B).
Take the 3/3 BELL (C).
Look at the photos closely to learn the sequence for the bells (D).
Note the bells over the door (E).
Select the wardrobe stand for a HOS (F).
 Locate all the items on the list.
Open the hatbox to find the flowers (#).
You will earn the BRUSH.
Look at the door and bells in the back.
 Place the 3 BELLS onto the frame for the mini-game (G).
Refer to your journal for the sequence of notes (H).
Play the notes in this sequence: I-I-J-K-L-K-I.
Walk forward through the door.
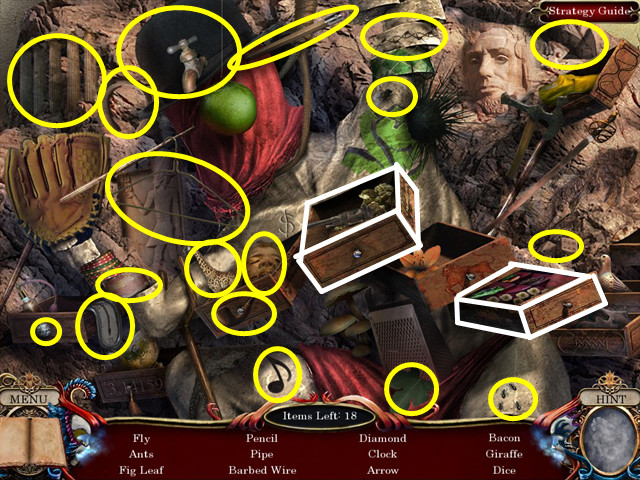
 Select the sewer canal for a HOS.
Locate all the items on the list.
Open the diving mask to find the face (M).
You will earn the WOOD PLANK.
 Place the WOOD PLANK over the sewer canal (N).
Take the VALVE and use it on the shut off valve (O).
Find the 15/20 Illusion Object (@).
Walk forward.
 Find the 16/20 Illusion Object (@).
Take the LARGE STONE (P).
Note the broken rungs (Q).
Walk down.
 Look at the wall and use the BRUSH to clean the dust (R).
Use the LARGE STONE on the bricks (S).
Take the METAL BARS (T).
Walk forward.
 Use the METAL BARS to repair the ladder (U).
Climb up through the manhole cover (V).
 Walk forward up the street (W).
Find the 17/20 Illusion Object (@).
Enter the paddleboat (X).
 Walk forward up the stairs.
Look at the center door and place the FRANSCOIS MASK, the THEO MASK, MARIE MASK, and the MAXIME MASK into the matching slots (A).
Once the masks are in place, the corners will move out.
Take the Bug Spray (B).
Enter the door on the right.
 Chase the specter through the mirrors – click on the mirrors in numerical order (1-4).
Take the SHARD of GLASS (C).
Use the SHARD of GLASS to cut open the drapes covering the bed (D).
Select the bed for a HOS (E).
 Locate all the items on the list.
Move the 'c' squared to complete the equation (F).
Lift the box to find the gun (#).
You will earn the GREED GEM.
 Exit the room and enter the door on the left.
Find the 18/20 Illusion Object (@).
Look at the box and use the GREED GEM on the indentation (G).
Open the box and take the PORTRAIT PIECE 4 (H).
Select the trophies for a HOS (I).
 Locate all the items on the list.
Use the pen on the baseball card to make the signed rookie card (J).
Open the trophy door to find the mouse (#).
You will earn the RAZOR BLADE.
Exit the room and walk downstairs.
 Look at the door on the left and use the BUG SPRAY on the web (K).
Click on the doorknob to open, then enter the room (L).
 Find the 19/20 Illusion Object (@).
Select the bags for HOS (M).
 Locate all the items on the list.
You will earn the LACROSSE STICK.
Open the jar to find the insect (#).
Exit the room, go up the stairs and enter the room on the left. Look at the deer head and use the LACROSSE STICK to get the LETTER OPENER (N).
Look at the bear head, use the LETTER OPENER to open his mouth and take the MOLECULE SAMPLE (O).
Exit the room, walk down the stairs and enter the room on the left. Look at the table and use the MOLECULE SAMPLE on the microscope (P).
Look in the microscope to see a color code (Q).
Make sure to click on the close-up of the code.
Exit the room and look at the door on the right. Click on the colored lights until the pattern matches the one in the microscope (R).
Click on each light until you reach the desired color.
Enter the room. Find the 20/20 Illusion Object (@).
Look at the painting and use the RAZOR BLADE to cut a hole (S).
Take the CURIOSITY GEM and the MANNEQUIN HEAD (T).
Place the MANNEQUIN HEAD on the torso (U).
Open the mouth and take the SADNESS GEM (V).
Select the area under the painting for a HOS (W). Locate all the items on the list.
You will earn the BOLT CUTTERS.
Exit to the hall, then enter the room on the left. Look at the box and use the CURIOSITY GEM on the indentation (A).
Open the box and take the PORTRAIT PIECE 2 (B).
Look at the birdcage, use the BOLT CUTTERS to open it up then take the FURY GEM (C).
Exit to the hall then enter the room on the right. Look at the box and use the FURY GEM on the indentation (D).
Open the box and take the PORTRAIT PIECE 1 (E).
Exit the room, walk up the stairs and enter the room on the right. Look at the box and use the SADNESS GEM on the indentation (F).
Open the box and take the PORTRAIT PIECE 3 (G).
Exit the room and look at the center door.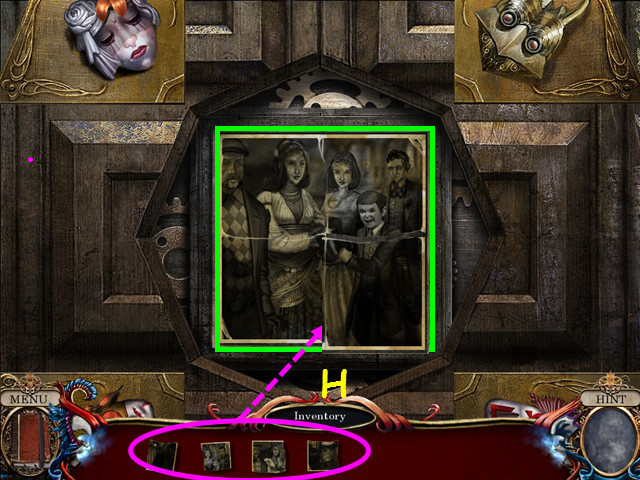 Place the 4 PORTRAIT PIECES into the frame (H).
The pieces will automatically snap into position.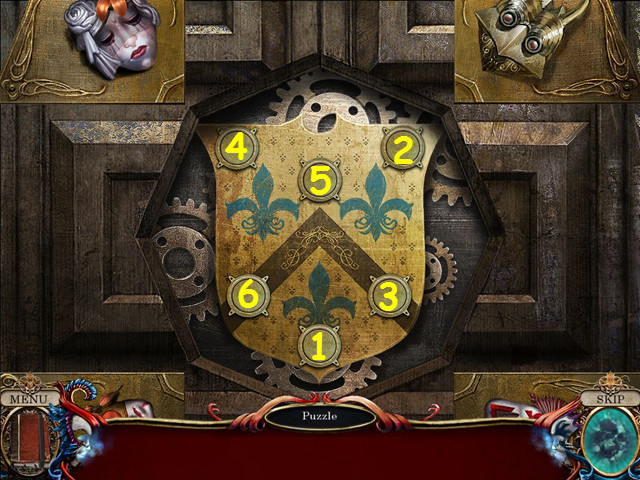 Find the sequence that has all the buttons stay pushed in.
Find the button that stays down, then use trial and error to find the second button that once you push it, the first button stays down.
Continue this process until all the buttons stay down.
Press the buttons in numerical order (1-6).
Walk forward.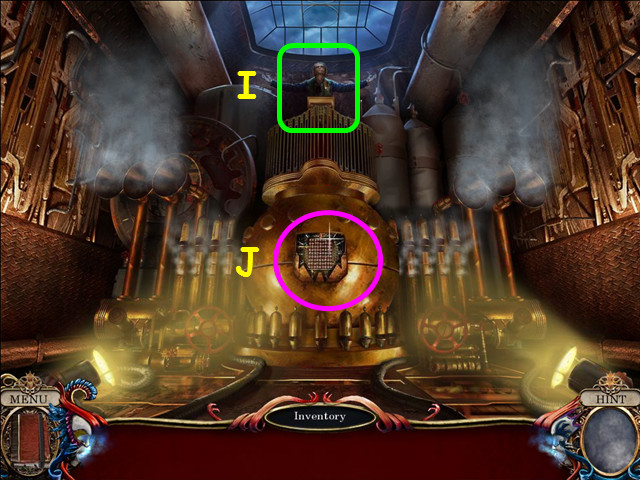 Talk to Visage (I).
Select the machine in the center for a mini-game (J). Move the pipe pieces to connect the 4 pipe outlets.
Use the grid coordinates to make the following moves: E1, E1, E1, E2, E2, E2, E4, A1, A2, A1, A3, A3, A3, A4, A3, A3,E6, D6, D6, C7, C7, C6, C6, B8, B7, E8, E8, E8, D8, D8, C8, C8, C8, B5, B6, C7, G7, G8, G8, G8, F8, F8, F8, E8, E8, E8, D8, D8, D8, C8, C8, C8, E7, E7, E7, D8, D8, D8,G1, H1, H1, H1, H2, H2, H4, H4, H7, G7, F1, F1, F1, G1, G1, H1, H1, H1, H2, H2, H3, H3, H2, H2, H4, H4, H4, G7, G7, G6, G6, G6, G8, G8, G7, G7, G8.
Exit the paddleboat.
Congratulations! You have completed Shattered Minds: Masquerade Standard Edition!
No comments:
Post a Comment